
AWS prerequisites for CoreStack Assessments
Learn about the onboarding prerequesites for onboarding AWS cloud accounts for CoreStack Assessments.
Introduction
There are certain settings and prerequisites that need to be configured in your AWS account before it can be fully onboarded into CoreStack. Primarily, this involves creating an Identity Access Management (IAM) Role for CoreStack and providing it with the necessary permissions.
There are two ways users can authorize CoreStack to access their AWS cloud accounts:
- Assume an Amazon Resource Name (ARN) role (Recommended)
- Provide access manually through a secret key
In this user guide, we'll walk you through the steps for each of these approaches and what steps you need to take to properly prep things for CoreStack Assessments.
Note:
CoreStack recommends using the first approach -- assuming an ARN role -- because all the required permissions can be created automatically by using CloudFormation templates in AWS.
The second method involves manually enabling all the necessary permissions, which will work just as well but usually takes more time and effort.
Prerequisites for assuming an ARN role
The first method of providing CoreStack with access to your AWS cloud account involves using a CloudFormation template in your AWS portal. It will take care of creating an IAM Role for CoreStack and assign the required permissions automatically. We recommend using this method since it takes care of everything in an automated way using templates.
When onboarding a new cloud account in CoreStack, the associated AWS IAM role must be created with one of the following access permissions:
- For Assessments: Read-Only Access
- For Assessments & AWS Sync: Read-Only + AWS Sync Access
CoreStack simplifies this process by providing CloudFormation Templates that will take care of creating an IAM Role and assigning the necessary permissions automatically within your AWS cloud environment.
Note: For lists of the required permissions that will be created by each template, please refer to this section at the end of this user guide.
Based on the type of access you wish to provide for CoreStack, you can use one of the AWS S3 storage bucket URLs provided below to get the appropriate pre-configured CloudFormation template, then run it from your AWS portal.
- S3 URL with Template for CoreStack Assessment (Read-Only Access)
- S3 URL with Template for CoreStack Assessment (Read-Only + Sync with AWS WAF)
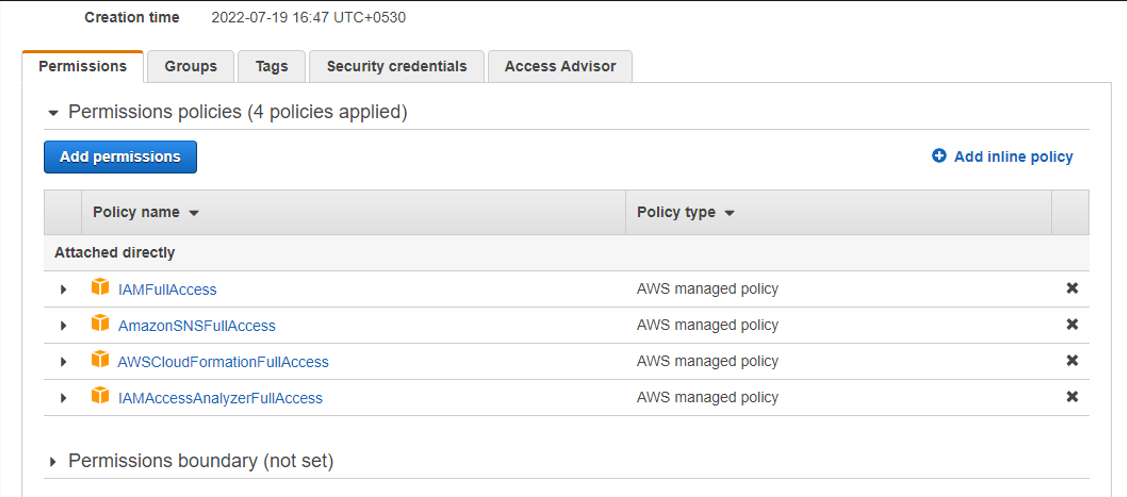
Before you can run any of the templates in AWS, you must have the following permissions shown below:
- IAMFullAccess
- AmazonSNSFullAccess
- AWSCloudFormationFullAccess
- IAMAcessAnalyzerFullAccess

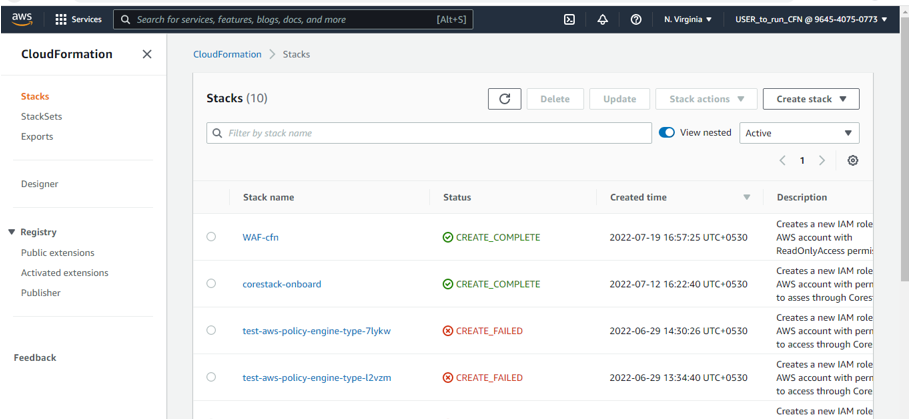
How to run the CloudFormation template in AWS
To run the CloudFormation template in AWS after downloading one from the links above, first log in to your AWS portal and navigate to:
CloudFormation > Stacks > Create stack
Click on “Create stack.” Then follow the steps below.
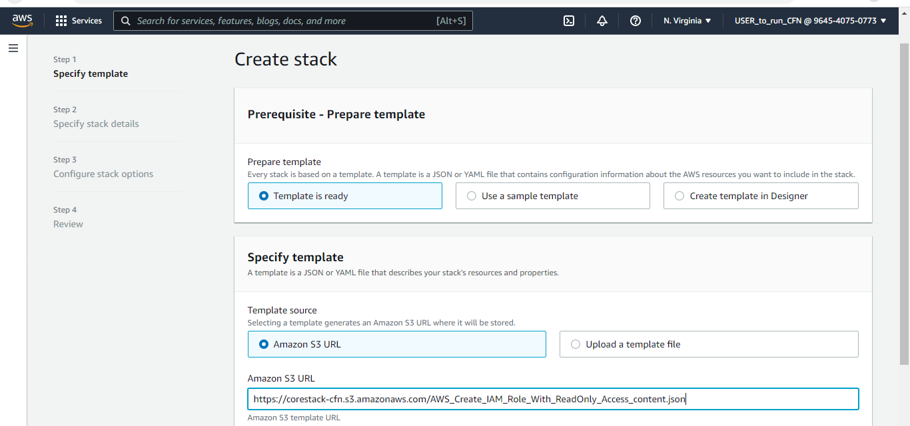
- Specify the template: Paste the S3 URL from above pointing to your chosen CloudFormation template to create a user that can access your AWS Account from CoreStack.
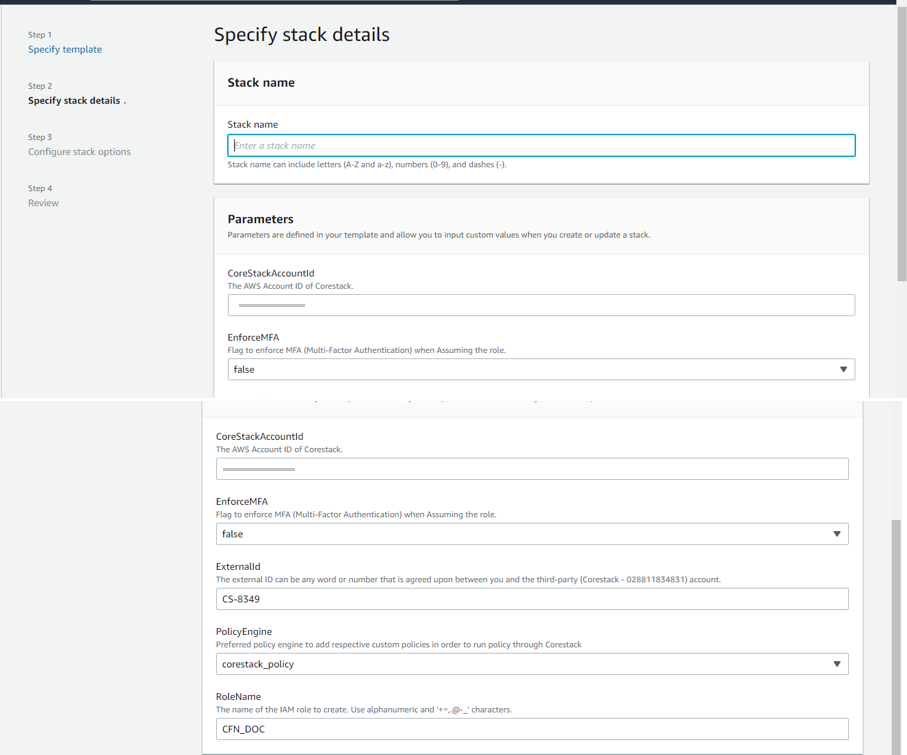
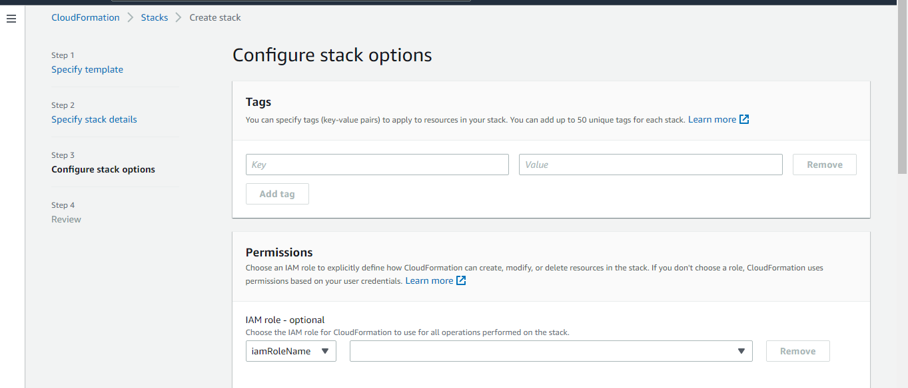
- Specify stack details: Enter the following details for the stack…
- Stack name (Provide any name based on your requirements)
- External ID (Can be any word or number you and the third-party account agree on)
- Role name (Provide any name based on your requirements)
Note:
The External ID is a unique ID created for each CoreStack customer. Hence to get the ID for your account, please reach out to [email protected].
The support channel is available 24/7 and you can typically expect a response within 2 hours.
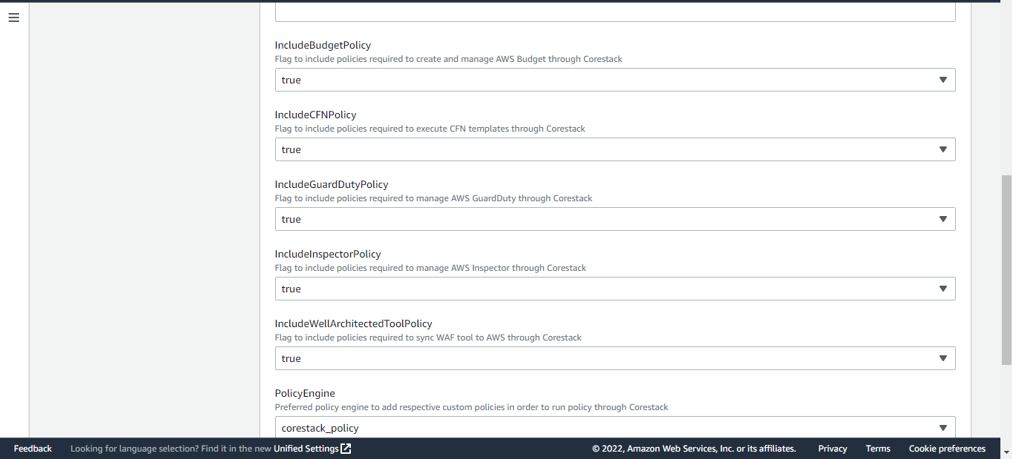
Important note for the Assessments + Automation (Read-Write Access) option:
In the Create Stack section, make sure to set ‘IncludeBudgetPolicy,’ ‘IncludeGuardrailPolicy,’ and ‘IncludeInspectoryPolicy’ to True.
If these are set to False, some other features might not work.
- Configure stack options: Leave these fields blank and proceed.
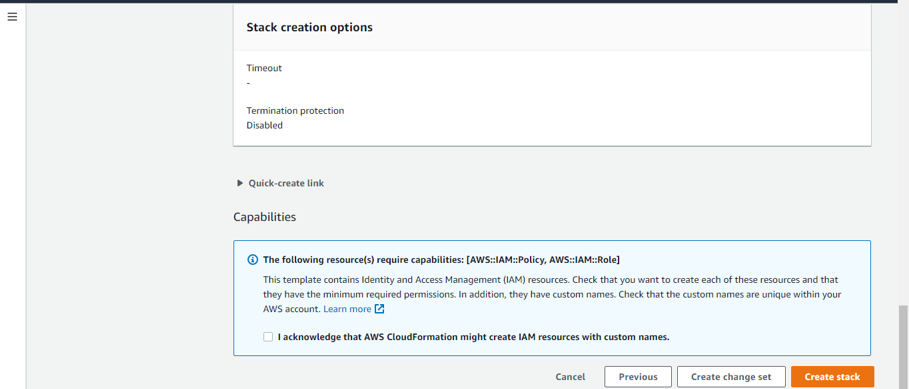
- Review the details, then check the acknowledgement box shown in the image below before finally clicking on Create stack when you’re ready.
- “I acknowledge that AWS CloudFormation might create IAM resources with custom names.”
Warning about possible errors:
If you encounter an error saying the role or the policy already exists, you will need to first delete the old role and policy before you can run one of the templates provided by CoreStack.
Then, you'll need to re-run the CloudFormation template from the start.
You can refer to the sections below for steps on how to do this.
After the stack has been created, it will be visible when you go to the CloudFormation > Stack list area in your AWS cloud portal.
- Click on the newly created stack, then go to the output and copy the below details. You will need these details later when onboarding the AWS cloud account into CoreStack.
- Role ARN: The Amazon Resource Name (ARN) for the new IAM Role.
- External ID: The external ID can be any word or number that is agreed upon between you and the third-party account.
- Require MFA: Enable this option to indicate whether the role is restricted with multi-factor authentication (MFA)
Ready for onboarding:
After copying the required details listed above from the CloudFormation template's output, you should have all the details needed to begin onboarding your AWS cloud account into CoreStack.
To begin the onboarding process, please refer to our AWS onboarding for CoreStack Assessments user guide.
How to delete a role if an error says it already exists
If you encounter an error that says, for example, the CorestackConfigRole role already exists in your AWS account, then you will have to delete it before you can run any of the CloudFormation templates provided in this user guide.
If you don't encounter this error message, then you can skip this section.
To do this, please follow the below steps:
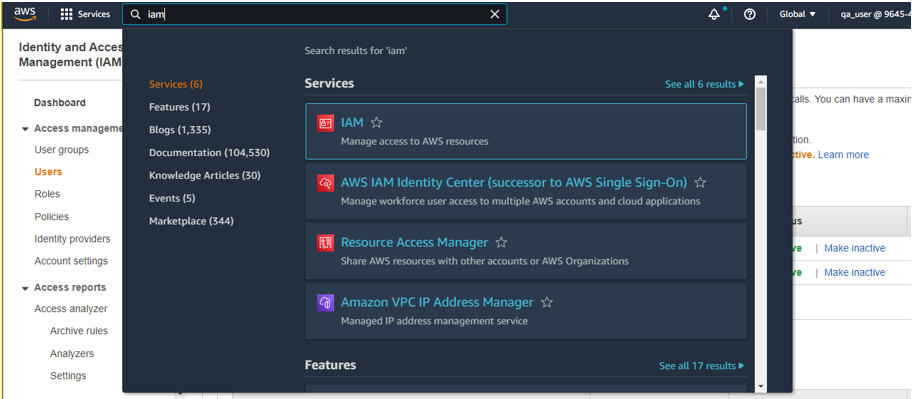
- Go to IAM > Role in the AWS web portal.
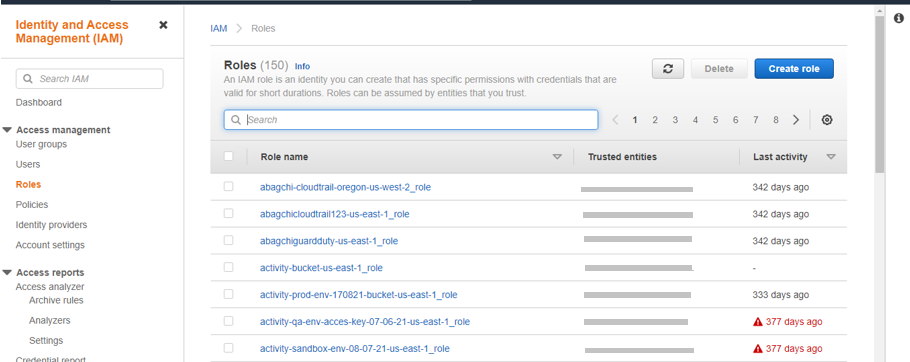
- Search for the exact role name. For example, “CorestackConfigRole”.
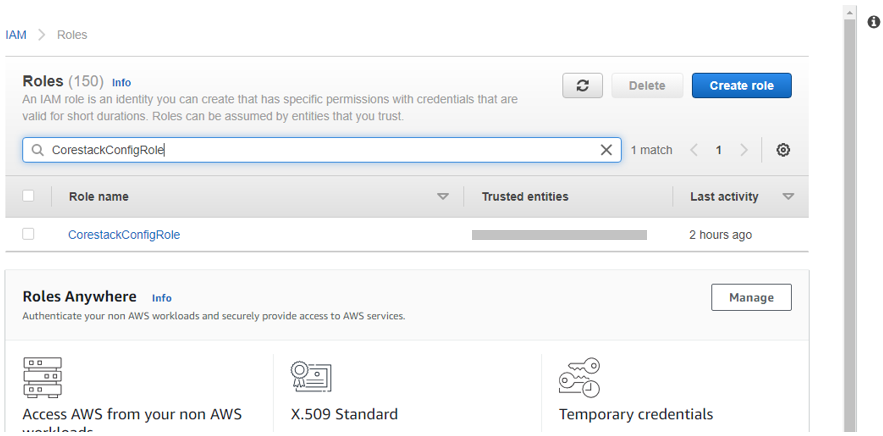
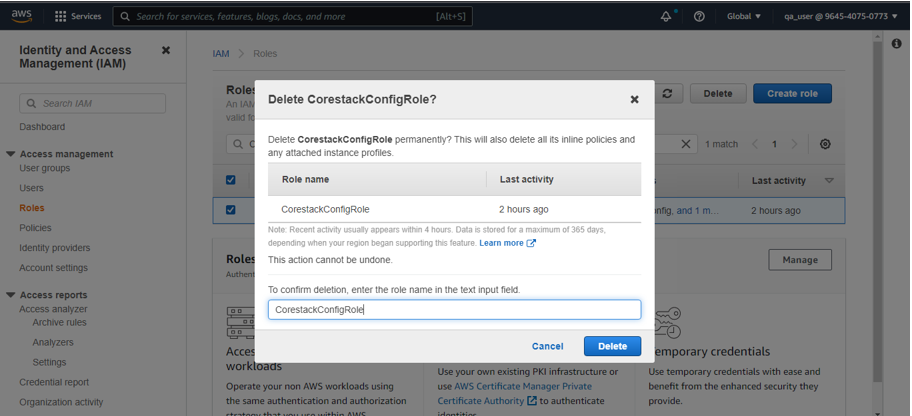
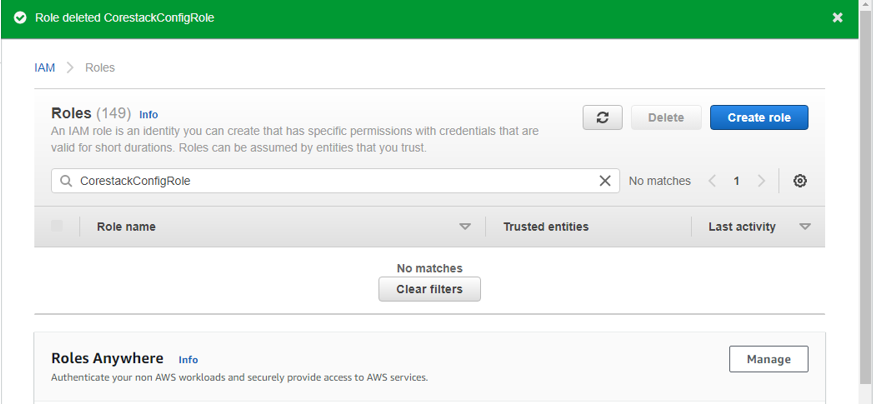
- Select the role once it appears, then click on Delete. It will ask for confirmation.
How to delete a policy if an error says it already exists
If you encounter an error that says, for example, the Corestack_SelfservicePolicy policy already exists in your AWS account, then you will have to delete it before you can run any of the CloudFormation templates provided in this user guide.
If you don't encounter this error message, then you can skip this section.
To do this, please follow the below steps:
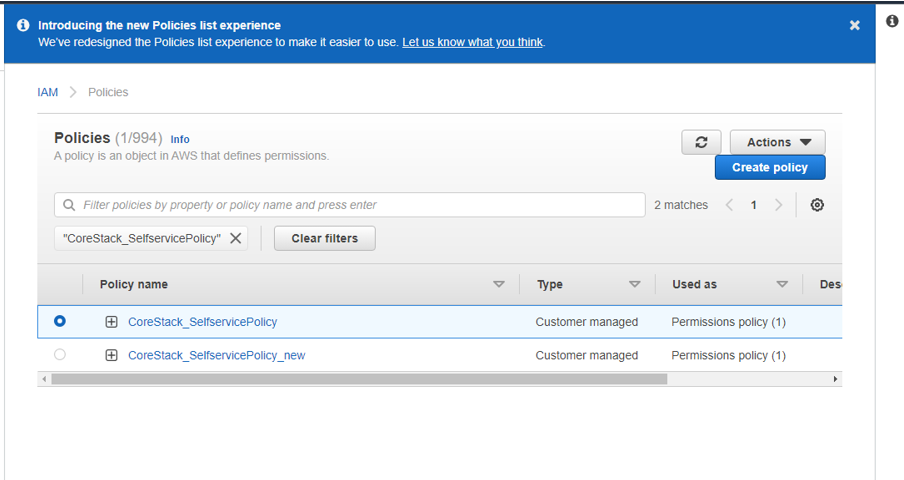
- Go to IAM > Policies in the AWS web portal.
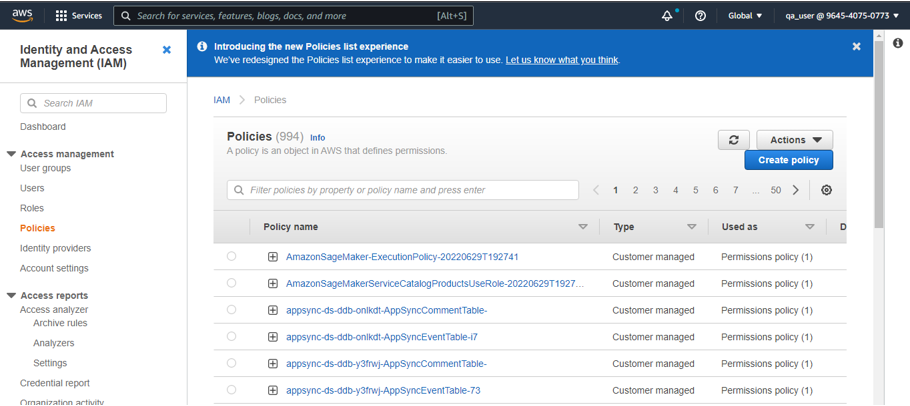
- Search for the policy name. For example, “CoreStack_SelfservicePolicy”.
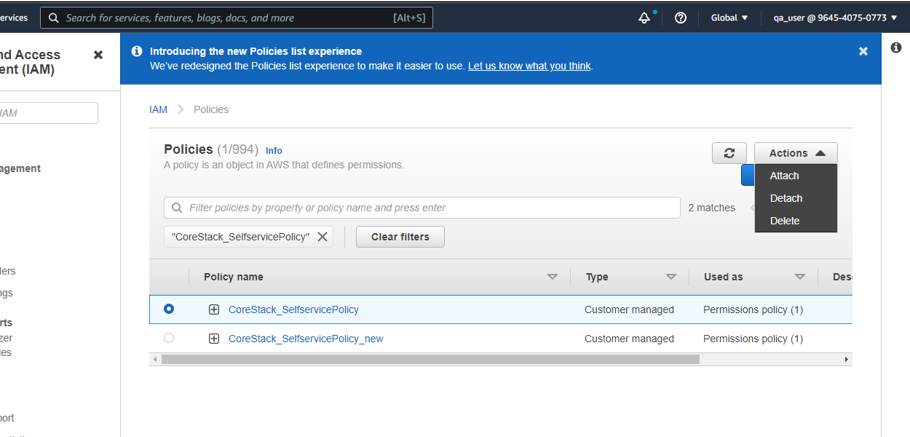
- Select the policy once it appears, then click on Action. You’ll see an option for Delete – click it.
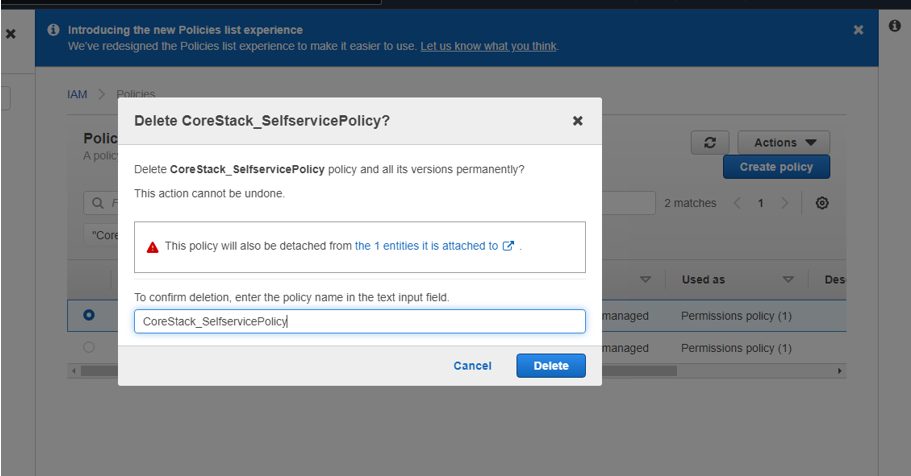
- It will ask for confirmation – proceed by clicking on Delete.
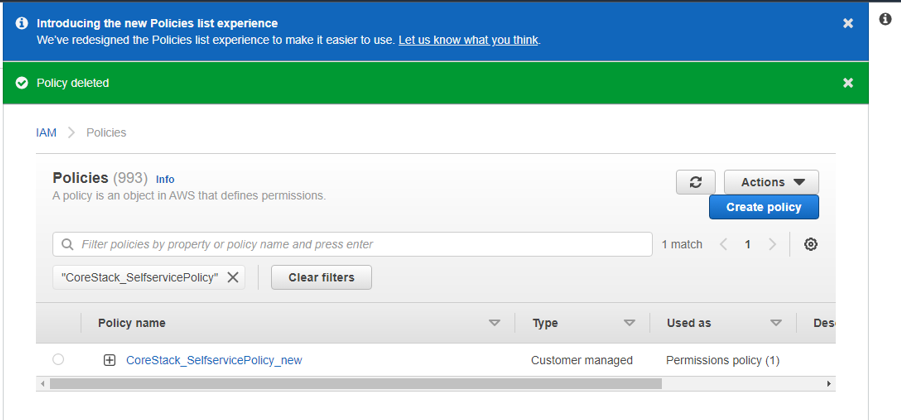
- If done correctly, you should see a message confirming the policy was deleted successfully.
Prerequisites for using an existing user and secret key
The second method of providing CoreStack with access to your AWS cloud account involves using an existing user with a secret key. For this option, you will need to add the required permissions manually in your AWS account.
Note:
As a reminder, CoreStack recommends using the assume an ARN role approach described in the previous section, but taking the manual approach described here will also work.
To see which permission names will be required depending on your desired access level, please refer to the table of permissions shown at the end of this user guide in the Permissions created after the template runs section.
How to add permissions manually in AWS
For cases where permissions need to be added manually, you can perform the following steps for each individual permission.
We'll provide an example below of what steps you should follow -- but please note that you'll need to perform the same set of steps for each permission you need to add.
For example, let's say we have to add a permission for the policy “WellArchitectedConsoleFullAccess”.
Start by navigating to IAM > Users > Add Permission in the AWS portal:
- Click Attach existing policy directly
- Search for “WellArch”
- Select the permission title -- in this case, “WellArchitectedConsoleFullAccess”
- Click Next: Review
- The permission should now be added to that account.


Again, you'll want to repeat this process for each required permission.
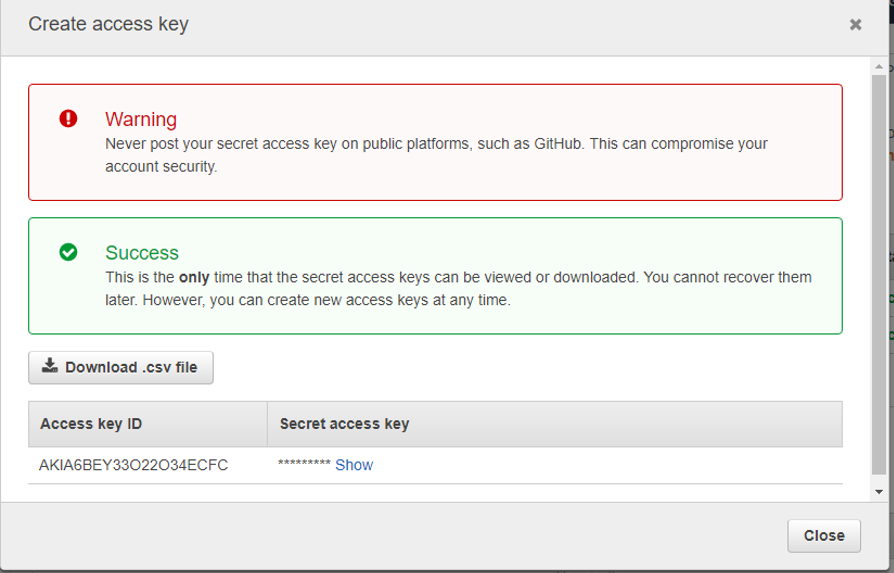
How to get the Access and Secret keys from the AWS portal
If you want to choose the option to use an access and secret key from AWS to grant access to CoreStack, then first you need to retrieve those values from your AWS account.
Follow these steps to get that info:
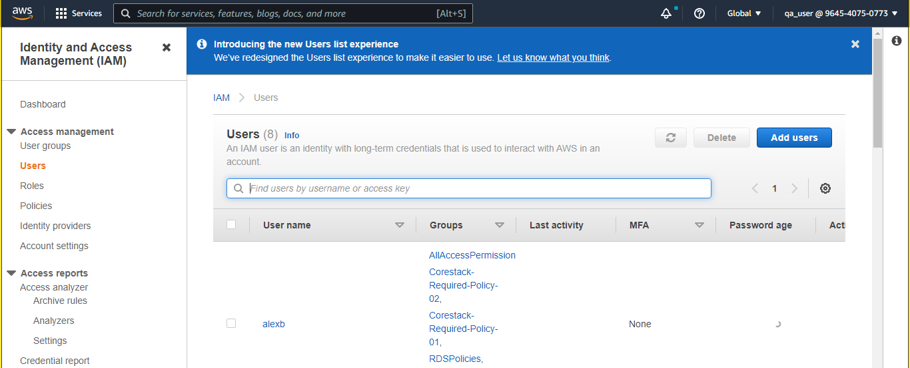
- First, log in to your AWS portal.
- Next, navigate to IAM > Users.
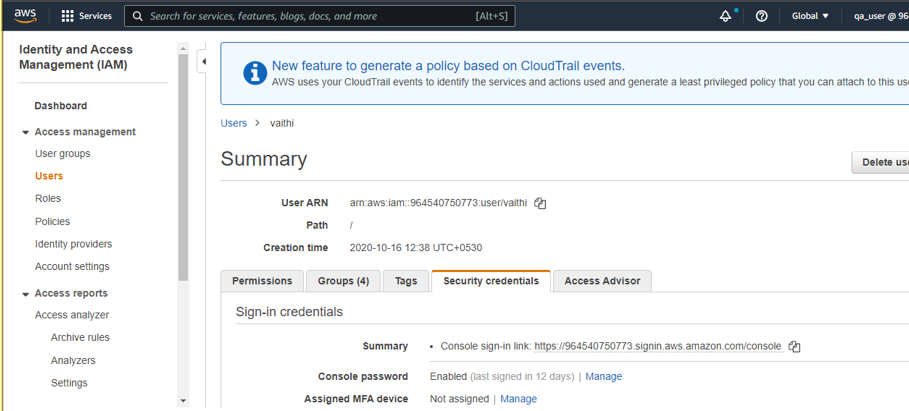
- Select any user, then go to Security Credentials.
- Click on the Create Access Key button under Access Keys.
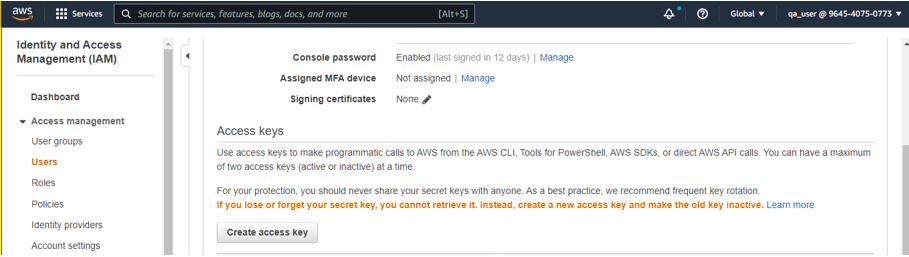
- The Access Key and Secret Key should be displayed, and you should also be able to download the .json file if you wish.
Currently, you should only be able to create a maximum of 2 Access and Secret keys for any single IAM user.
Ready for onboarding:
After copying the required Access key and Secret key mentioned above, you should have all the details needed to begin onboarding your AWS cloud account into CoreStack.
To begin the onboarding process, please refer to our AWS onboarding for CoreStack Assessments user guide.
Permissions created after the template runs
Below are the permissions that will be assigned to the role created in AWS based on which CloudFormation template you choose to use.
If you decide to use the manual approach for assigning permissions in AWS, you can also use the below tables as a reference for which permissions need to be added based on your desired access level (i.e. Read-Only, Read-Write, etc.):
Click to expand permissions table for Read-Only access
| Permissions (Read-Only) |
|---|
| "access-analyzer:List*", "acm:DescribeCertificate", "acm:GetCertificate", "acm:ListCertificates", "acm:ListTagsForCertificate", "apigateway:GET", "application-autoscaling:DescribeScheduledActions", "autoscaling:Describe_", "backup:ListBackupVaults", "batch:Describe_", "clouddirectory:DescribeDirectories", "clouddirectory:GetDirectory", "clouddirectory:ListDirectories", "cloudformation:DescribeStacks", "cloudformation:GetStackPolicy", "cloudformation:GetTemplate", "cloudformation:ListStackResources", "cloudformation:ListStacks", "cloudfront:Get_", "cloudfront:List_", "cloudhsm:Describe_", "cloudhsm:List_", "cloudtrail:DescribeTrails", "cloudtrail:Get_", "cloudtrail:ListTrails", "cloudwatch:Describe_", "cloudwatch:GetDashboard", "cloudwatch:ListDashboards", "cloudwatch:GetMetricData", "codeartifact:DescribeDomain", "codepipeline:List", "cognito-identity:Describe_", "cognito-identity:Get_", "cognito-user:List_", "cognito-user:Describe_", "config:DescribeConfigurationRecorderStatus", "datapipeline:DescribePipelines", "datapipeline:GetPipelineDefinition", "datapipeline:ListPipelines", "directconnect:Describe_", "dms:Describe'_", "dynamodb:Describe_", "dynamodb:List_", "dynamodb:ListTagsOfResource", "ec2:Describe_", "ec2:GetEbsEncryptionByDefault", "ec2:MonitorInstances", "ecr:BatchGetImage", "ecr:BatchImportUpstreamImage", "ecr:DescribeRepositories", "ecr:GetLifecyclePolicy", "ecr:GetLifecyclePolicyPreview", "ecr-public:GetRepositoryCatalogData", "ecs:Describe_", "ecs:List_", "eks:Describe_", "eks:List_", "elasticache:Describe_", "elasticbeanstalk:Describe_", "elasticfilesystem:Describe_", "elasticloadbalancing:Describe_", "elasticmapreduce:Describe_", "elasticmapreduce:List_", "es:Describe_", "es:ListDomainNames", "glacier:Describe_", "glacier:List_", "guardduty:Describe_", "guardduty:List_", "iam:Get_", "iam:List_", "iam:SimulatePrincipalPolicy", "iot:DescribeThing", "iot:ListThings", "inspector:Describe_", "inspector:List_", "kafka:Describe_", "kafka:List_", "kinesis:Describe_", "kinesis:Get_", "kinesis:List_", "kms:Get_", "kms:List_", "lambda:Get_", "lambda:List_", "lightsail:Get_", "logs:Describe_", "logs:GetLogEvents", "mgh:DescribeApplicationState", "mgh:ListApplicationStates", "mq:DescribeBroker", "mq:ListBrokers", "opsworks:Describe_", "organizations:Describe_", "organizations:List_", "qldb:DescribeLedger", "quicksight:Describe_", "quicksight:List_", "rds:Describe_", "rds:List_", "redshift:Describe_", "route53:Get_", "route53:List_", "s3:GetAccountPublicAccessBlock", "s3:GetBucketACL", "s3:GetBucketLocation", "s3:GetBucketLogging", "s3:GetBucketNotification", "s3:GetBucketPolicy", "s3:GetBucketPublicAccessBlock", "s3:GetBucketTagging", "s3:GetBucketVersioning", "s3:GetLifecycleConfiguration", "s3:GetNotificationConfiguration", "s3:GetEncryptionConfiguration", "s3:HeadBucket", "s3:ListAllMyBuckets", "s3:ListBucket", "sdb:DomainMetadata", "sdb:ListDomains", "servicecatalog:Describe_", "servicecatalog:List_", "secretsmanager:List_", "secretsmanager:Describe_", "sheild:DescribeProtection", "sheild:ListProtections", "sns:GetSnsTopic", "sns:GetSubscriptionAttributes", "sns:GetTopicAttributes", "sns:ListSubscriptionsByTopic", "sns:ListTopics", "sqs:GetQueueAttributes", "sqs:ListQueues", "ssm:Describe_", "ssm:Get_", "ssm:List_", "storagegateway:Describe_", "storagegateway:List_", "swf:List_", "waf:Get_", "waf:List_", "waf-regional:Get_", "waf-regional:List_", "wafv2:Get_", "wafv2:List_", "workmail:Describe_", "workmail:List_", "workspaces:Describe_" |
Click to expand permissions table for Read-Only + Sync with AWS WAF access
| Permissions (Read-Only + Assessment, sync with AWS WAF) |
|---|
| "access-analyzer:List*", "acm:DescribeCertificate", "acm:GetCertificate", "acm:ListCertificates", "acm:ListTagsForCertificate", "apigateway:GET", "application-autoscaling:DescribeScheduledActions", "autoscaling:Describe_", "backup:ListBackupVaults", "batch:Describe_", "clouddirectory:DescribeDirectories", "clouddirectory:GetDirectory", "clouddirectory:ListDirectories", "cloudformation:DescribeStacks", "cloudformation:GetStackPolicy", "cloudformation:GetTemplate", "cloudformation:ListStackResources", "cloudformation:ListStacks", "cloudfront:Get_", "cloudfront:List_", "cloudhsm:Describe_", "cloudhsm:List_", "cloudtrail:DescribeTrails", "cloudtrail:Get_", "cloudtrail:ListTrails", "cloudwatch:Describe_", "cloudwatch:GetDashboard", "cloudwatch:ListDashboards", "cloudwatch:GetMetricData", "codeartifact:DescribeDomain", "codepipeline:List", "cognito-identity:Describe_", "cognito-identity:Get_", "cognito-user:List_", "cognito-user:Describe_", "config:DescribeConfigurationRecorderStatus", "datapipeline:DescribePipelines", "datapipeline:GetPipelineDefinition", "datapipeline:ListPipelines", "directconnect:Describe_", "dms:Describe_", "dynamodb:Describe_", "dynamodb:List_", "dynamodb:ListTagsOfResource", "ec2:Describe_", "ec2:GetEbsEncryptionByDefault", "ec2:MonitorInstances", "ecr:BatchGetImage", "ecr:BatchImportUpstreamImage", "ecr:DescribeRepositories", "ecr:GetLifecyclePolicy", "ecr:GetLifecyclePolicyPreview", "ecr-public:GetRepositoryCatalogData", "ecs:Describe_", "ecs:List_", "eks:Describe_", "eks:List_", "elasticache:Describe_", "elasticbeanstalk:Describe_", "elasticfilesystem:Describe_", "elasticloadbalancing:Describe_", "elasticmapreduce:Describe_", "elasticmapreduce:List_", "es:Describe_", "es:ListDomainNames", "glacier:Describe_", "glacier:List_", "guardduty:Describe_", "guardduty:List_", "iam:Get_", "iam:List_", "iam:SimulatePrincipalPolicy", "iot:DescribeThing", "iot:ListThings", "inspector:Describe_", "inspector:List_", "kafka:Describe_", "kafka:List_", "kinesis:Describe_", "kinesis:Get_", "kinesis:List_", "kms:Get_", "kms:List_", "lambda:Get_", "lambda:List_", "lightsail:Get_", "logs:Describe_", "logs:GetLogEvents", "mgh:DescribeApplicationState", "mgh:ListApplicationStates", "mq:DescribeBroker", "mq:ListBrokers", "opsworks:Describe_", "organizations:Describe_", "organizations:List_", "qldb:DescribeLedger", "quicksight:Describe_", "quicksight:List_", "rds:Describe_", "rds:List_", "redshift:Describe_", "route53:Get_", "route53:List_", "s3:GetAccountPublicAccessBlock", "s3:GetBucketACL", "s3:GetBucketLocation", "s3:GetBucketLogging", "s3:GetBucketNotification", "s3:GetBucketPolicy", "s3:GetBucketPublicAccessBlock", "s3:GetBucketTagging", "s3:GetBucketVersioning", "s3:GetLifecycleConfiguration", "s3:GetNotificationConfiguration", "s3:GetEncryptionConfiguration", "s3:HeadBucket", "s3:ListAllMyBuckets", "s3:ListBucket", "sdb:DomainMetadata", "sdb:ListDomains", "servicecatalog:Describe_", "servicecatalog:List_", "secretsmanager:List_", "secretsmanager:Describe_", "sheild:DescribeProtection", "sheild:ListProtections", "sns:GetSnsTopic", "sns:GetSubscriptionAttributes", "sns:GetTopicAttributes", "sns:ListSubscriptionsByTopic", "sns:ListTopics", "sqs:GetQueueAttributes", "sqs:ListQueues", "ssm:Describe_", "ssm:Get_", "ssm:List_", "storagegateway:Describe_", "storagegateway:List_", "swf:List_", "waf:Get_", "waf:List_", "waf-regional:Get_", "waf-regional:List_", "wafv2:Get_", "wafv2:List_", "workmail:Describe_", "workmail:List_", "workspaces:Describe_" "wellarchitected:AssociateLenses", "wellarchitected:CreateMilestone", "wellarchitected:CreateWorkload", "wellarchitected:DisassociateLenses", "wellarchitected:UpdateAnswer" |
Next steps
Now that you understand how to create the necessary roles and permissions in your AWS environment to onboard your AWS cloud account into CoreStack so that you can fully utilize CoreStack Assessments, you can proceed to the AWS onboarding for CoreStack Assessments user guide.
Updated 6 months ago