
GCP onboarding for CoreStack Assessments
Learn how to onboard your GCP cloud accounts to be compatible with CoreStack Assessments.
Introduction
Once you've finished configuring all the necessary prerequisites in your GCP environment, you're ready to onboard your GCP cloud account(s) into CoreStack.
Onboarding in done from within the CoreStack application. While the specific onboarding steps may differ slightly depending on which type of cloud account(s) you want to onboard, in general the process is the same for GCP cloud accounts.
In this user guide, we'll walk you through the onboarding steps for different GCP cloud account types and explain what specific actions must be taken in order to properly enable CoreStack Assessments.
Before you start:
If you haven't yet completed the required prerequisite configurations in your GCP cloud environment, please refer to our GCP prerequisites for CoreStack Assessments user guide, complete the necessary steps, then return to this user guide.
Onboard a GCP Billing Account
The following steps need to be performed to onboard a GCP Billing Account into CoreStack:
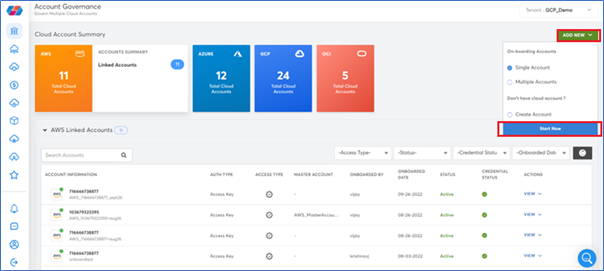
- Click the Add New button in the Account Governance dashboard and select Single Account.
- Click Start Now.
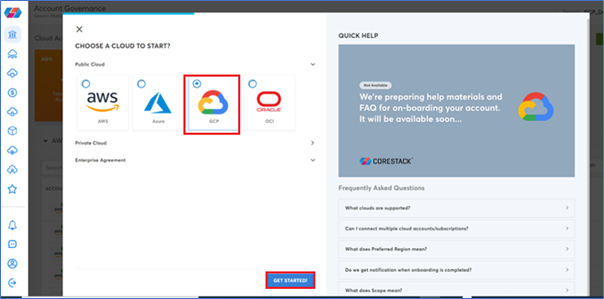
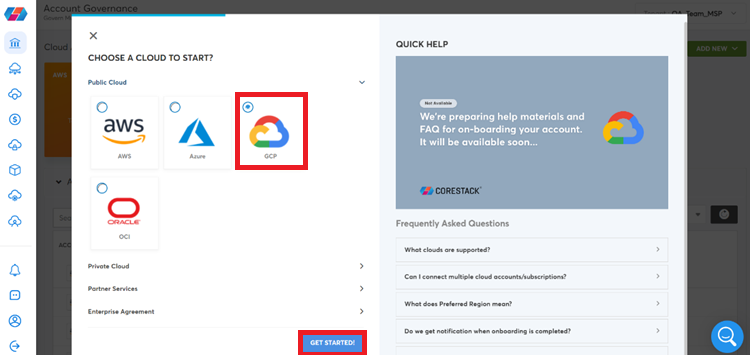
- Select the GCP option in the Public Cloud field.
- Click the Get Started button.
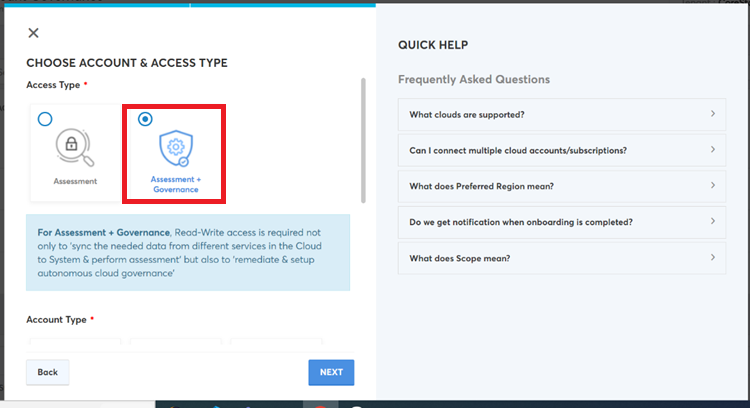
- Under Access type, you can select Assessment or Assessment + Governance. We recommend selecting Assessment since it will allow you to run CoreStack Assessments while only providing CoreStack with the minimum levels of access. Selecting Assessment + Governance will provide the same experience and functionality as Assessment.
Note:
As of August 2023 the above statement is true -- however, in future updates there will be notable differences between the Assessment and Assessment + Governance options relating to CoreStack Assessments. This user guide will be updated accordingly at that time.
- Select the Billing Account option in the Account Type field.
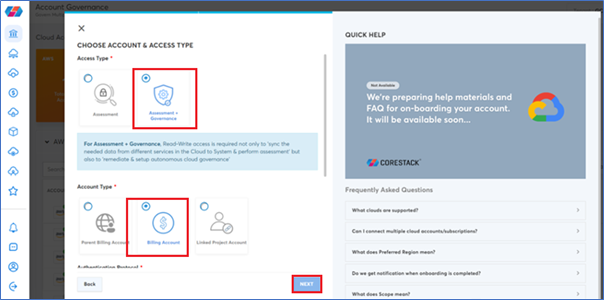
- Select the required option in the Authentication Protocol field. The options are: OAuth2 and Service Account.
- Click Next.
- Provide the necessary details explained in the Pre-onboarding section above based on the option selected in the Authentication Protocol field (Client ID, Client Secret, Scope, Project ID, Redirect URI, Authorization Code, Bucket Name, Billing Account ID, and Dataset ID OR Bucket Name, Billing Account ID, Dataset ID, Project ID, and Credentials File (JSON)).
- Click the Validate button.

- The Advanced Settings section will be displayed with additional fields (Name and Scope).
- Modify the pre-populated name of the account in the Name field, if required.
- Select the required option in the Scope field. The options are: Account, Private, and Tenant.
- Click the I'm Done button.

Additional Values from the Parent Billing Account:
In addition to the authentication protocol prerequisites explained previously, there are a few additional values that must be generated/copied from your parent GCP billing account and configured in CoreStack.
Parent Billing Account ID:
- Login to the GCP console.
- Navigate to the Manage Billing Accounts screen.
- Click My Projects. The list of projects will be displayed.
- Copy the Billing Account ID for the required projects.
Provide these details in CoreStack for your Billing Account onboarding, along with either the OAuth2 or Service Account information explained above based on your Authentication Protocol selection.
On-demand Scheduled Query
DECLARE
unused STRING;
DECLARE
current_month_date DATE DEFAULT DATE_SUB(@run_date, INTERVAL 1 MONTH);
DECLARE
cost_data_invoice_month NUMERIC DEFAULT EXTRACT(MONTH
FROM
current_month_date);
DECLARE
cost_data_invoice_year NUMERIC DEFAULT EXTRACT(YEAR
FROM
current_month_date);
EXPORT DATA
OPTIONS ( uri = CONCAT('gs://<your bucket name>/', CAST(cost_data_invoice_year AS STRING), '-', CAST(current_month_date AS STRING FORMAT('MM')), '/*.csv'),
format='JSON',
overwrite=True) AS
SELECT
*, (SELECT STRING_AGG(display_name, '/') FROM B.project.ancestors) organization_list
FROM
`<Your complete Table Id goes here>` as B
WHERE
B.invoice.month = CONCAT(CAST(cost_data_invoice_year AS STRING), CAST(current_month_date AS STRING FORMAT('MM')))
AND B.cost != 0.0
DECLARE
unused STRING;
DECLARE
current_month_date DATE DEFAULT DATE_SUB(@run_date, INTERVAL 2 MONTH);
DECLARE
cost_data_invoice_month NUMERIC DEFAULT EXTRACT(MONTH
FROM
current_month_date);
DECLARE
cost_data_invoice_year NUMERIC DEFAULT EXTRACT(YEAR
FROM
current_month_date);
EXPORT DATA
OPTIONS ( uri = CONCAT('gs://<your bucket name>/', CAST(cost_data_invoice_year AS STRING), '-', CAST(current_month_date AS STRING FORMAT('MM')), '/*.csv'),
format='JSON',
overwrite=True) AS
SELECT
*, (SELECT STRING_AGG(display_name, '/') FROM B.project.ancestors) organization_list
FROM
`<your Complete Table id goes here>` as B
WHERE
B.invoice.month = CONCAT(CAST(cost_data_invoice_year AS STRING), CAST(current_month_date AS STRING FORMAT('MM')))
AND B.cost != 0.0
DECLARE
unused STRING;
DECLARE
current_month_date DATE DEFAULT DATE_SUB(@run_date, INTERVAL 3 MONTH);
DECLARE
cost_data_invoice_month NUMERIC DEFAULT EXTRACT(MONTH
FROM
current_month_date);
DECLARE
cost_data_invoice_year NUMERIC DEFAULT EXTRACT(YEAR
FROM
current_month_date);
EXPORT DATA
OPTIONS ( uri = CONCAT('gs://<your bucket name>/', CAST(cost_data_invoice_year AS STRING), '-', CAST(current_month_date AS STRING FORMAT('MM')), '/*.csv'),
format='JSON',
overwrite=True) AS
SELECT
*, (SELECT STRING_AGG(display_name, '/') FROM B.project.ancestors) organization_list
FROM
`Your complete Table Id goes here` as B
WHERE
B.invoice.month = CONCAT(CAST(cost_data_invoice_year AS STRING), CAST(current_month_date AS STRING FORMAT('MM')))
AND B.cost != 0.0
Onboard a GCP Parent Billing Account
The following steps need to be performed in CoreStack to onboard a GCP Parent Billing Account.
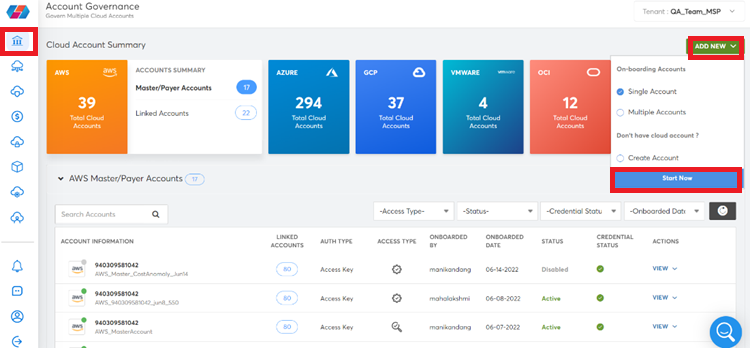
- Navigate to the Account Governance page from the left menu. Click the Add New button in the top right and select Single Account.

- Click Start Now.
- Select the GCP option in the Public Cloud field.
- Click the Get Started button.

- Under Access type, you can select Assessment or Assessment + Governance. We recommend selecting Assessment since it will allow you to run CoreStack Assessments while only providing CoreStack with the minimum levels of access. Selecting Assessment + Governance will provide the same experience and functionality as Assessment.
Note:
As of August 2023 the above statement is true -- however, in future updates there will be notable differences between the Assessment and Assessment + Governance options relating to CoreStack Assessments. This user guide will be updated accordingly at that time.
- Select the Parent Billing Account option in the Account Type field.

- Select the required option in the Authentication Protocol field. The options are: OAuth2 and Service Account.
- Add the Currency type.
- Click Next.

- Provide the necessary details explained in the Pre-onboarding section earlier based on the option selected in the Authentication Protocol field (Client ID, Client Secret, Scope, Project ID, Redirect URI, Authorization Code, Bucket Name, Billing Account ID, and Dataset ID OR Bucket Name, Billing Account ID, Dataset ID, Project ID, and Credentials File (JSON)).
- Click the Validate button.

- The Advanced Settings section will be displayed with additional fields (Name and Scope).
- Modify the pre-populated name of the account in the Name field, if required.
- Select the required option in the Scope field. The options are: Account, Private, and Tenant.
- Click the I'm Done button.
After all the previous steps are completed, your GCP Project will be onboarded successfully into CoreStack. Any relevant insights and information about the resources available in the GCP Project will be populated under each of the available cloud governance pillars in CoreStack.
Onboard a GCP Linked Project
The following steps need to be performed to onboard a GCP Linked Project.
- Click the Add New button in the CoreStack dashboard and select Single Account.
- Click Start Now.
- Select the GCP option in the Public Cloud field.
- Click the Get Started button.
- Under Access type, you can select Assessment or Assessment + Governance. We recommend selecting Assessment since it will allow you to run CoreStack Assessments while only providing CoreStack with the minimum levels of access. Selecting Assessment + Governance will provide the same experience and functionality as Assessment.

Note:
As of August 2023 the above statement is true -- however, in future updates there will be notable differences between the Assessment and Assessment + Governance options relating to CoreStack Assessments. This user guide will be updated accordingly at that time.
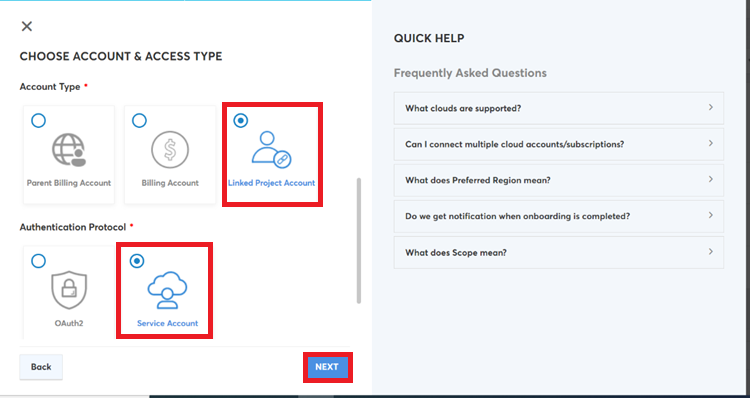
- Select the Linked Project Account option in the Account Type field.
- Select the required option in the Authentication Protocol field. The options are: OAuth2 and Service Account.
- Click Next.
- Provide the necessary details (Client ID, Client Secret, Scope, Project ID, Redirect URI, and Authorization Code OR Hierarchy Scope, Project ID/Folder ID, Credentials File (JSON)) explained in the Pre-onboarding section based on the option selected in the Authentication Protocol field.
If the Service Account option is selected in the Authentication Protocol field, the Hierarchy Scope field will be available and must be configured as follows.
-
In the Hierarchy Scope field, select the required option based on your need as explained below. The option is Project.
- Project: This option will enable a specific GCP project to be onboarded. Specify the ID of the GCP Project in the Project ID field.
-
Click the Validate button.

-
The Advanced Settings section will be displayed with additional fields (Name, Master Account, and Scope).
-
Modify the pre-populated name of the account in the Name field, if required.
-
Select the required account in the Master Account drop-down list.
-
Select the required option in the Scope field. The options are: Account, Private, and Tenant.
-
Click the I'm Done button.
After completing the previous steps, the GCP Project will be onboarded successfully into CoreStack. Any relevant insights and information about the resources available in the GCP Project will be populated under each of the cloud governance pillars available in CoreStack.
Onboard a GCP Linked Project - Organization/Folder Scope
The following steps need to be performed to onboard a GCP Linked Project with Organization/Folder scope:
- Click the Add New button in the CoreStack dashboard and select Single Account.
- Click Start Now.

- Select the GCP option in the Public Cloud field.
- Click the Get Started button.

- Under Access type, you can select Assessment or Assessment + Governance. We recommend selecting Assessment since it will allow you to run CoreStack Assessments while only providing CoreStack with the minimum levels of access. Selecting Assessment + Governance will provide the same experience and functionality as Assessment.
Note:
As of August 2023 the above statement is true -- however, in future updates there will be notable differences between the Assessment and Assessment + Governance options relating to CoreStack Assessments. This user guide will be updated accordingly at that time.
- Select the Linked Project Account option in the Account Type field.
- Select the required option in the Authentication Protocol field. The options are: OAuth2 and Service Account.
- Click Next.

- Provide the necessary details (Client ID, Client Secret, Scope, Project ID, Redirect URI, and Authorization Code OR Hierarchy Scope, Project ID/Folder ID, Credentials File (JSON)) explained in the Pre-onboarding section based on the option selected in the Authentication Protocol field.
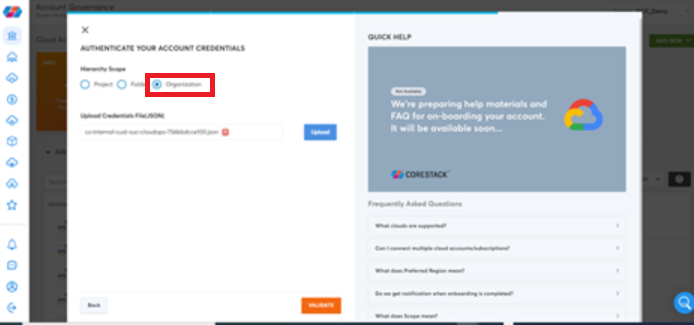
If the Service Account option is selected in the Authentication Protocol field, the Hierarchy Scope field will be available and must be configured as follows:
-
In the Hierarchy Scope field, select the required option based on your need as explained below. The options are: Project, Folder, and Organization.
- Project: This option will enable a specific GCP project to be onboarded. Specify the ID of the GCP Project in the Project ID field.
- Folder: This option will enable the GCP projects that are available within a Folder (departments or teams within an organization) in GCP to be onboarded. Specify the ID of the GCP folder in the Folder ID field.
- Organization: This option will enable all the GCP projects that are available within an Organization in GCP to be onboarded.
Note:
GCP Projects must have access to the specified service account. While onboarding a Folder or Organization from GCP, only the GCP Projects that have access to the specified service account will be onboarded.
-
Click the Validate button.
-
The Advanced Settings section will be displayed with additional fields (Name, Master Account, and Scope).
-
Modify the pre-populated name of the account in the Name field, if required.
-
Select the required account in the Master Account drop-down list.
-
Select the required option in the Scope field. The options are: Account, Private, and Tenant.
-
Click the I'm Done button.
After completing the previous steps, the GCP Project will be onboarded successfully into CoreStack. Any relevant insights and information about the resources available in the GCP Project will be populated under each of the cloud governance pillars available in CoreStack.
Updated 4 months ago