
Templates
Introduction
Orchestration Templates are essentially infrastructure automation instructions written in "YAML" or "JSON" format. Templates can have multiple tasks within them, each of them performing a specific action in a target cloud or a tool. You may also have a single template to orchestrate across multiple cloud(s) and/or tool(s).
CoreStack supports Templates of the formats: AWS CFN, Azure ARM, OpenStack HEAT, OpenStack MISTRAL, Terraform, Oracle, DM.
One of the key differentiators of CoreStack is its support for cloud-native DSL (Domain Specific Language) which ensures that there is no limitation in terms of the supported services within that platform.
For example, you can execute:
- CFN Templates against AWS
- ARM Templates against Azure
- HEAT, MISTRAL, and Terraform Templates against OpenStack Public/Private Cloud Accounts
You can bring into CoreStack any of these templates with ease and re-use them outside of CoreStack if required.
Navigation
Navigate to Automation submenu under Operations in the Left navigation menu and select Templates option to land in Templates (Marketplace).
The tabs at the top represent the scope of the templates. You can see 2 tabs: Marketplace and My Templates.
Marketplace
CoreStack provides a wide range of pre-defined templates which can help in realizing multiple use cases. The marketplace lists the templates available across multiple clouds and tools. These are pre-loaded for all subscriptions and are FREE to be executed on-demand or scheduled.
These templates are available across all tenants and are usually created by the Product Administrator.
Tip:
These templates have the scope value set to Global.
Note:
- After the default template is added in CoreStack, there would be an approximate sync time required (which might be for of 30 minutes or more) to view the template added by you. Till then, you will see a message "Template Synchronization is in progress. Please check back after some time."
- In case of any discrepancies, we advise you to contact [email protected].
My Templates
These templates have been created by users within the tenant. These are available only for users within the tenant. You can add more templates or edit/delete existing templates in this tab based on your role and access policies.
Tip:
These templates have the scope value set to Tenants.
Note:
- After the default template is added in CoreStack, there would be an approximate sync time required (which might be for of 30 minutes or more) to view the template added by you. Till then, you will see a message "Template Synchronization is in progress. Please check back after some time."
- In case of any discrepancies, we advise you to contact [email protected].
Search and Filter Templates
CoreStack offers search and filter functions to help quickly look for the templates you need to execute. The Search bar is available just above the templates list. To Filter Templates, you can click on the "Filter" icon placed to the right end above the templates list.

The Text Search helps you search using any string available in the following fields:
- Name of the Template
- Description of the Template
- Type
- DSL
- Classification
- Service
The text search is thus quite useful in refining your search results based on any little information you have on the preferred result set.
CoreStack also offers Filters to help you narrow down the list of templates by using one or a combination of filters. On clicking the Filter icon, you will see the list of Filter options available as shown below. Select the preferred options and click on "Apply Filter" button at the bottom of this box.


Tip:
Use the Reset button to quickly remove all selected filters and view all results.
Once you decide on a template that you would like to try out, you can execute it on-demand or schedule it for a one-time or recurring execution(s) in future.
View Template Details
To get more information about a specific template, click on the template to open the 'Template Detail' page. You can view the attributes related to the template and update the values if required by clicking on Update.

The actual content of the template, which is in 'YAML' or 'JSON' format is also displayed. Click 'Edit' button and make changes to the content if required.

Template Actions
Template actions will be shown to every template listed when you are hovering mouse on a template. The list of actions depends on the scope of the template (Marketplace, My Templates) and the RBAC access for templates that user has.

- Execute – Executes the template immediately and redirects to "Job history" where you can see the status and output of the execution.
- Edit– Modifies the properties, content, metadata of the Template. It's like Template Create workflow.
- Schedules – Similar to Execute, but schedules it to be run later once/multiple times.
- Delete – Deletes the template
Execute Template
Executes the template against Cloud Accounts and performs the tasks specified in the template. In 'Job History' you can find the status and outputs for this execution. Execute requires following inputs:
- Job Name – Optional. If not given system will generates this.
- Cloud Account – Cloud Account need to be used for execution.
- Cloud Account Additional Info – Additional Info of Cloud Account (E.g., Resource Group, Location, Region).
- Execution Parameters – Additional parameters from the Template.
A sample Template execute window, for a simple example of taking an "AWS_EC2_Instance_With_SecurityGroup" is shown below:
- The Cloud Accounts lists the available list of AWS cloud accounts in this Tenant.

- Once the Cloud Account details are selected, click on "Load Execute parameters" to get the input parameters of the template.

- You can enter/select values from dropdown for input params based on need and hit "Run" to execute the template.
- Once a template is executed, it is run as a "Job" within CoreStack. You can check the execution logs and job status from the "Job History" tab.
Tips:
- Most of the input parameter values are fetched automatically from the respective cloud account. This is very useful in choosing real-time values from the cloud. There is no need to login to the AWS Console to refer these details.
- You can use the "?" on the right side of each input parameter to understand more about the parameter.
Execute Terraform templates from GitHub
In addition to being able to execute and manage orchestration templates from a base of pre-existing templates, CoreStack users can also execute Terraform templates from a GitHub Enterprise code repository via an integration.
With this feature, users can store their Terraform code in a Github Enterprise repository and then configure a pipeline that automatically pulls the code and executes it. This enables teams to collaborate on infrastructure configuration and allows for easy version control and auditing of changes.
CI/CD Config File Management
- CoreStack Automation now provides the opportunity to edit/manage the saved CI/CD config files on the GitHub deployment repo for provisioned resources. Users will be able to perform an edit and save the changes in the config management of provisioned resources.
- After a user edits and saves these pre-existing CI/CD configuration files on the deployment repo for the provisioned resources through CoreStack, the existing Azure DevOps/ADO pipeline will detect the changes to these CI/CD config files and trigger the pipeline execution. This in turn will update the configuration setting of the resource on the target account.
Enable access to your GitHub repository
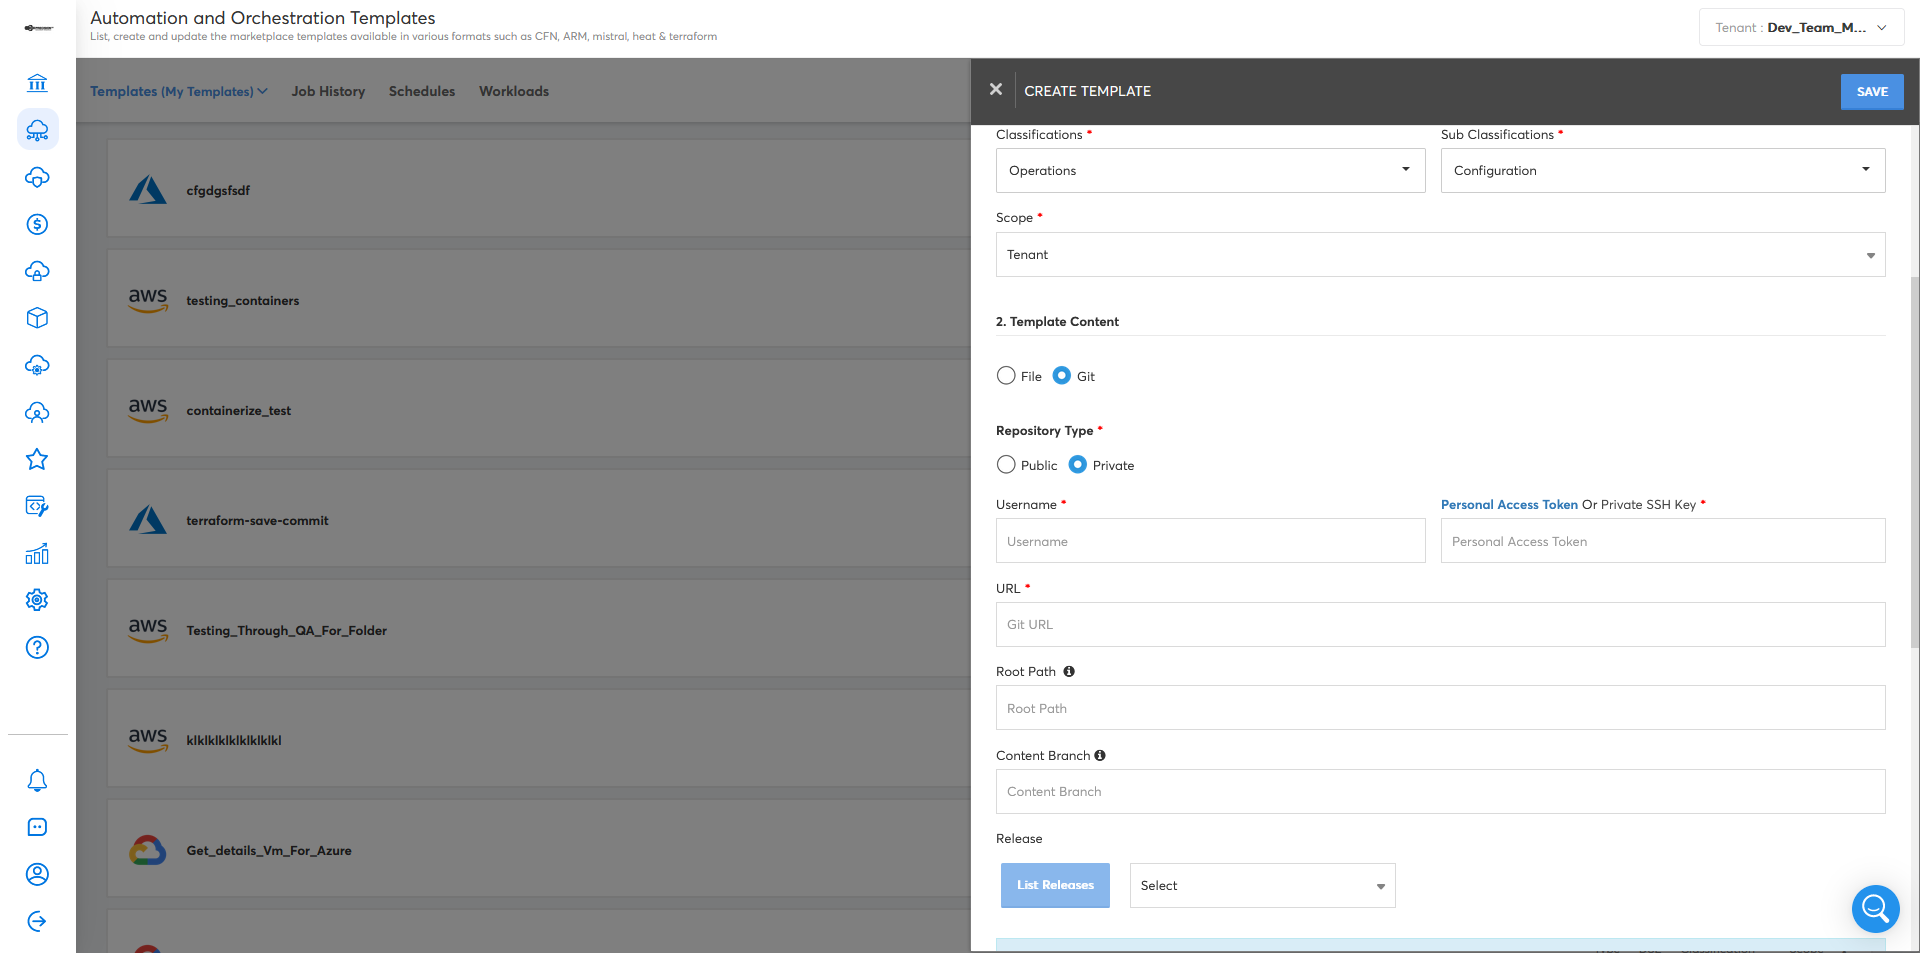
Users can authorize GitHub repository access with a personal access token, which will enable them to clone and run Terraform templates stored in GitHub through CoreStack.
To do this, start by clicking the plus icon (+) on the Automation > Templates > My templates page to open the Create Template menu.
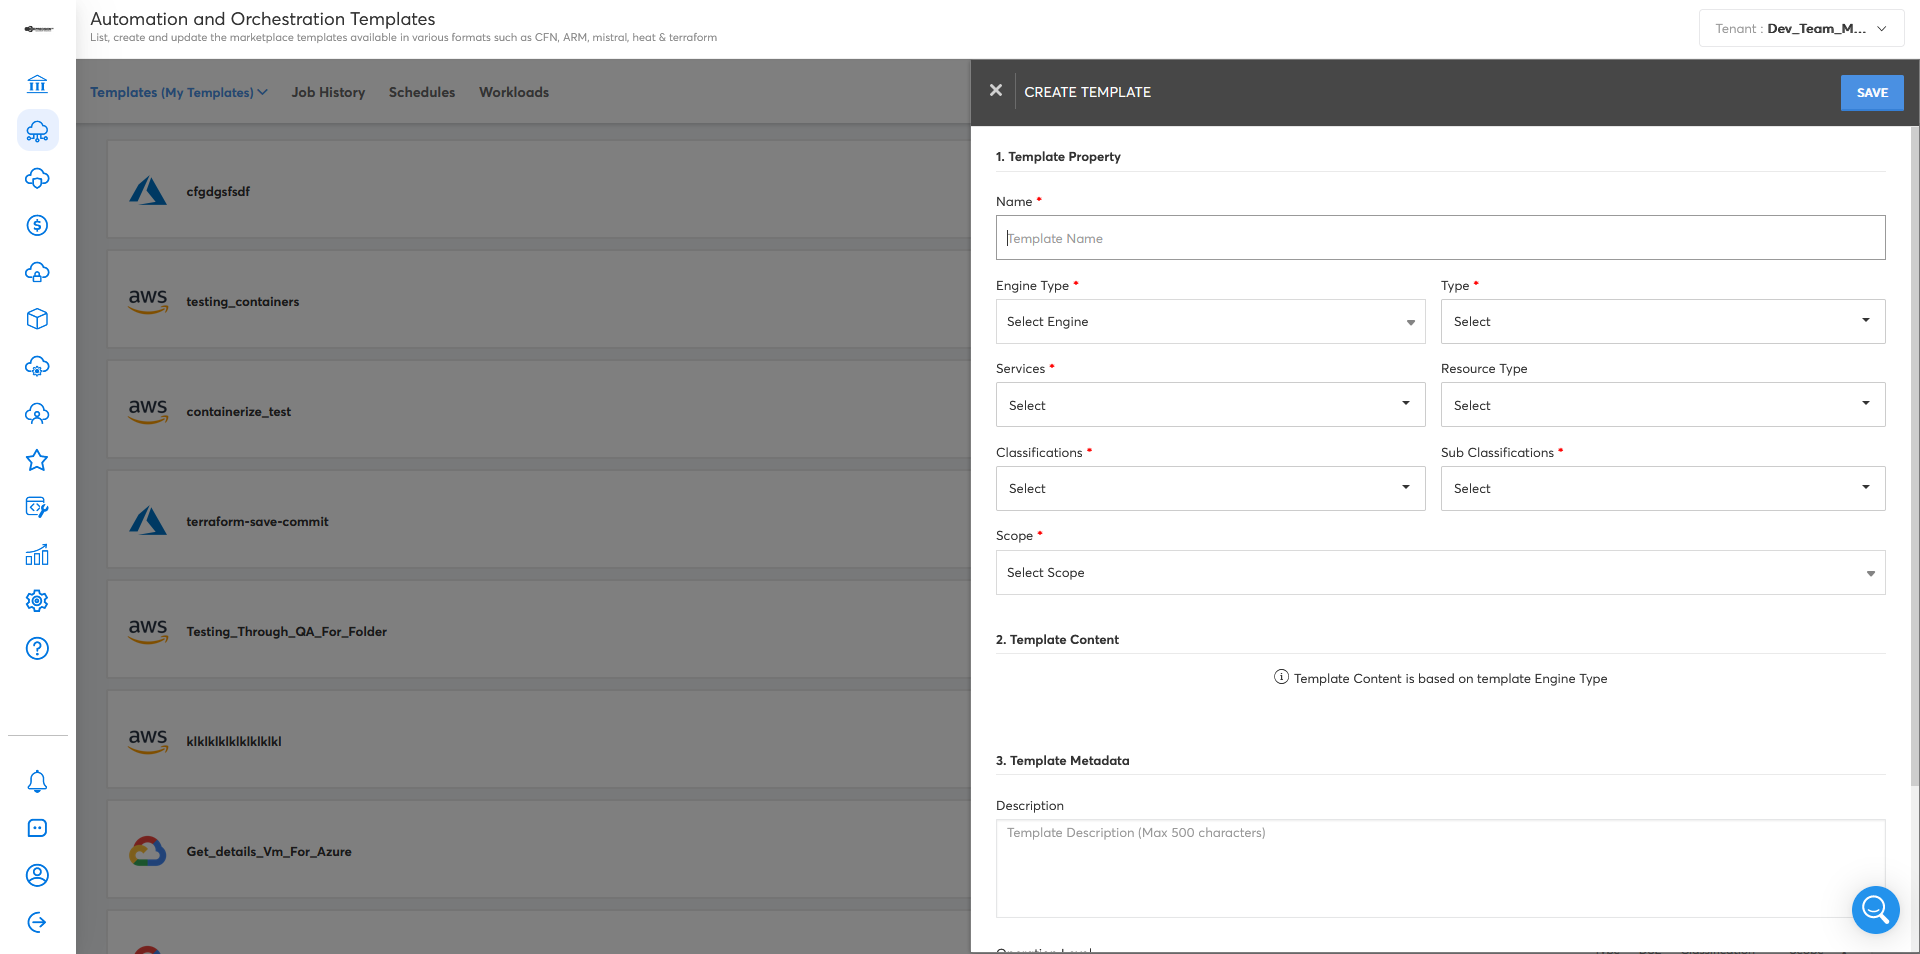
After users provide all the necessary details in the Template Property section, they can select the Git option under the Template Content section.
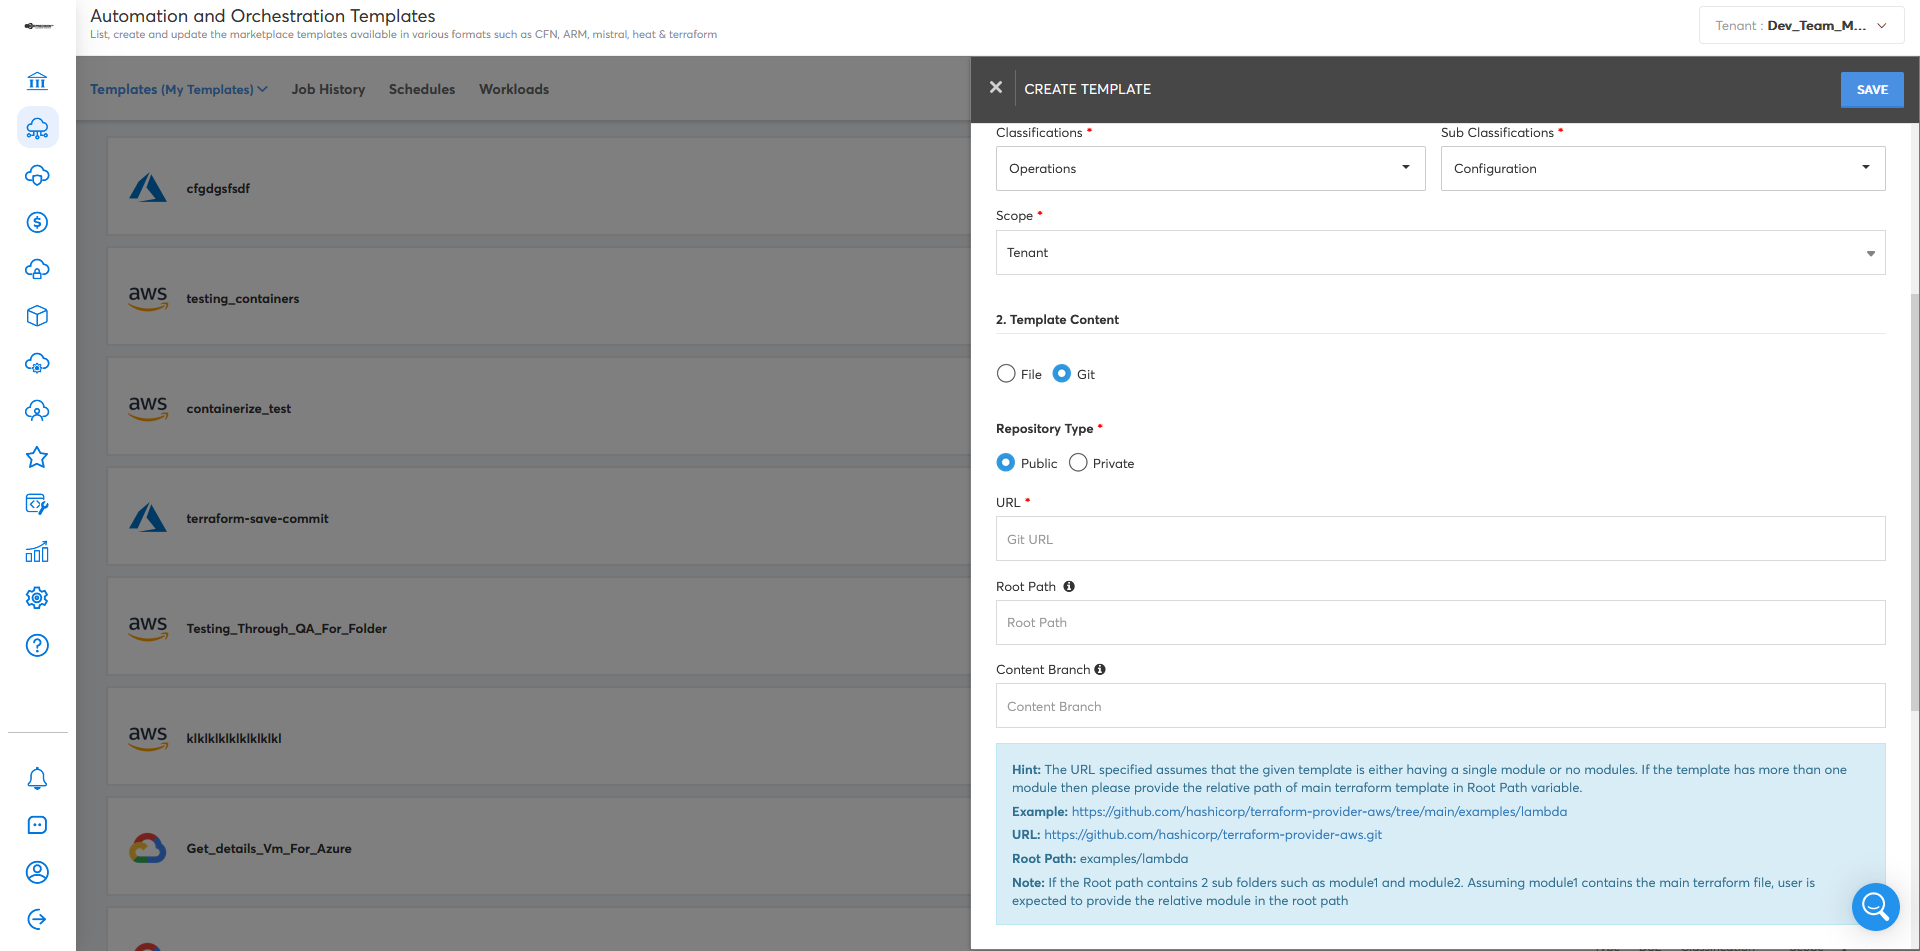
At this point, users can upload single Terraform folders or multiple folders through a .zip file through the import feature.
Users can choose the optional values from Terraform and leave them as optional in CoreStack during template execution without them being mandated.
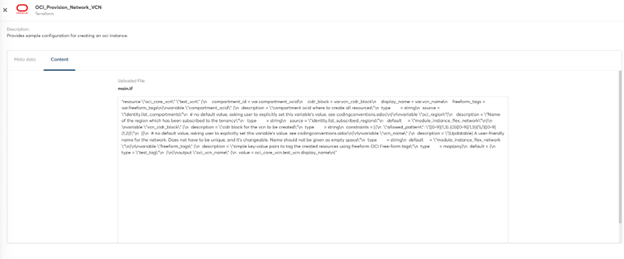
Viewing Terraform template content
After a template is imported or created under the Terraform category, users can view it by selecting it from the available templates, then selecting the content tab. This will show the Terraform template content with proper coding alignment in order to help interpret the code.
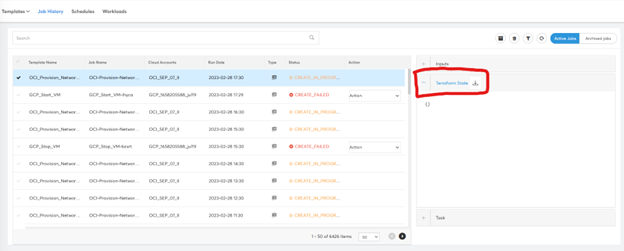
View and download .tfstate file for executed Terraform templates
During the execution of a Terraform template, users will be able to view the .tfstate file created as part of the execution.
This is shown as a card under the Job History tab. Select that tab and then select the Terraform State tab for any executed Terraform templates along the right side to view the code contents of the file. This file can also be downloadable for reference by clicking the download icon.
Note:
- Upload Json Support: CoreStack now provides Terraform templates to be uploaded through JSON.
- Download Job Result: CoreStack now supports the download of executed Terraform job logs.
Deleting and rolling back templates that failed to execute
Users can use the ‘delete’ option when a particular template fails to execute, which will act as a rollback to remove all the changes made and bring it back to its original state, so that it can be re-run later.
Users can access this option under the Job History tab by selecting the delete icon from the available action buttons along the top of the page.
Schedule Template
This schedules the template execution to be run later once or multiple times. For example, you can schedule backup for an Instance daily. The schedule requires the following details:
- Name – Name of the schedule.
- Description – Detailed description about the schedule.
- Schedule Settings – Execution options. Template can be scheduled to execute Once or to repeat after specified Minutes, Hours, Daily, Weekly, Monthly, and Yearly.
- Cloud Account – Cloud Account need to be used for execution.
- Cloud Account Additional Info – Additional Info of Cloud Account (e.g. Resource Group, Location, Region).
- Execution Parameters – Additional parameters from the Template.
An example screenshot of scheduling a template is shown below:

The list of schedules created for that specific tenant can be viewed from the Schedules tab.
Create (Upload) Custom Templates
CoreStack also provides the option for users to upload their own templates and use them to execute against their service accounts. Follow the steps given below: Use the '+' button next to the 'Search' bar at top right.
Template create window will have 3 sections as follows: Properties, Content, and Metadata.
| Group | Field | Description |
|---|---|---|
| Properties | Name | Name of the template. |
| Properties | Engine Type | Engine of the template. E.g., CFN, ARM, Mistral Heat. |
| Properties | Type | Cloud or Integrated Tool |
| Properties | Services | Services based on Type. E.g., If type is Cloud Account service or Tool Account service |
| Properties | Classifications | Classification of the template like Provisioning, Configure, Backup etc. |
| Properties | Scope | Scope of the template. |
| Properties | Input Source | Defaults to Templates |
| Content | Content Type | File or URL. File option used to upload the template content as file where URL option is used download from that URL. This URL may any downloadable URL. |
| Content | Browse | File Upload |
| Content | URL | URL to download the content file. |
| Metadata | Description | Detailed description of the template with purpose and use cases. |
| Metadata | Operation Level | Support level of IT Operation Management required to handle this operation in Cloud manually. |
| Metadata | Operation Time | Approximate time will be spent by Operation level person to do this operation manually. |
| Metadata | Tags | Custom key – value tags that can help in grouping and searching templates. |


Job History
Lists all template executions of the current tenant. A sample screenshot is shown below. The tabs at the top right represents the archive status of jobs. You can see 2 tabs: Active Jobs and Archived Jobs.

The Template Job History page offers search and filter functions to help quickly look for the executions. The Search bar is available just above the jobs list. To Filter Jobs, you can click on the "Filter" icon placed to the right end above the Job detail tab.
Template Job History page also has Archive, Un-Archive and Delete Actions. These actions can be used to have limited number of executions in Job history page.
Job history page has option to refresh the Jobs list. This will help when you are landing here from template execute page. By the time you are landing the Job might be IN_PROGRESS state. This will help to refresh the status.
Template Jobs list show the following columns in the list.
- Template Name – Name of the Template executed.
- Job Name – Name of the Job which is generated by the CoreStack with Template name and some random characters.
- Cloud Accounts – Name of the Cloud Account selected when executing.
- Run Date – Date & Time of the Job execution.
- Type – Execution Type (On-Demand, Scheduled, or System).
- Status – Status of the Job execution.
- Actions – Actions will be available for CloudFormation and HEAT templates. In CloudFormation and HEAT each template execution considered as stack, which supports the update and delete actions. Update action used to update the attributes of the resources where Delete action removed all the resources created by that execution.
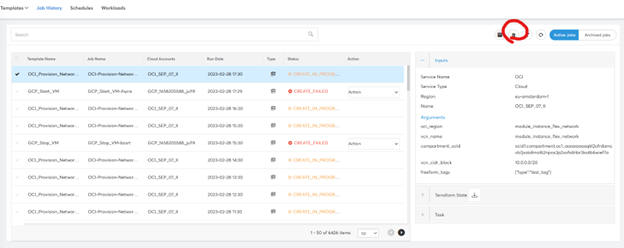
Template Job Detail will be shown on clicking Job from the list. This will show three tabs. Inputs, Output, and Task.
- Inputs – Cloud Account details and input parameters passed for the execution.
- Output – Outputs from the template execution.
- Task – List of tasks or resources executed in this template.
Schedules
Lists all template execution schedules of the current tenant. The tabs at the top right represents the schedule status. You can see 2 tabs: Upcoming and Past. Upcoming will list the schedules which are active, to be execute on future based on its scheduled time. Past will list the schedules which are no longer going to be executed. For example, Scheduled Once will be moved to the Past tab after its execution.
A sample screenshot is shown below:

The Template Schedules page offers search and filter functions to help quickly look for the schedules. The Search bar is available just above the schedules list. To Filter Jobs, you can click on the "Filter" icon placed to the right end above the Schedule detail tab.
Template Schedules list show the following columns in the list:
- Schedule Name – Name of the schedule.
- Template – Name of the Template Scheduled.
- Recurrence – Recurrence of the Schedule (Once/ Daily / Weekly / Monthly / Yearly).
- Next Run Time – Date and Time of the Next execution.
- Requested By – CoreStack username who created the schedule.
Template Schedule Detail will be shown on clicking Schedule from the list. This will show the execution history the schedule which will redirect to Job history page and filter by this schedule. It's also supports the following actions on schedule.
- Edit (All Occurrences) – Modifies the Schedule like Schedule Create.
- Delete (All Occurrences) – Deletes the Schedules.
CoreStack also provides control over the next execution of the schedule. You can remove the next execution or can edit the next execution time alone without modifying the schedule.
For example, in a daily 12pm schedule, you can change the time of the next execution.
Updated 5 months ago