
Start your first CoreStack Assessment
Learn how to run an assessment for a workload in CoreStack Assessments.
Introduction
Once you've onboarded a cloud account, you can either edit the initial CoreStack Assessment that runs automatically after onboarding, or create a new assessment (in this case, a Workload Assessment). The purpose of assessments is to provide users with a way to clearly understand the state of their workloads for a particular cloud account and take steps to improve their performance and efficiency.
An assessment is a process where the CoreStack platform analyzes all cloud resources in a workload as per the selected framework (e.g. AWS Well-Architected Framework). It then provides a set of questions and best practices for users to run through along with insights and remediation suggestions for any issues detected by the platform.
Understanding the key elements of an assessment
CoreStack Assessments are comprised of different elements and actions that users will encounter as they progress through assessments, explained below:
- Assessment definition: The process of evaluating a workload against an established cloud framework.
- Assessment run: The tracking of the progress of a single assessment.
- Pillars: The top-level categories for a particular well-architected framework, under which assessment questions and any related best practices are sorted.
- Questions: Questions appear under the relevant pillars, and address key areas of a particular framework that your cloud workload should adhere to in order to meet the relevant standards. Questions can be answered either manually by users or automatically by executing policies. Each question contains a set of best practices.
- Best practices: Best practices are grouped under assessment questions, and can be marked to indicate whether or not a user's cloud account/workload meet their requirements, and/or to what extent.
Options for running an assessment
Depending upon the scope of your workload, there are multiple assessment options you can choose to trigger:
- AWS WAF: This option will be available if your workload has AWS accounts set up under its tiers.
- AZURE WAF: This option will be available if your workload has Azure accounts set up under its tiers.
- GCP WAF: This option will be available if your workload has GCP accounts set up under its tiers.
For AWS, there are two options available while creating the assessment:
- Start assessment without sync: In this case, the assessment details will not sync with your AWS console.
- Start assessment with sync: In this case, the assessment details will be synced with your AWS console.
Note:
This AWS sync mentioned above will be a ONE-WAY-SYNC only.
Updates from the CoreStack assessment will also be updated in your AWS console, but if any changes are made in the AWS console, those same changes won't be updated in your CoreStack WAF assessment.
Create a new assessment
Follow the steps outlined below to create and run an assessment:
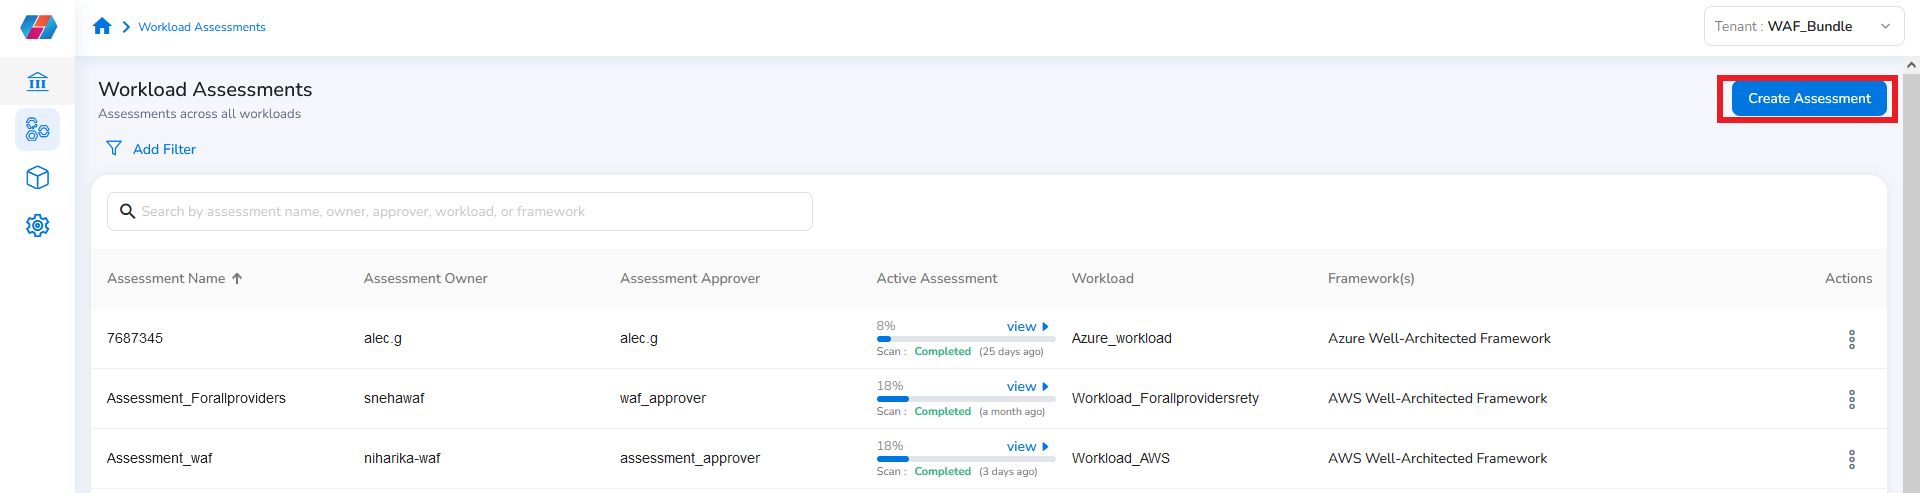
- On the left-hand navigation bar, select Assessments> Workload Assessments > Create Assessment.
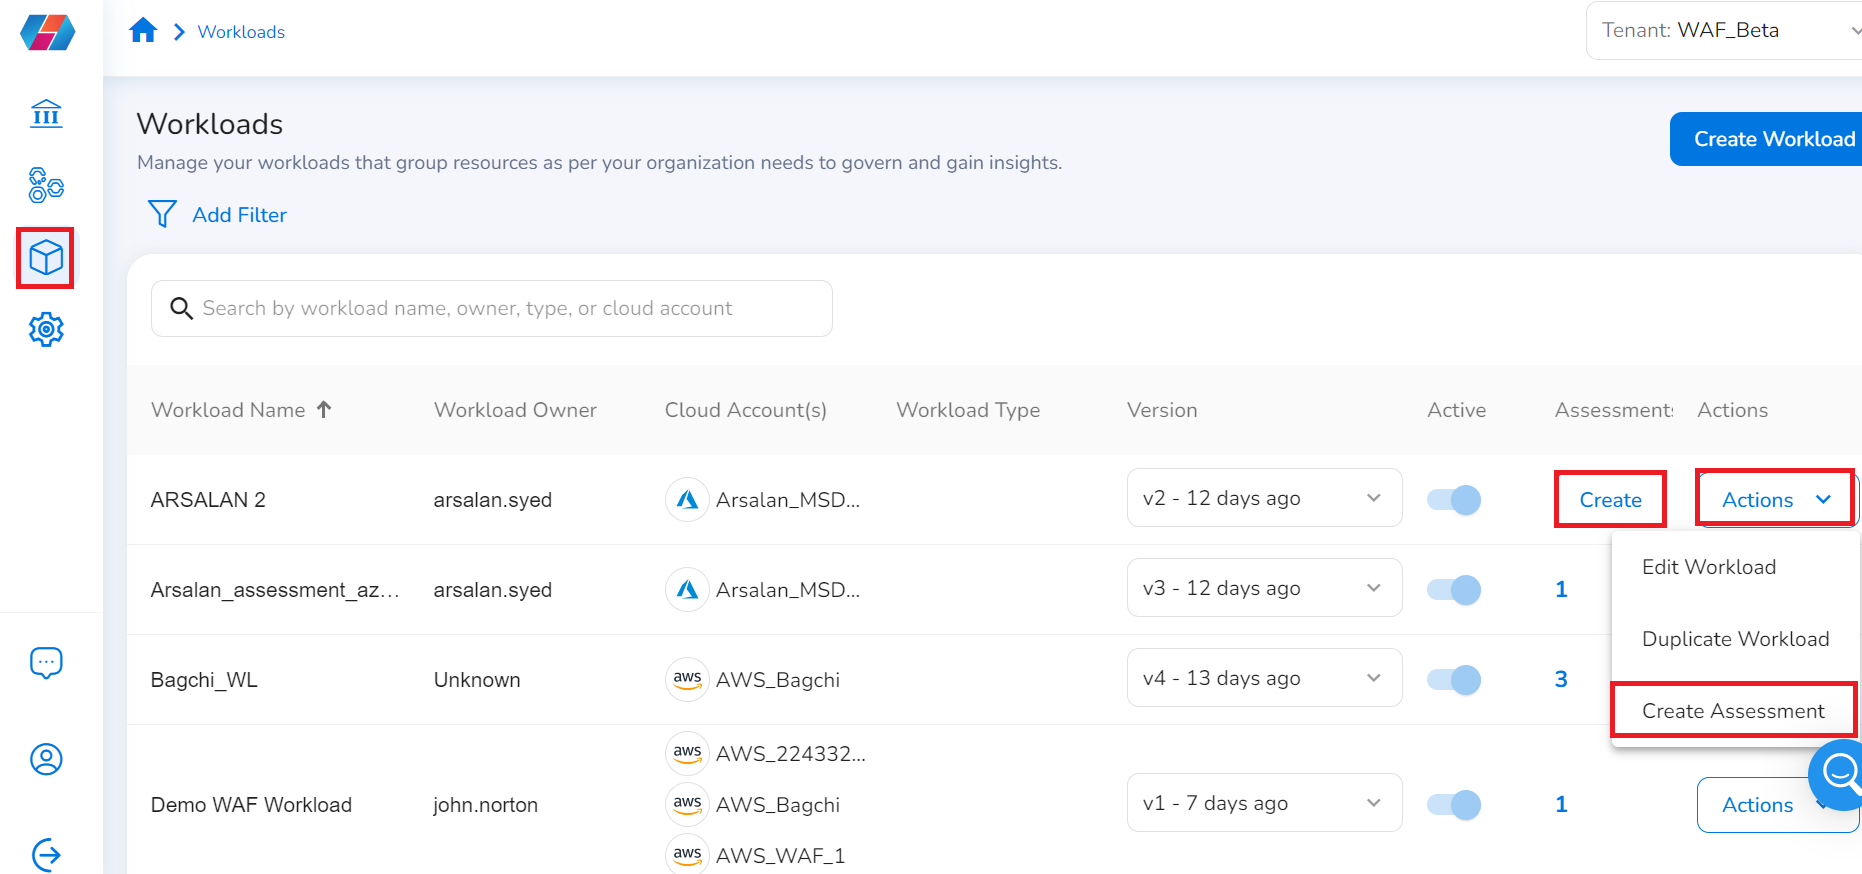
- Alternatively, to create new assessment, on the left navigation pane, go to Resource > Workloads > Create (corresponding to a workload).
- Alternatively, go to Resource > Workloads > Actions > Create Assessment.
-
On the Create Assessment form, fill the following fields:
-
In the Assessment Name box, type in a name for the assessment.
-
In the Assessment Description text box, type in a description for this assessment (for example, what it is for, which resources it is assessing, etc.).
-
In the Assessment Owner list, click to select a user you want to assign as the owner of this assessment (owners can update the assessment and submit for approval).
-
In the Assessment Approver list, click to select a user you want to assign as the approver for this assessment (approvers review the results and mark an assessment as formally approved).
-
In the Workload Name list, click to select a workload name for this assessment.
-
In the Frameworks list, click to select the framework on which the assessment will be run. A user can select multiple options in this field and then click Ok.
-
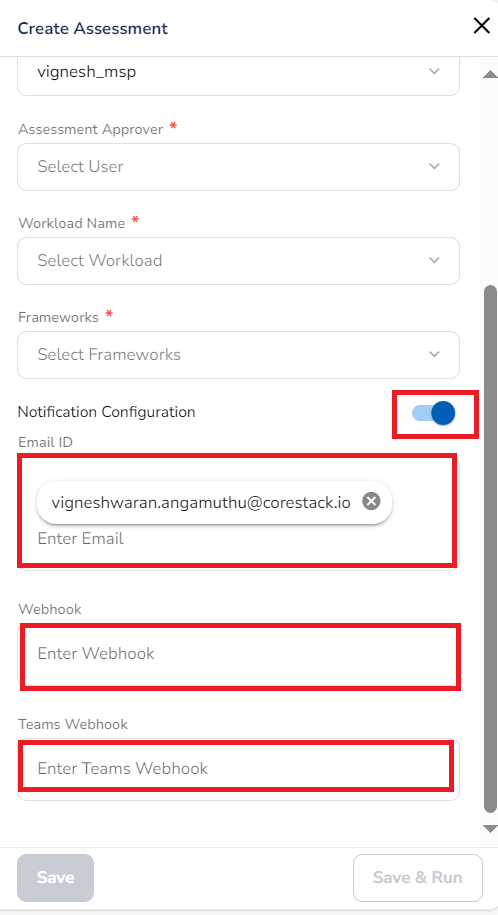
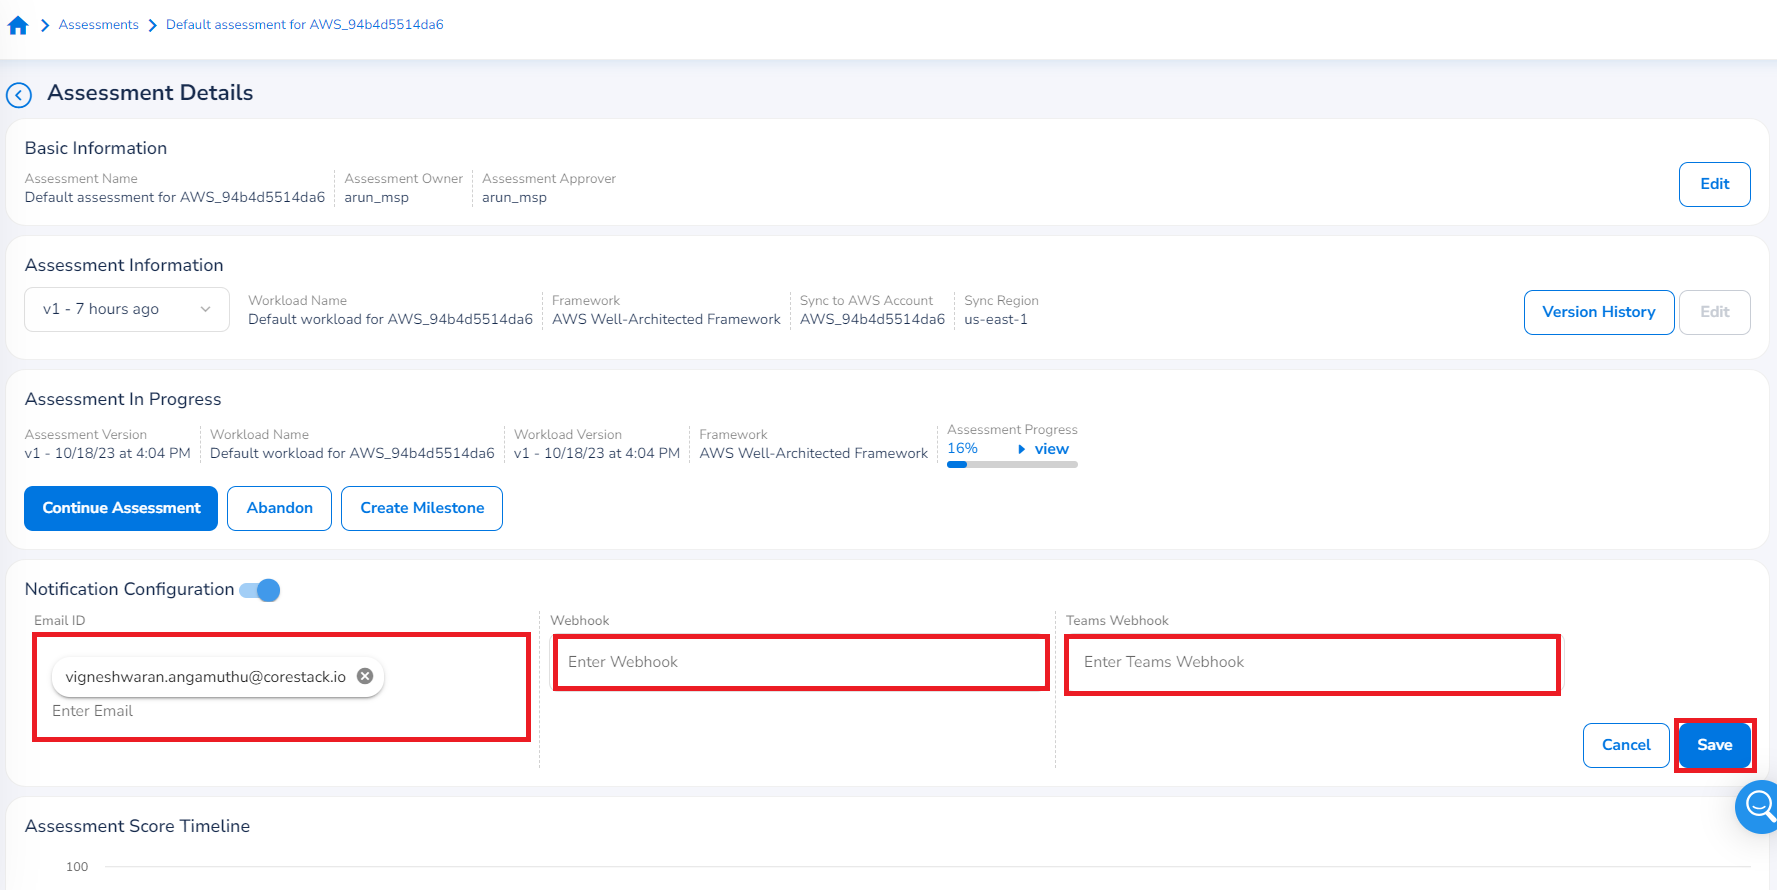
In the Notification Configuration field, click right to move the slider and enable notifications or click left to disable notifications.
-
If the Notification Configuration field is enabled, then fill the following fields:
- In the Email ID box, type the email ID of the assessment owner to whom the notification about the assessment summary needs to be sent. You can enter up to 50 email IDs in this field.
- In the Webhook box, type the webhook links. You can enter up to 20 webhook links in this field.
- In the Teams Webhook box, type the Microsoft Teams webhook links. You can enter up to 20 webhook links in this field.
-
Click Save to save the assessment or click Save & Run to save the assessment and run it.
-

- Click Save to save the assessment or click Save & Run.
- If an assessment listed on the Assessment screen has not yet started, then click Begin Assessment to start the assessment.
Note:
A user can use the Add Filter option to filter details as per the available filtering options. Alternately, the user can also use the Search box to find the required information.
Assessment Notification
After the scan is completed for an assessment, an email notification about the summary of assessment is sent to the assessment owner and any other configured users. The notification is only sent for assessments with a completed scan.
The assessment notification provides information about the assessment that was triggered for a particular workload and also provides the execution details. It includes a pillar-wise count of issues – Verified, High Risk Issues (HRI), Medium Risk Issues (MRI), and Low Risk Issues (LRI). The notifications are sent every 24 hours after the data sync with the source is completed.
Users receive the assessment notification only if notification configuration is enabled for a particular assessment. To enable notification configuration, refer to the steps in Create a new assessment.
The assessment notification configuration can also be done from the Assessment Information screen. Perform the following steps to configure the assessment notification there:
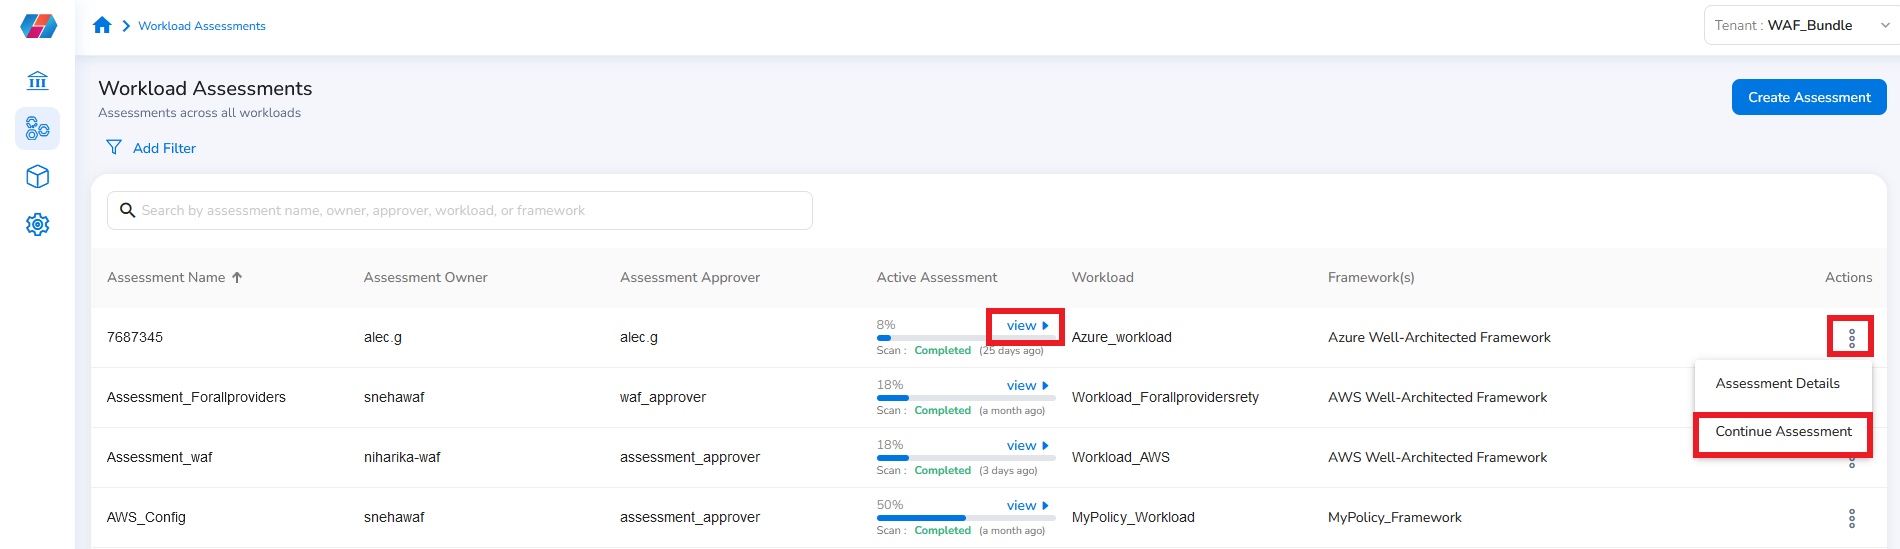
- Navigate to Assessments > Workload Assessments.
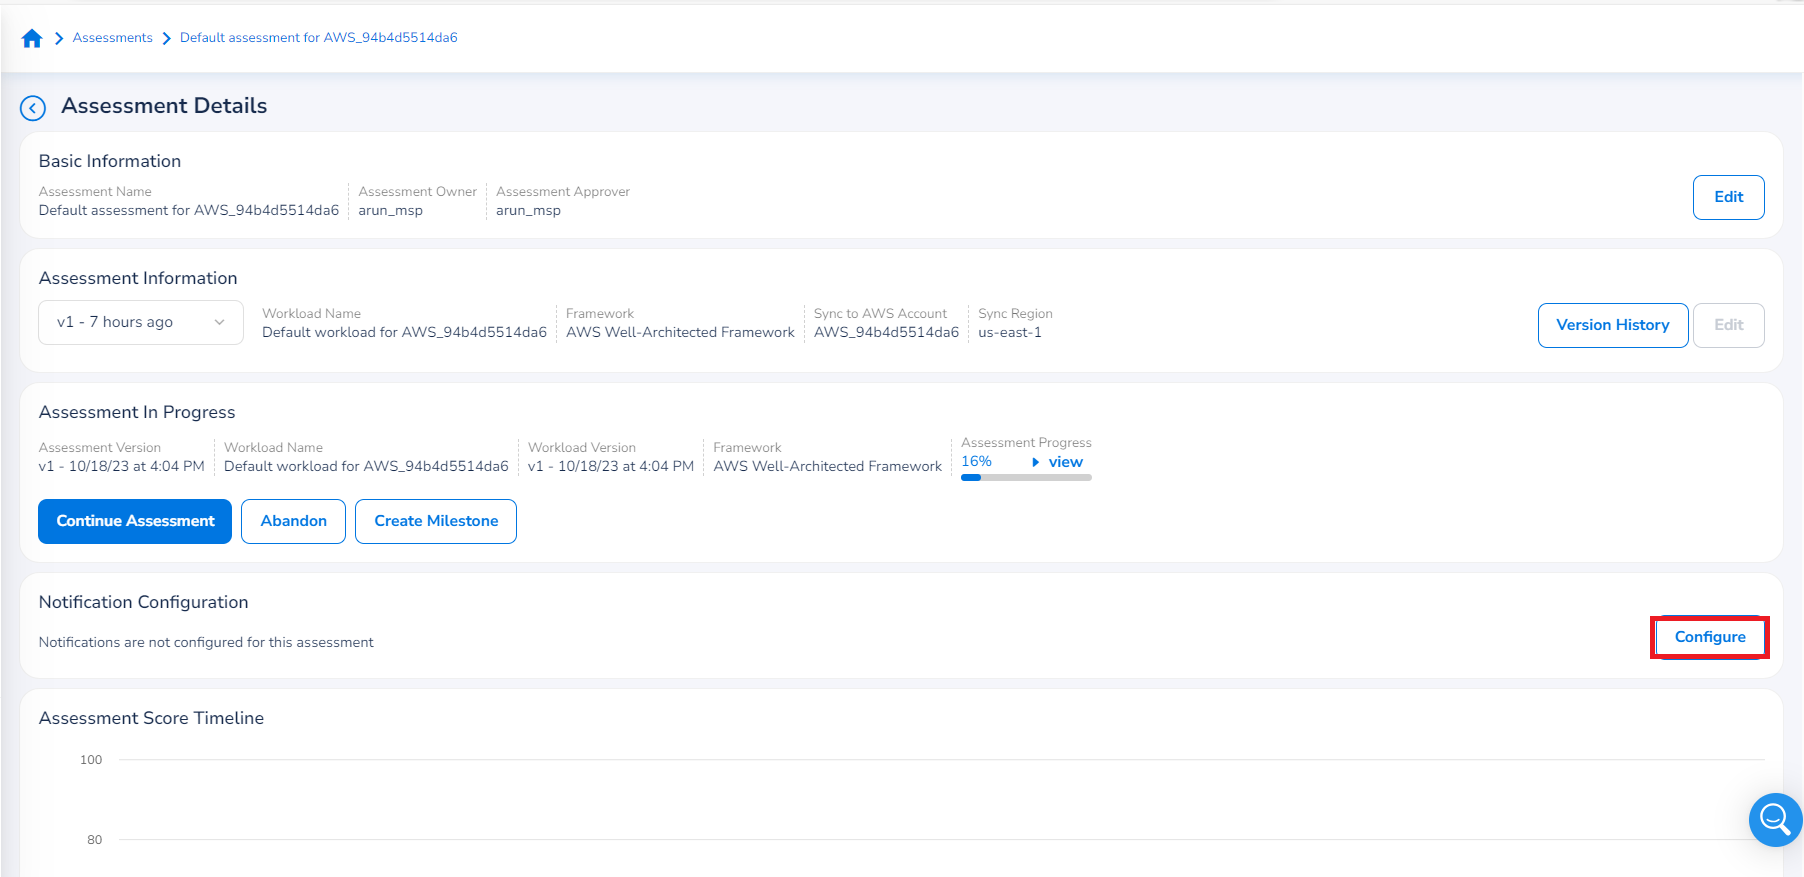
- For a particular assessment, in the Actions column, click Assessment Details. On the Assessment Details screen, you can see the Notification Configuration section.
- In the Notification Configuration section, click Configure.
- In the Email ID box, type the email ID of the assessment owner to whom notifications about the assessment summary need to be sent. You can enter up to 50 email IDs in this field.
- In the Webhook box, type the webhook links. You can enter up to 20 webhook links in this field.
- In the Teams Webhook box, type the Microsoft Teams webhook links. You can enter up to 20 webhook links in this field.
- Click Save.
Note:
If you want to disable the assessment notification at any time, then in the Notification Configuration section, move the slider to the left. The slider will be greyed out to show it is now disabled.
Versioning for assessments
Assessments follow versioning rules. Those rules are as follows:
- Every edit made results in a new version.
- Any previous versions can be edited to create a new version. For example, v1 is the version that was created with a new assessment. When you edit version v1 and make relevant changes, and then save it, the version saved version is v2.
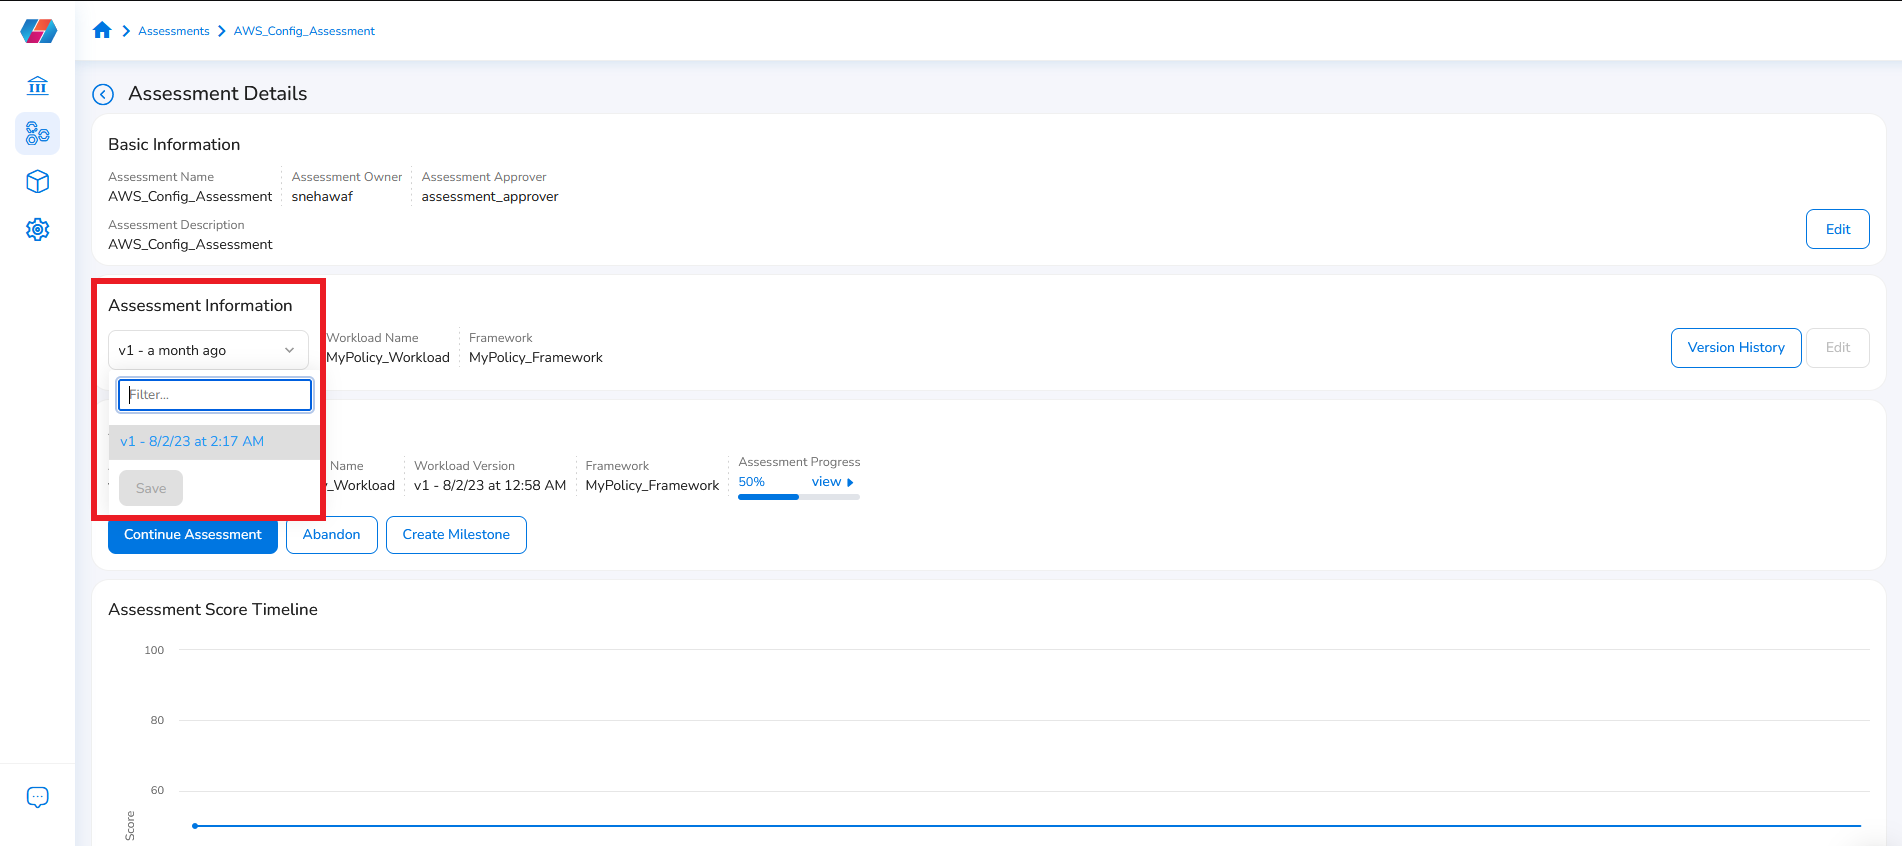
- You can switch between versions of an assessment based on the need.
- A single version will be marked as the release version. This version will be the one visible to other Assessments objects (i.e. workloads, frameworks).
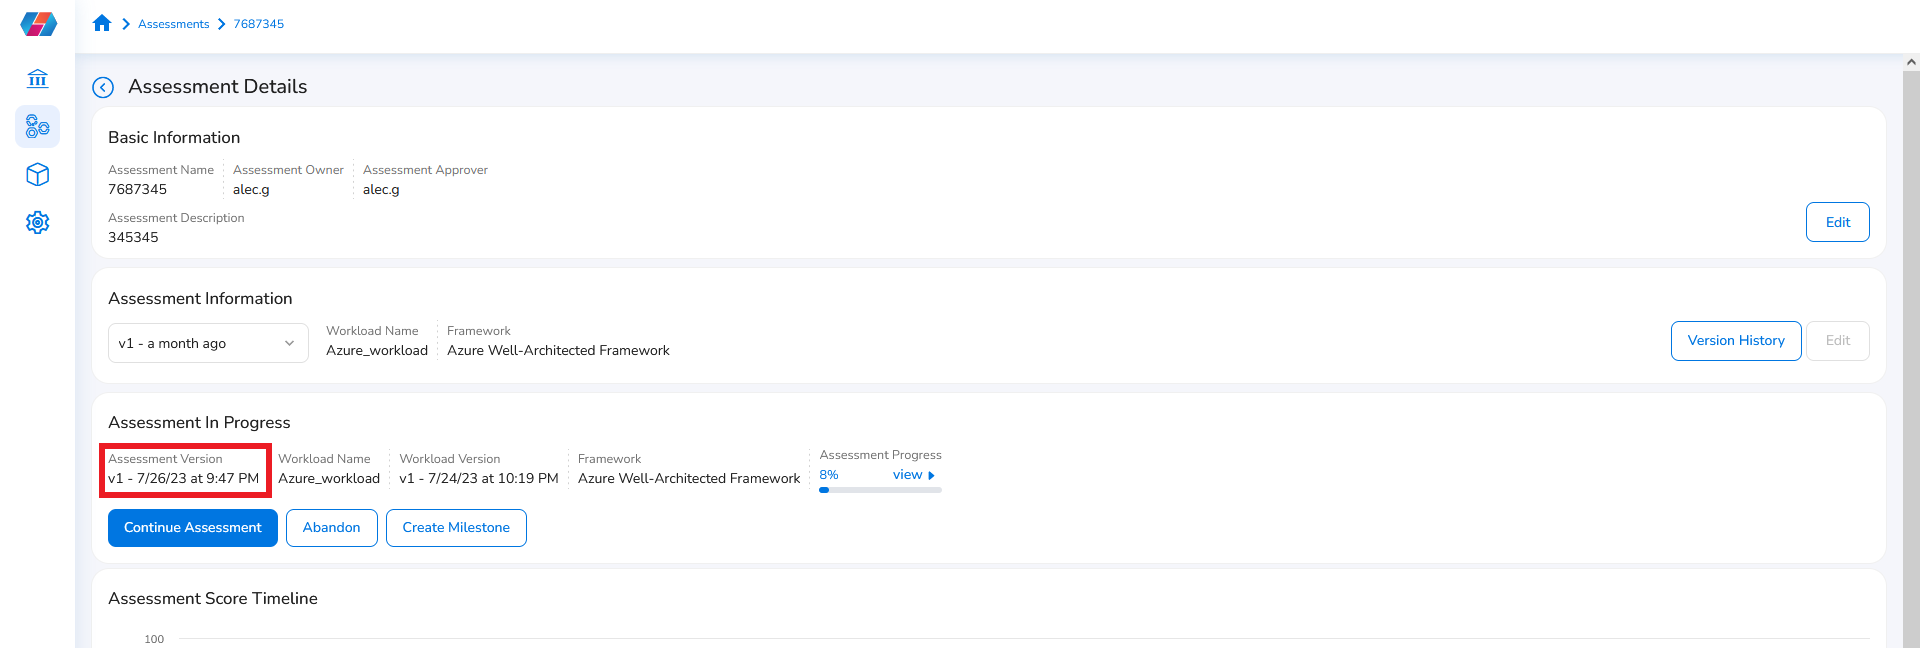
- Version History tab shows the workload and framework details for an assessment. You can also view the current assessment version in the Assessment In Progress section.
Go through your assessment
When you select an assessment to go through its details, or if you want to continue with an existing assessment, then you can go through the details of that assessment and each best practice.
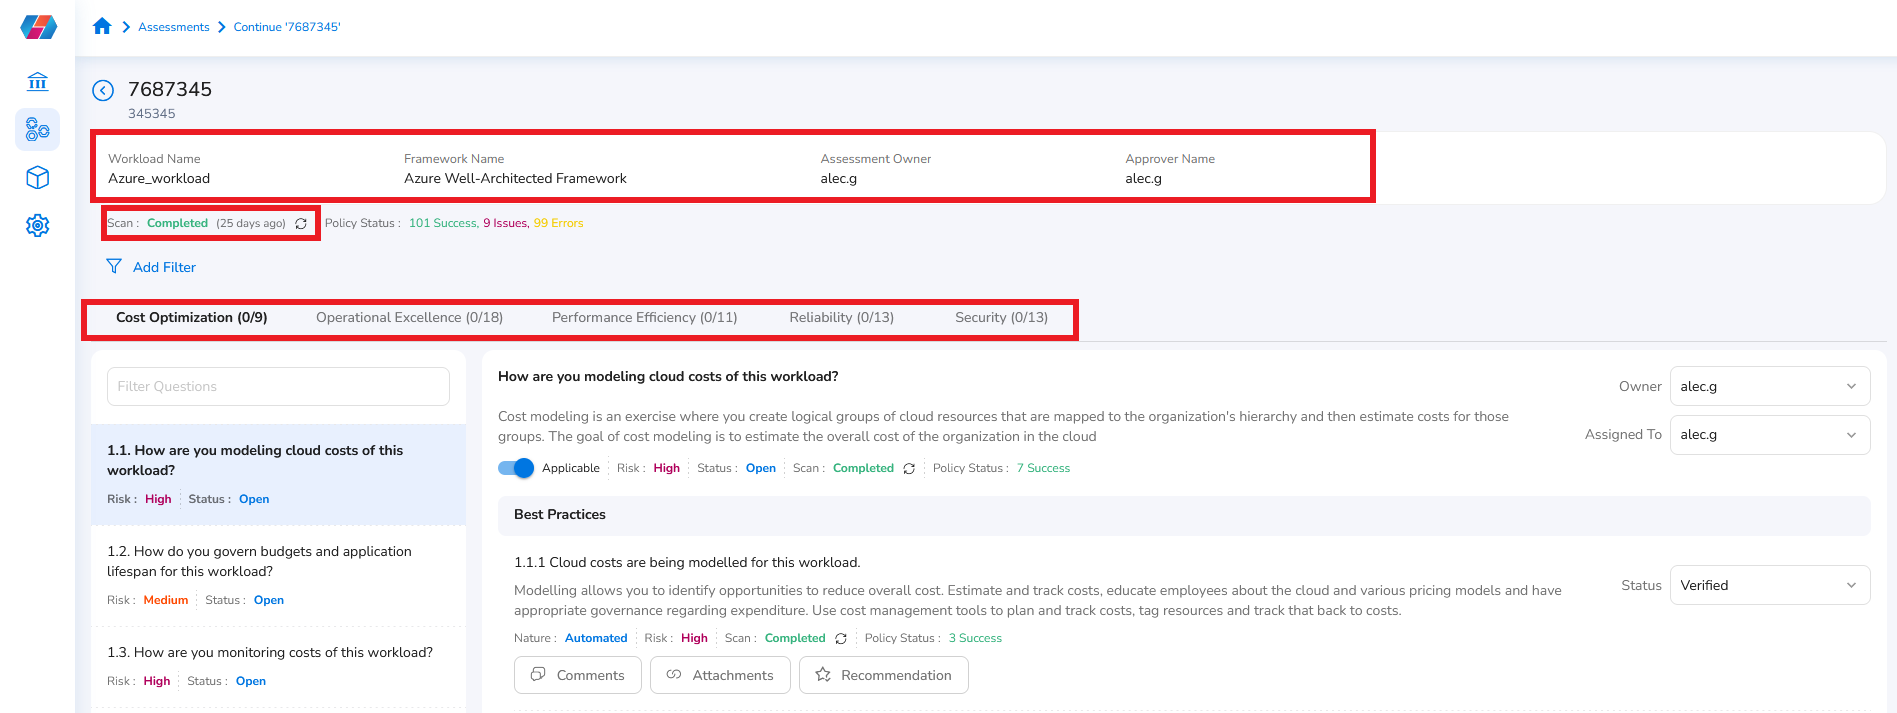
For a particular assessment, you can view the workload it belongs to, the framework it belongs to, assessment owner, and approver name on the top of the screen.
The overall scan status and policy status for an assessment is also displayed on the top of the screen. In addition to policy status, the number of policies executed successfully, with issues, and with errors for that assessment are also shown.
The top-level categories are displayed in horizontal tabs, and you can click any tab (System design, Operational excellence, Security, privacy, and compliance, Reliability, Cost optimization, and Performance optimization) to view the best practices related to it.
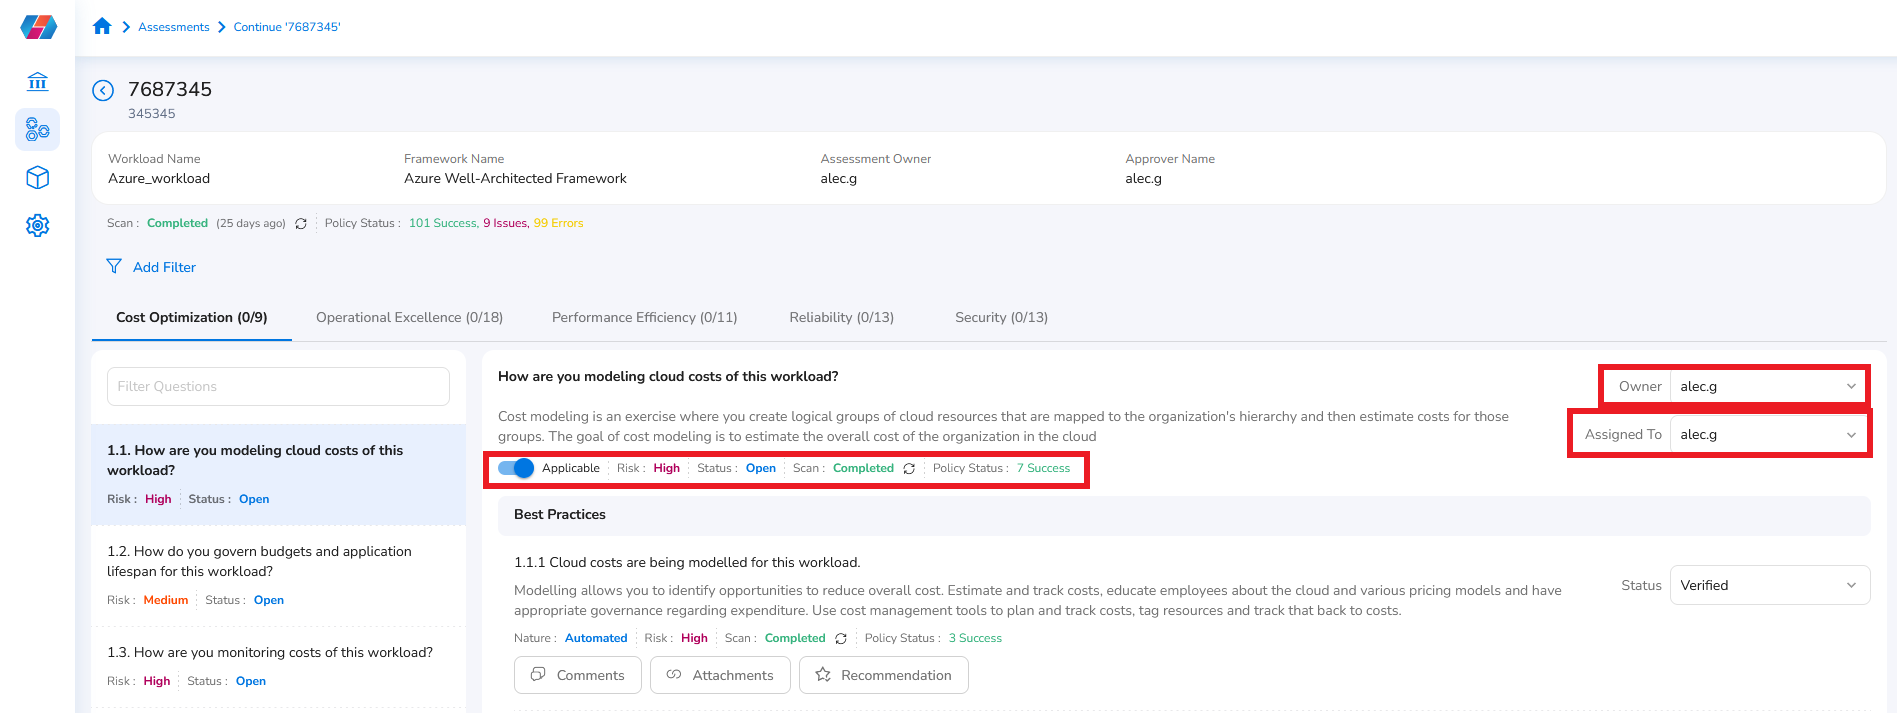
For each question selected on the left pane, you can view the list of associated best practices on the right pane. Each question on the left panel shows the overall risk and status. For a particular question, the right panel also shows the risk, assessment status for the selected question, scan status, policy status, owner name, and user to whom the best practices are assigned.
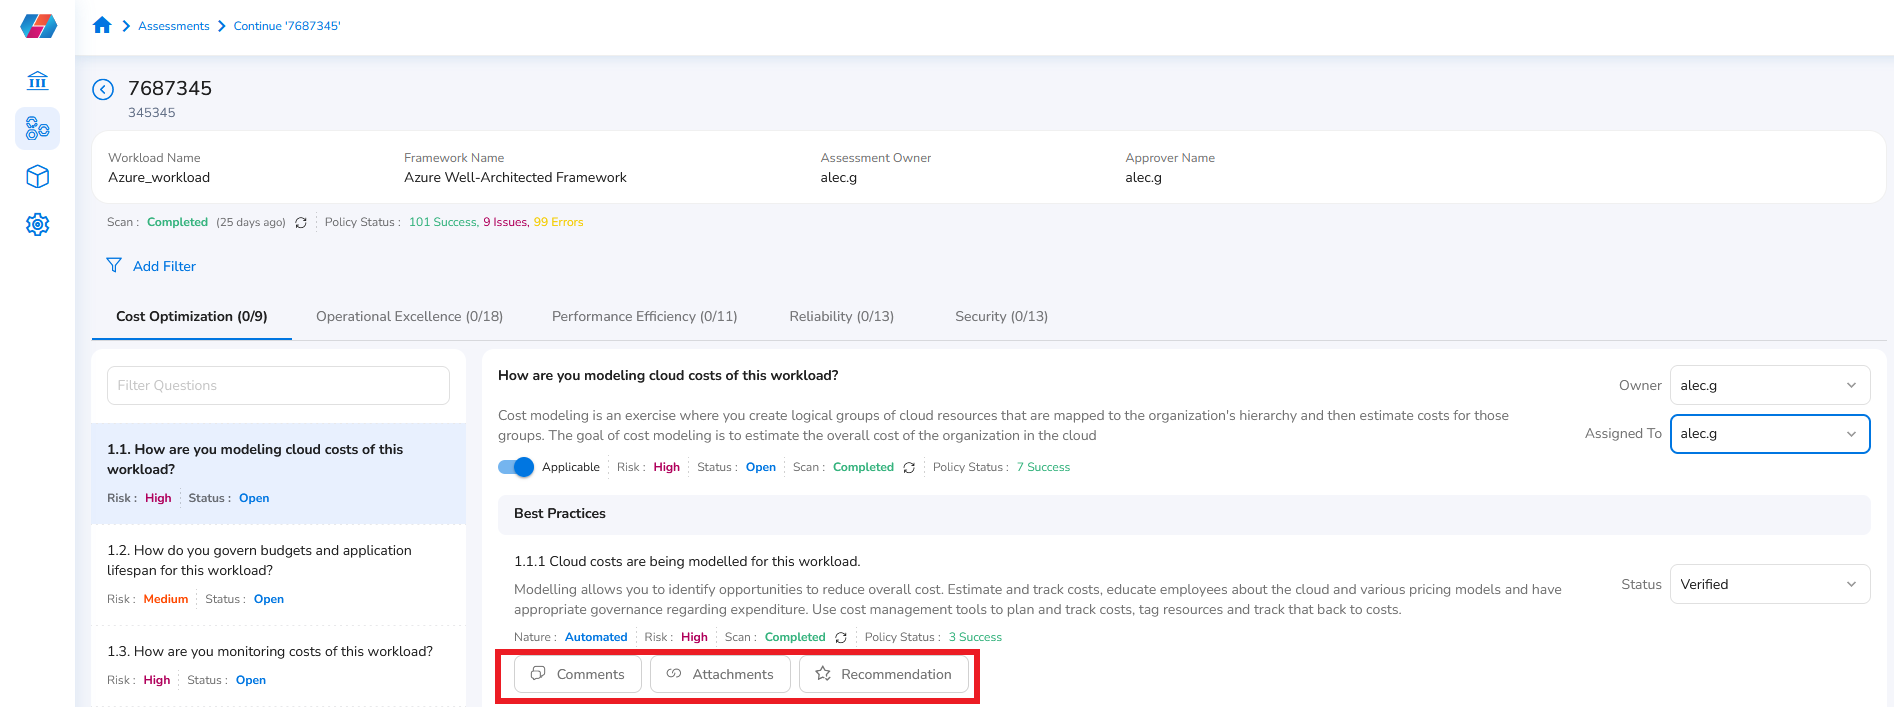
For each best practice, you can view the nature of the best practice, risk associated with it, scan status, policy status, and the status of the best practice. Users can comment on a best practice, add attachments, and view recommendations.
Follow the steps outlined below to complete your assessment:
- Go to Assessments > Workload Assessments > Actions > Continue Assessment.
You can view lists of questions and best practices, along with a view along the top of the page showing the current assessment scan status, policy status, and the information you had entered while creating the assessment in the previous steps (for example, workload name, framework name, assessment owner, approver name, etc.).
The questions and best practices shown here align to the core pillars of the well-architected framework of whichever cloud platform you're using. The pillars for the selected framework in context are displayed in the CoreStack UI as categories along the top banner (e.g. Cost Optimization, Operational Excellence, Performance Efficiency, Reliability, and Security).
The Policy Status field (on the top of the screen) shows the overall status of executed policies related to an assessment. To know more about violations or successes, click Successes or Issues or Errors. You can see the details in a dialog box that pops-up.
The overall Risk, Status, Scan, and Policy Status for a particular question can be seen just above the list of best practices.
The questions can be reviewed and addressed either by an individual architect or by a team of users (for example, Security Ops team), whichever suits your needs best.
Note:
- The Applicable field is enabled by default. This ensures that the selected question is included for the assessment.
- To disable a question from assessment, move the slider to left and in the dialog box that opens, add comments in the Reason comment box, and click Save.
- If a question is disabled, then it will not be used for that assessment, however, a user can come back and enable it anytime.
- To navigate between questions, select one question from the left-side menu shown as a numbered list.
- Below each question are two status tags: the first indicating the risk associated (Low/Medium/High), and the second indicating whether the status of workload (Open/Verified/Not applicable/Verified With Exception).
- After you have selected a question, you should see an expanded list of best practices arranged in rows at the right side of the screen.
- Each question has an Owner and Assign To field shown alongside it. By default, the assessment owner is selected as the Owner and assignee for all best practices and questions.
- Users assigned as the Owner are responsible for marking the question as resolved once it is completed.
- Users assigned in the Assign To field are responsible for actually performing the actions needed to verify the best practice is being met.
- Since some organizations might have separate teams or specialists who are best equipped to handle certain questions, this makes it easy to delegate questions to the relevant stakeholders inside your organization.
-
To assign a specific question an owner, click the Owner list and select a user.
-
To assign a specific question to a team or individual, in the Assign To list, select one or multiple users and click Ok.
-
Update the Status, Comments, Recommendation, and Attachments fields for each best practice.
Each best practice has a short description about what it is about.- If the Nature of best practice is Automated, that means CoreStack is able to validate it automatically. It will show "In progress" or highlight any issues once the scan is complete.
- If the Nature of the best practice is Manual below a best practice item, that means a user needs to manually check and/or confirm that a particular best practice is being met (click the Recommendation field beside it for next step guidance).
- The Risk level for a particular best practice can be High/Medium/Low. The risk associated with every best practice is shown below it.
- To add a comment, click Comments, type in your comment in the text box, and then click Post Comment to submit it. Click the X icon on the top right corner of the dialog box to close it. When you click Comments, the comments posted earlier are shown below.
- To add files, click Attachments > Add Attachment > Select File > select the attachment > Upload. Once finished, click the X icon on the top right corner of the dialog box to close it. Attachments added by you are listed in the Attachments section.
- To add custom recommendation for a best practice from this assessment, click Recommendation > Edit > type your recommendation > Save. Click the X icon on the top right corner of the dialog box to close it.
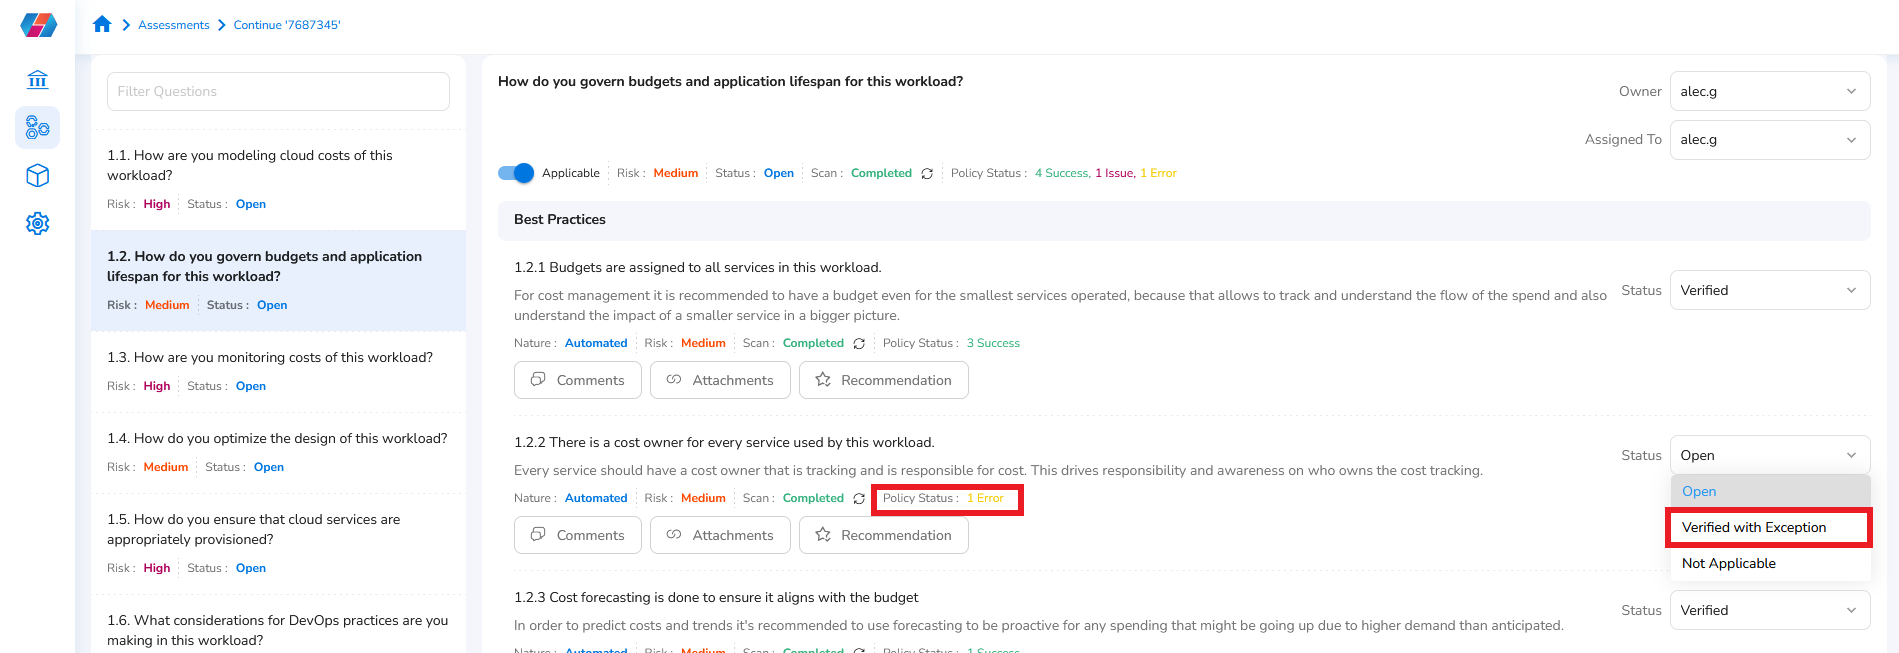
- To address or review a best practice item, in the Status list, select Open/Verified/Not Applicable. You can even add comments, attachments, and recommendations as explained in above steps.
- If there is a policy violation found for a particular automated best practice, then the user can click the red/yellow text that says Issue/Error and view the details about the policy that has been violated.
- If the user wants to ignore the violation, then in the Status list, they can click Verified with Exception.
All best practices must be marked as "resolved" or "not applicable" before marking the question as resolved.
By following this process and completing questions in the assessment, you will get a comprehensive view of the current states of your workloads and can share the findings easily with other important members of your organization. And by organizing this information in one place, you can get the insights needed to start optimizing your cloud workloads according to best practices.
Review your assessment results
At any point, you can check the overall summary of your assessment, which provides an intuitive dashboard view of how many best practices you've completed, where any issues are detected, and how severe those issues are.
The Assessment Summary view shows a scorecard spectrum view at the bottom of the screen indicating how well your workload is meeting best practices based on the questions that have been addressed. It also shows smaller, individual scorecards below indicating scores across each of the core pillars of the well-architected framework.
- A lower score (red color) means it is critical that you take the actions necessary to resolve any issues to meet best practices.
- A higher score (green color) means you are meeting most if not all best practices, and have a well-postured workload.
CoreStack Assessment score calculation
Here are more details about how CoreStack calculates its assessment scores:
RiskThe risk for each question is determined based on their underlying best practices' risk and their open status. Only best practices with the open status are considered when calculating a question's risk.
If a question has all its best practices resolved, then the risk for that question will be 'None'. However if a question contains at least one best practice with a High, Medium, or Low severity/risk in an Open state, then the question's risk will also be set to High, Medium, or Low, respectively, based on that.
Score Calculation for AssessmentsScore:
Count of resolved best practices / Count of applicable best practicesProgress Status:
(Count of resolved best practices + Count of best practices that are not applicable) / Total best practicesThe same scoring is used for calculating the pillar score and/or assessment score. In both cases, all the questions within the pillar or the assessment will be considered.
Follow the steps outlined below to review your assessment outcomes:
- In the CoreStack application, click Assessments > Workload Assessments > View (under Active Assessment column) corresponding to an assessment you would like to review.
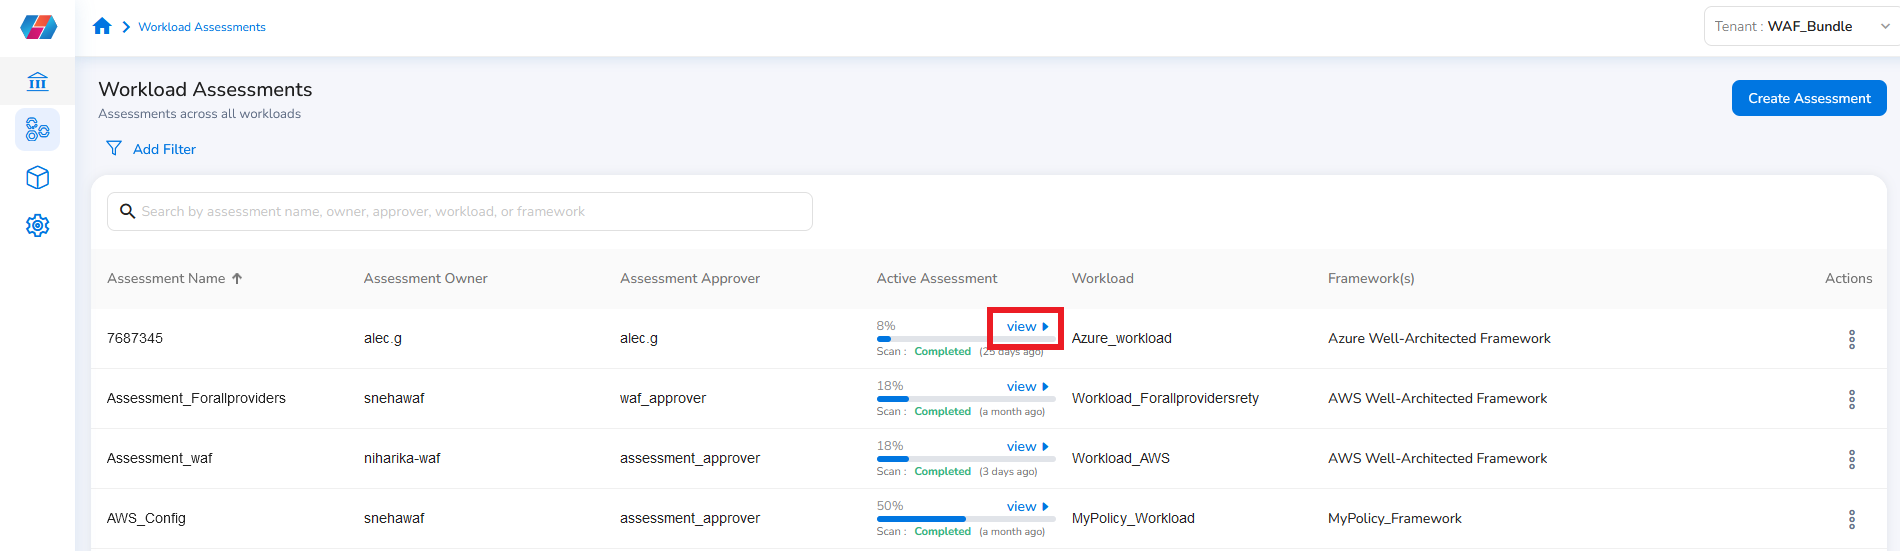
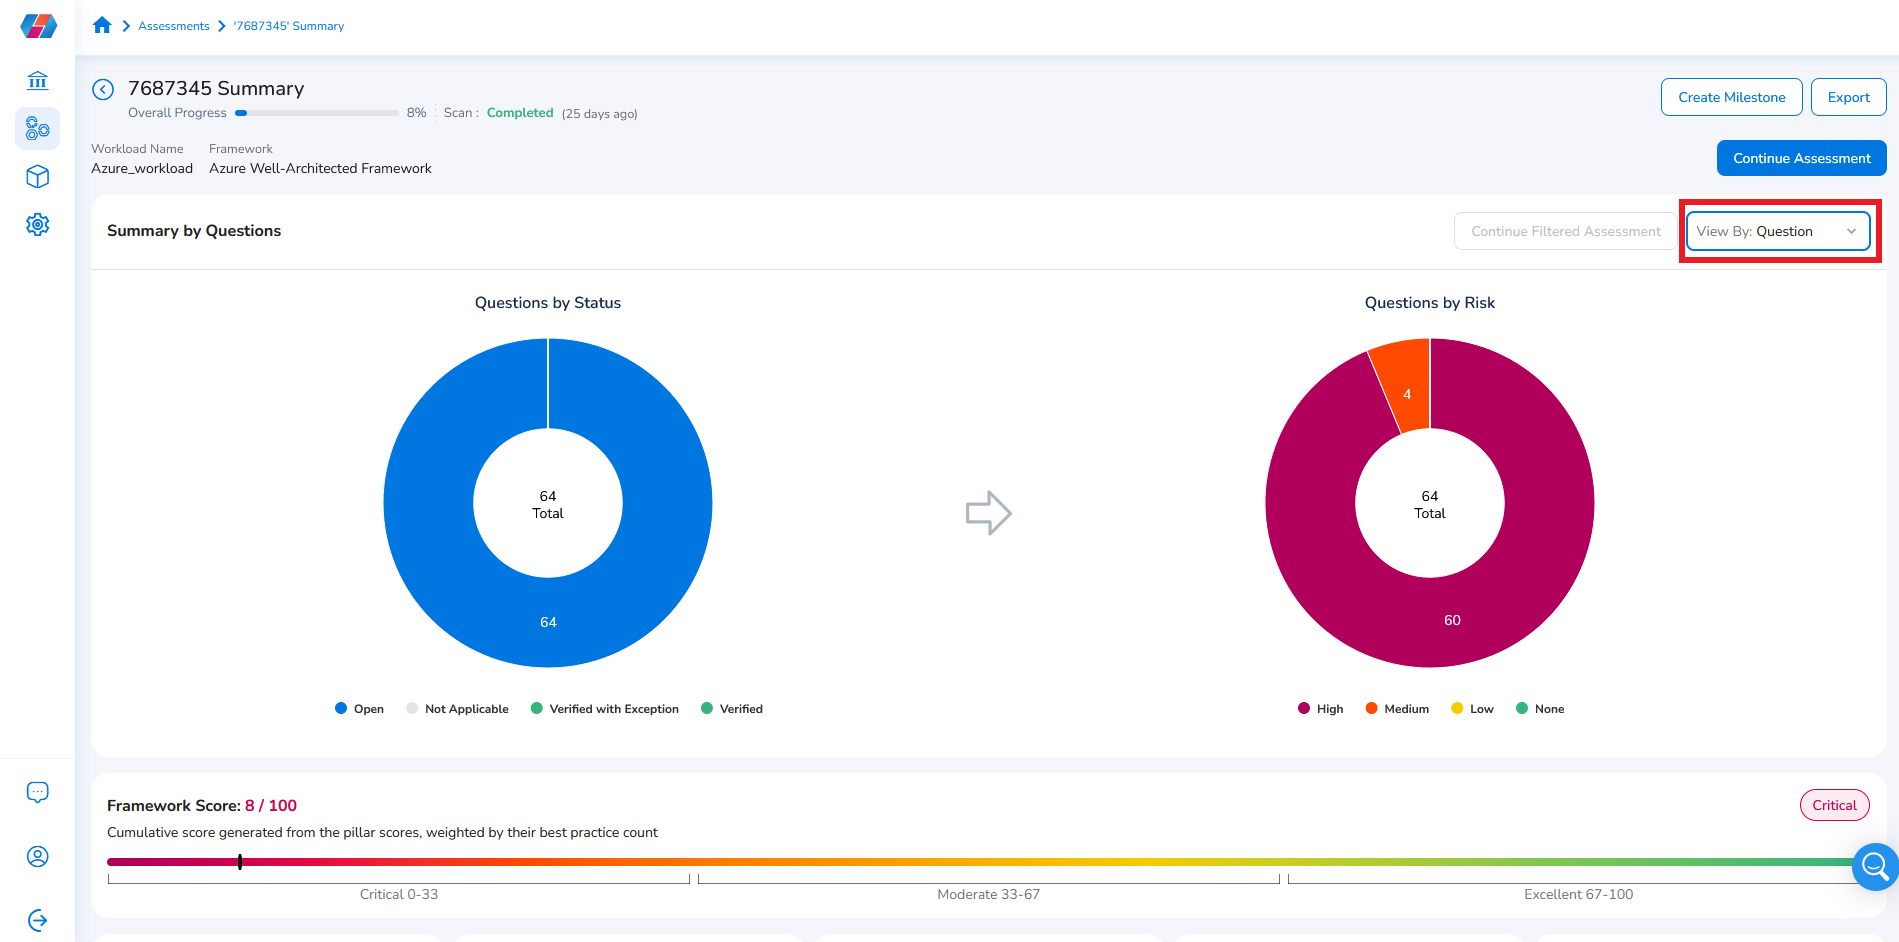
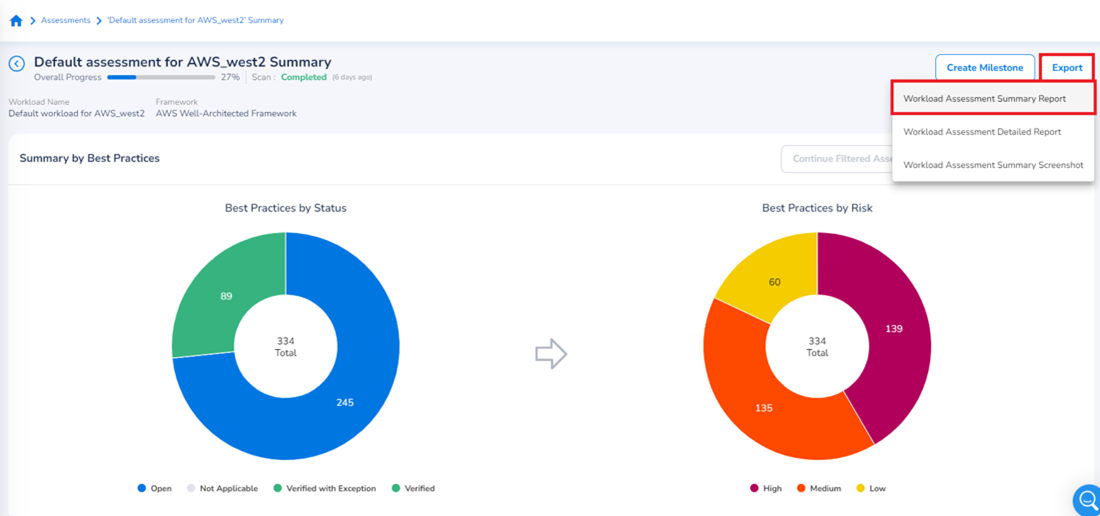
On the Assessment Summary screen, you can see doughnut charts and at the bottom of the screen, you can see the framework score along with category-wise scores of best practices. You can see the number of issues and improvement recommendations as well.
- Hover the mouse pointer anywhere on the doughnut graphs to view the count of best practices as per risk or status. Risk can be Low/High/Medium and status can be Not Applicable/Open/Verified.

- To view the best practices as per the questions, in the View By list, select Questions.
- The Best Practice option is selected by default.
- Scroll to the bottom of the screen to view the count of best practices.
-
To continue with your assessment on the assessment page, click Continue Assessment.
-
To export assessment results, select Export in the top-right corner of the dashboard view, then select PDF or JPEG to download the information in either file format.
The PDF export generates the assessment report in PDF format and the JPEG export generates an assessment summary image. This allows you to share information like overall status, policy alignment, issue resolution suggestions, and more with other stakeholders.
Other actions on the Results page:
- Click Create Milestone to create a new milestone. The steps to create a milestone are explained more in the next section below.
- Click either Abandon to discard the selected assessment, or click Approve to approve the selected assessment.
- Click Continue Filtered Assessment to get a filtered view of graphs.
Create a milestone
A milestone is a snapshot of workload assessment in the state it's in at that particular point in time.
Milestones can be created anytime after an assessment has started, and milestones will also be automatically created at the time of an assessment's approval.
Follow the steps outlined below to create a milestone for an assessment:
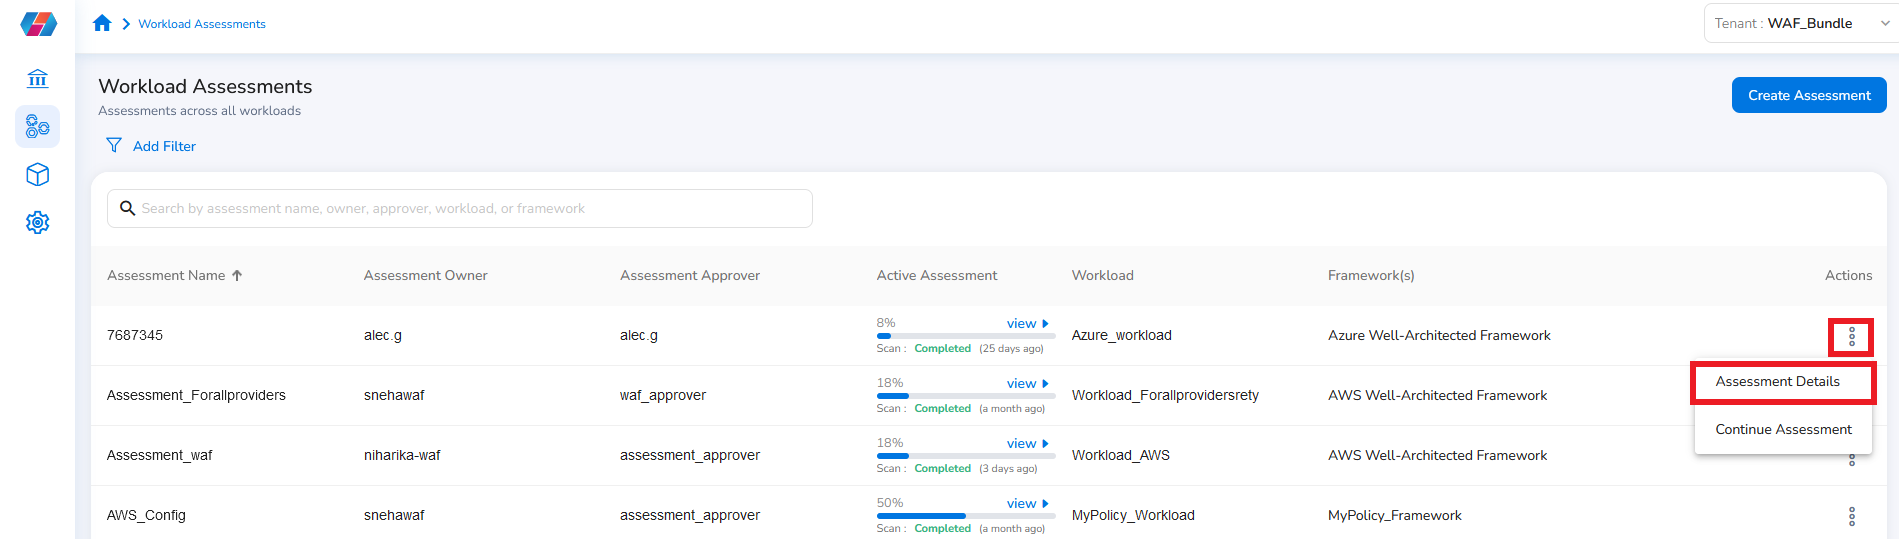
- To create a milestone for a particular assessment, click Assessments > Workload Assessments > Actions > Assessment Details. All the assessment details are displayed.
- Alternatively, to create a milestone, click Assessments > Workload Assessments > View (under Active Assessment column) corresponding to an assessment. The Assessment Summary screen appears.
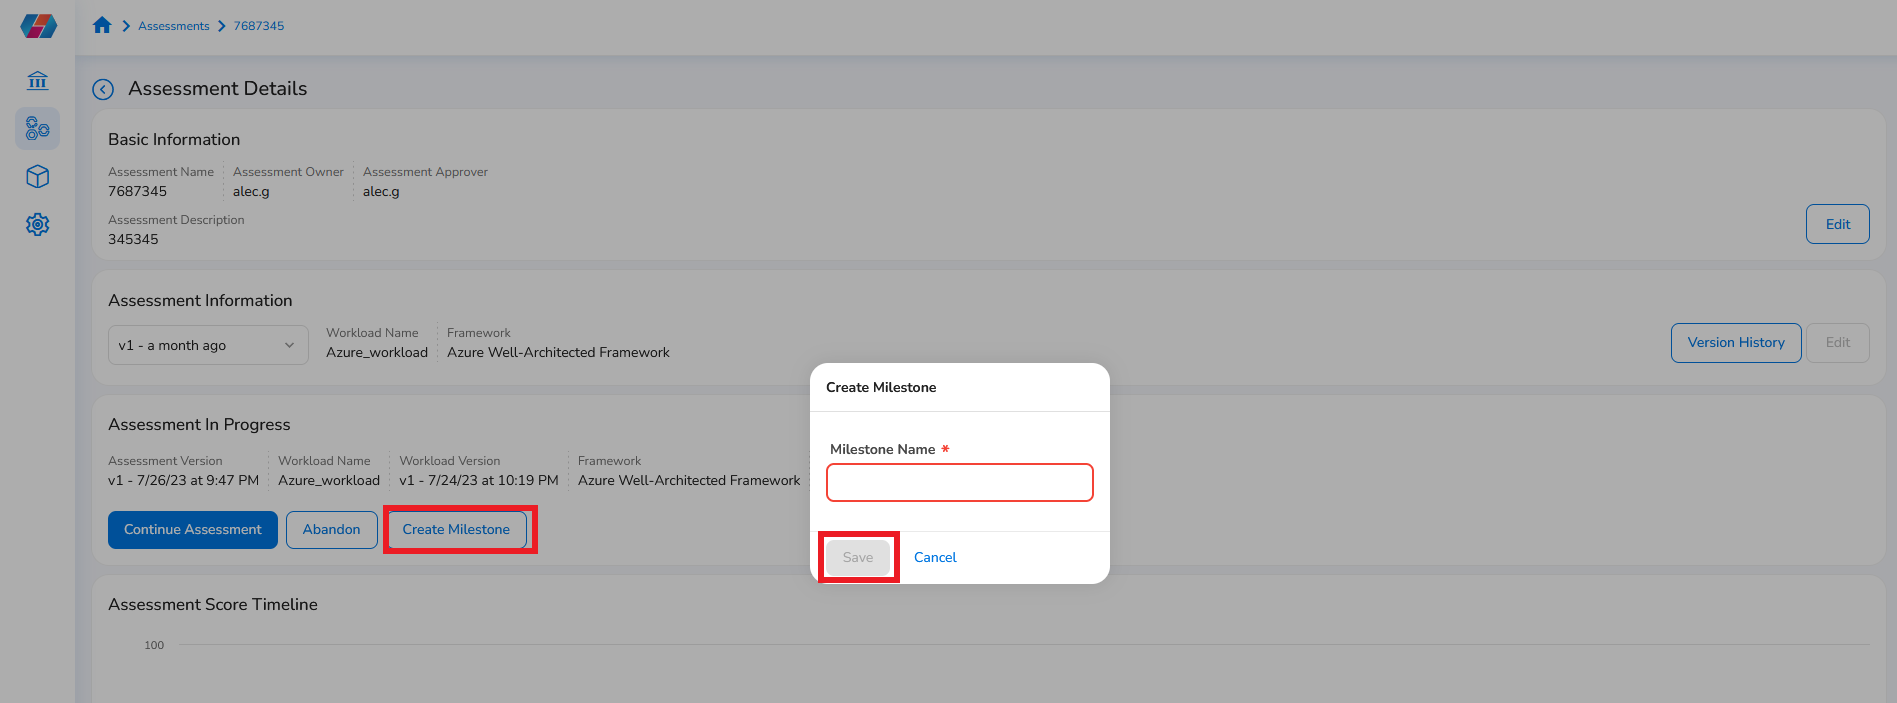
- Click Create Milestone.
- In the Milestone Name box, type the name of the milestone and then click Save.
The Milestone Summary section at the bottom of the screen shows the milestone details.
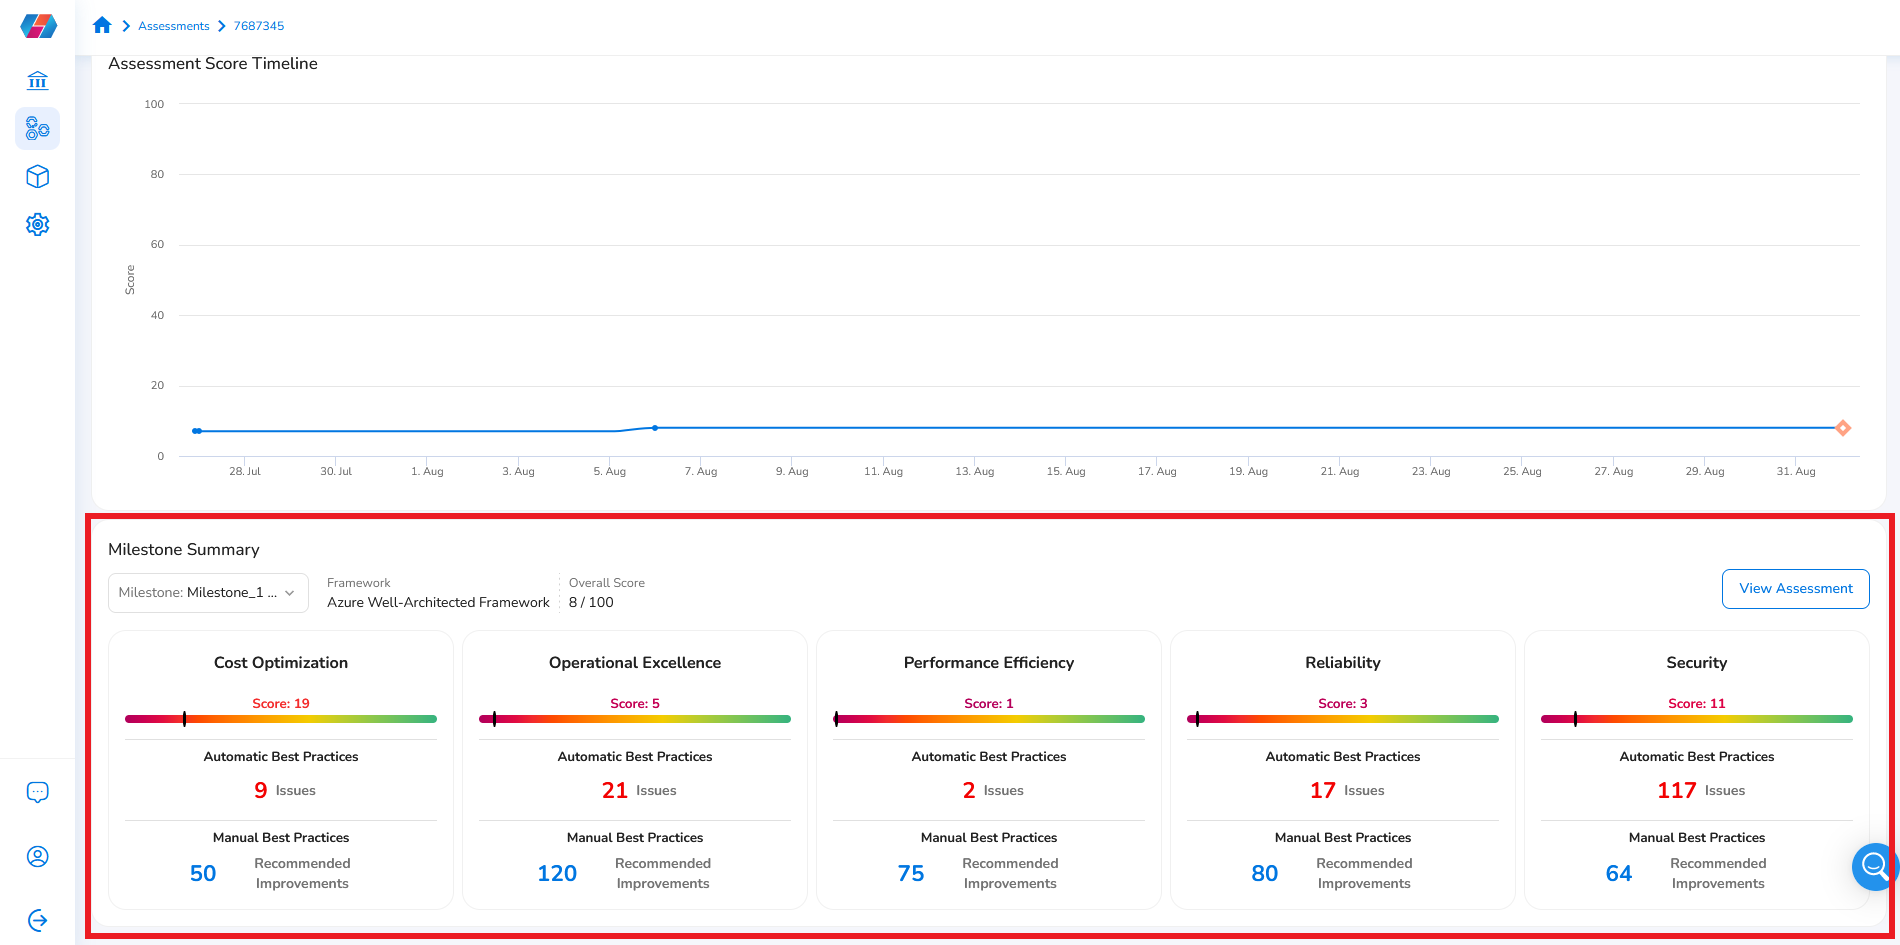
After the milestones are run completely, the scores shows up. The scores depends on the best practices that are followed. Each pillar has scores which are aggregated to arrive at the overall score.
- Automatic Best Practices: These best practices have CoreStack policies associated with them. Some of the issues that are brought up after the milestones are run can be set to be remediated automatically and some can be remediated manually.
- Manual Best Practices: These best practices don’t have policies associated with them.
Other actions available on the "Assessment Details" screen:
- Click Continue Assessment to go to the assessment screen (with the list of questions and best practices) of the selected assessment and continue the assessment process.
- Click Abandon to stop running the assessment.
- To make changes in the assessment's basic information, click Edit in the Basic Information section, make any changes, then click Save.
- To modify the workload or frameworks details, click Edit in the Assessment Information section, select the relevant options in the dialog box, then click Save.
- In the Assessment Information section, click Version History to view the version details.
- The Assessment In Progress section shows the selected version of assessment, workload name and version, framework name, and a progress bar with assessment completion percentage.
- In the Assessment Progress field, click View to view the Assessment Summary.
- Assessment Score Timeline: This graph shows assessment score for a particular date.
As mentioned previously, assessments aren't one-time processes. They can be run continuously at different periods, which is why saving milestones is useful. It gives you a historical understanding of the state of your workloads over time.
Submit and approve an assessment
Once any items are completed, the user(s) assigned the "Assessment Owner" role can submit them for approval. The user assigned the "Approver" role can then review the assessment and mark things as approved.
Follow the steps explained below to approve an assessment:
- When the user with Approver role logs in to CoreStack to review a particular assessment, under the Active Assessment column, they must click view.
- Click Approve or Abandon to approve or reject an assessment.
- If rejected, then the assessment Owner is notified by email to edit the assessment and re-submit for approval.
- If approved, then the assessment Owner should see a new Create Milestone button on the assessment summary page. Click this to create a milestone (explained above).
Workload Assessment Summary Report
The Workload Assessment Summary Report provides a high-level overview and perspective based on the latest scan of a workload assessment.
The assessment summary report shows the assessment name, description, framework name, workload date, and report date on the first page.
The various sections within a Workload Assessment Summary Report are explained in the sections below.
Generating the Workload Assessment Summary Report
Perform the following steps to generate the Workload Assessment Summary Report:
- In the CoreStack application, go to Assessments > Workload Assessments.
- Browse to a particular assessment, then in the Active Assessment column click view.
- Click Export > Workload Assessment Summary Report.
The Workload Assessment Summary Report can now be downloaded and viewed.
Key Report Sections
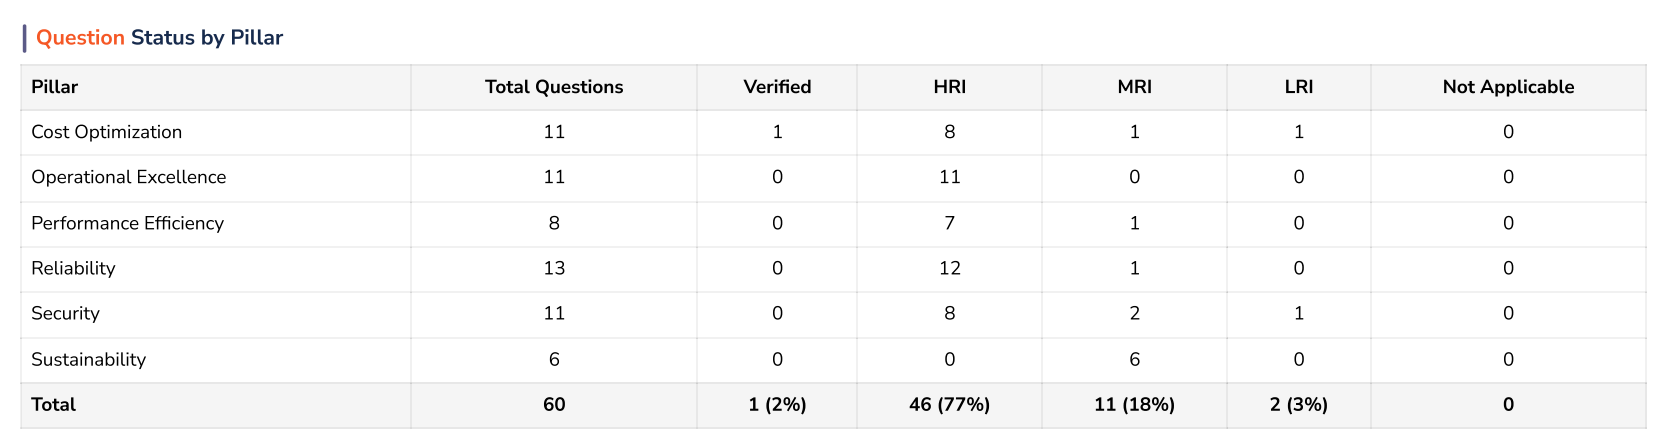
Question Status by Pillar
This section shows the count of questions in various status as per pillars. You can also see the total question count and total count as per different statuses.
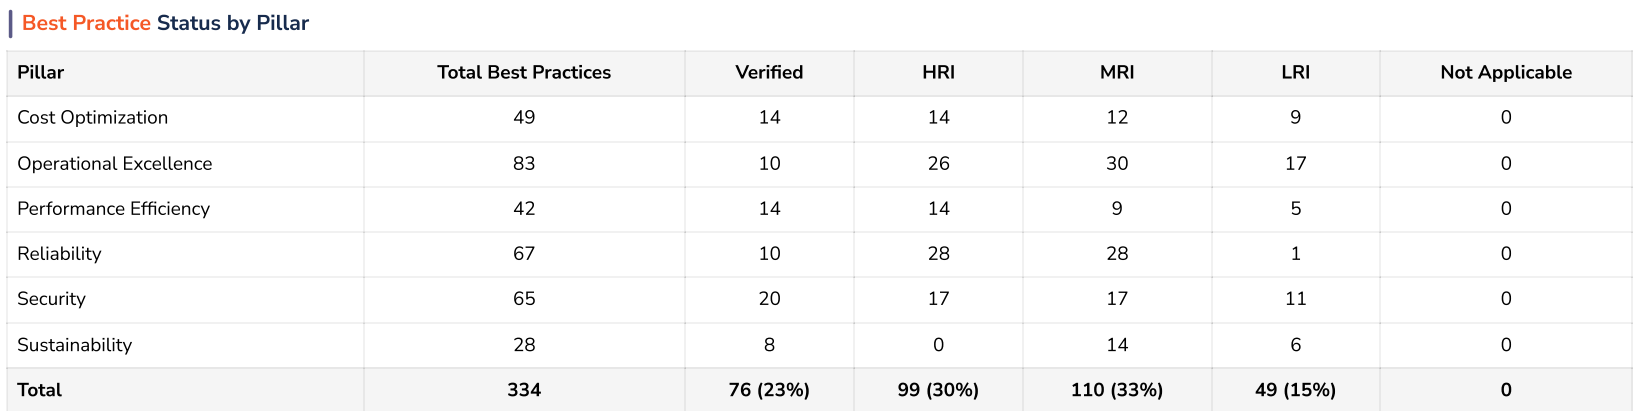
Best Practice Status by Pillar
This section shows the count of best practices in various states as per different pillars. You can also see the total best practice count and count as per different statuses.
Number of Questions that must be addressed to reach 45%, 75%, and 100% coverage across severities
This section shows the count of questions that must be addressed to reach 45%, 75%, and 100% coverage, * respectively.
*Coverage can be used interchangeably with the term verified. They mean the same.
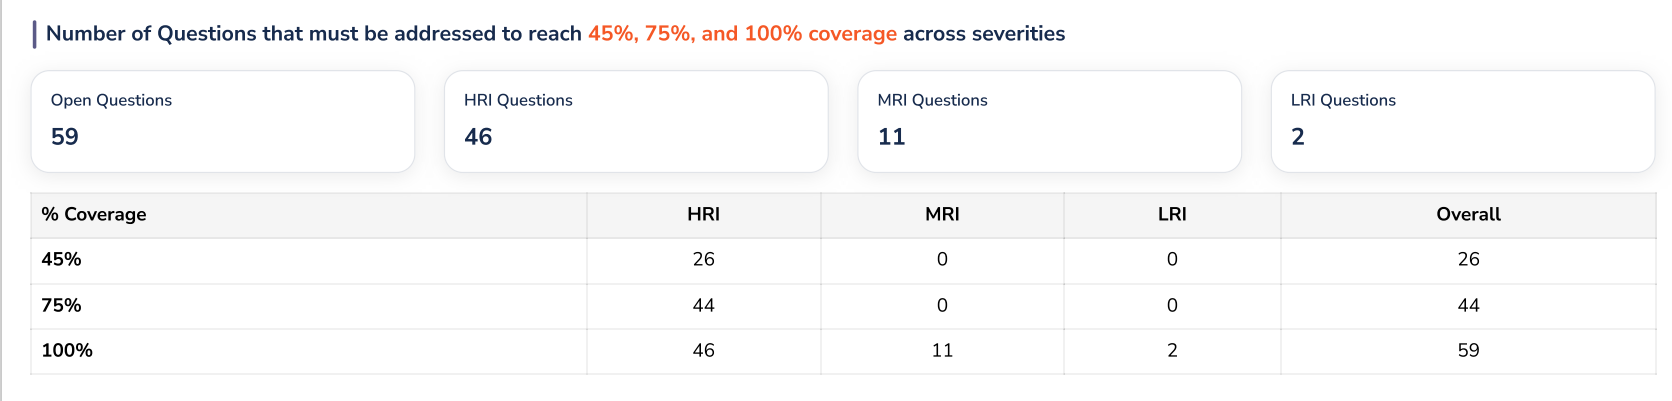
You can better understand this table with the help of an example. There are four tiles we can see on the top of the table: Open Questions, HRI Questions, MRI Questions, and LRI Questions.
- To meet the question coverage of 45%, the user must address overall 26 questions (26 HRIs + 0 MRIs + 0 LRIs).
- To meet the coverage of 75%, the user must address overall 44 questions (44 HRIs + 0 MRIs + 0 LRIs).
- And to meet the coverage of 100%, the user must address overall 59 questions (46 HRIs + 11 MRIs + 2 LRIs).
The order in which questions need to be addressed are HRIs > MRIs > LRIs. This implies that HRIs have the highest priority, followed by MRIs and then LRIs.
For 75% coverage, refer to the calculation shown below.
Total count of questions: 60 (you can refer to this in the Question Status by Pillar section of the report)
Open questions: 59
Step 1 – Total number of questions to be addressed for 75% coverage is total count of questions*75% -- 60*(75/100) = 45
Step2 – Count of questions already covered is the difference of total count of questions and open questions -- 60 - 59 = 1
Step 3 – Number of questions yet to be addressed for 75% coverage is difference of values from step 1 and step 2 -- 45 - 1 = 44
The number of questions yet to be addressed for a particular coverage is the sum of HRI, MRI, and LRI. In the above example, the total questions to be addressed are 44 HRIs + 0 MRIs + 0 LRIs = 44.
The calculation for 45% and 100% is similar to the 75% calculation explained above.
Number of Best Practices that must be addressed to reach 45%, 75%, and 100% coverage across severities
This section shows the count of best practices across HRI, MRI, and LRI that must be addressed to reach 45%, 75%, and 100% coverage*.
*Coverage can be used interchangeably with the term verified. They mean the same.
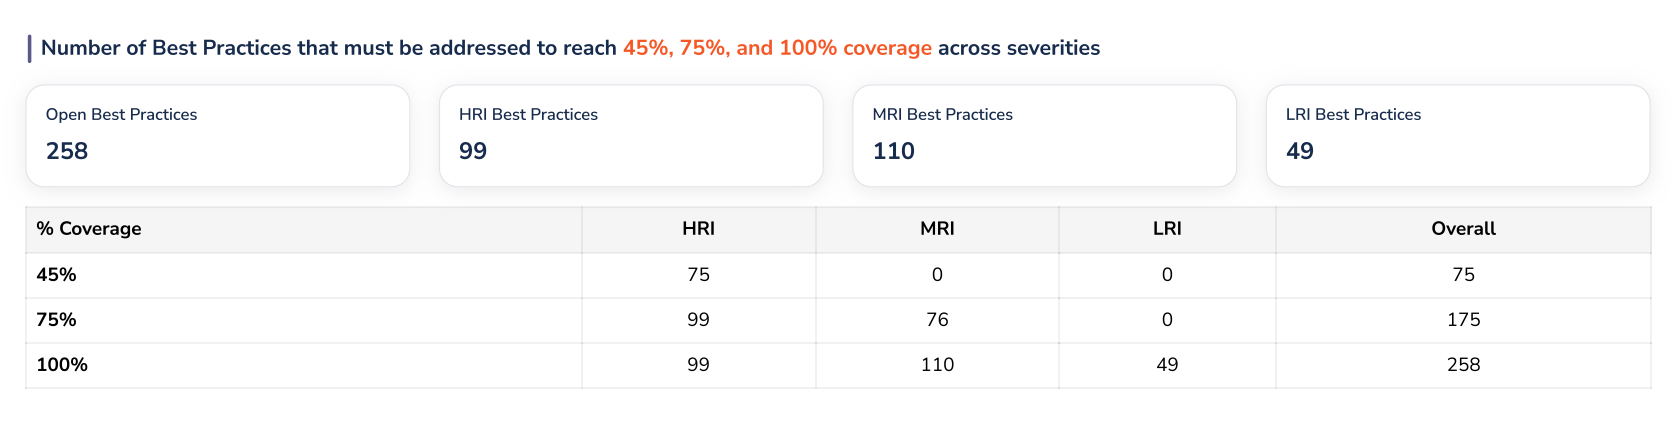
Let us understand this table with the help of an example. There are four tiles we can see on the top of the table: Open Best Practices, HRI Best Practices, MRI Best Practices, and LRI Best Practices.
- To meet the best practice coverage of 45%, the user must address overall 75 best practices (75 HRIs + 0 MRIs + 0 LRIs).
- To meet the coverage of 75%, the user must address overall 175 best practices (99 HRIs + 76 MRIs + 0 LRIs).
- And to meet the coverage of 100%, the user must address overall 258 best practices (99 HRIs + 110 MRIs + 49 LRIs).
The order in which best practices need to be addressed are HRIs > MRIs > LRIs. This implies that HRIs have the highest priority, followed by MRIs and then LRIs.
For 75% coverage, refer to the calculation shown below.
Total count of best practices: 334 (refer to the Best Practice Status by Pillar section of the report to know this number)
Open best practices: 258
Step 1 – Total number of best practices to be addressed for 75% coverage is total count of best practices*75% -- 334*(75/100) = 251
Step 2 – Count of best practices already covered is the difference of total count of best practices and open best practices -- 334-258 = 76
Step 3 – Number of best practices yet to be addressed for 75% coverage is difference of values from step 1 and step 2 -- 251-76 = 175
Number of best practices yet to be addressed for a particular coverage is sum of HRI, MRI, and LRI. In above example, total best practices to be addressed are 99 HRIs + 76 MRIs + 0 LRIs = 175.
The calculation for 45% and 100% is similar to the 75% calculation explained above.
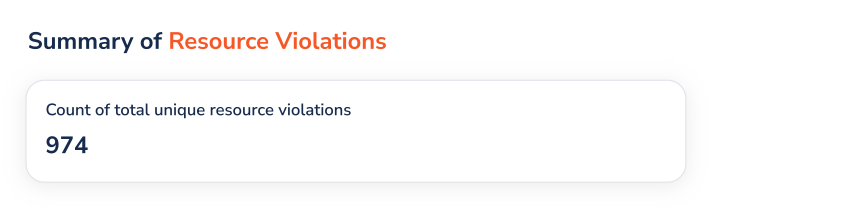
Summary of Resource Violations
This section shows the total count of resource violations.
Top Region by Resource Violation Count
This section shows the datacenter region (and associated cloud provider) with the highest number of resource violations.

Top Cloud Account by Resource Violation Count
This section shows the cloud account (and associated cloud provider) with the highest number of resource violations.

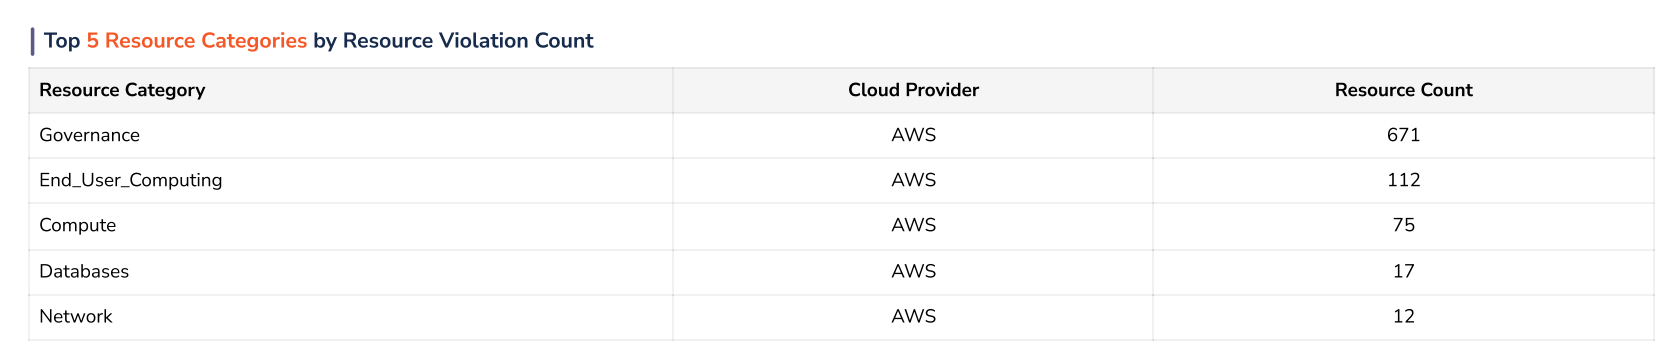
Top 5 Resource Categories by Resource Violation Count
This section shows the top five cloud resource categories (and associated cloud providers) by their respective resource violation counts.
Top 5 Resources that are violating across the most Best Practices
This section shows the top five cloud resources with violations across all the available policies. Counts of the associated questions and best practices are also shown.

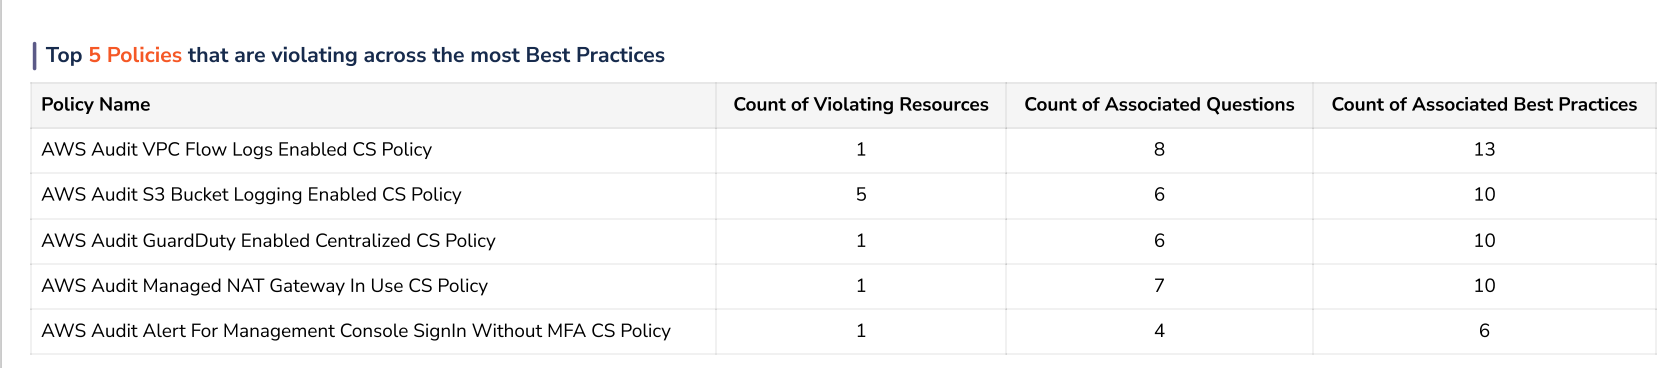
Top 5 Policies that are violating across the most Best Practices
This section shows the top five policies that have the most violations across all the available best practices. Counts of the associated questions and best practices are also shown.
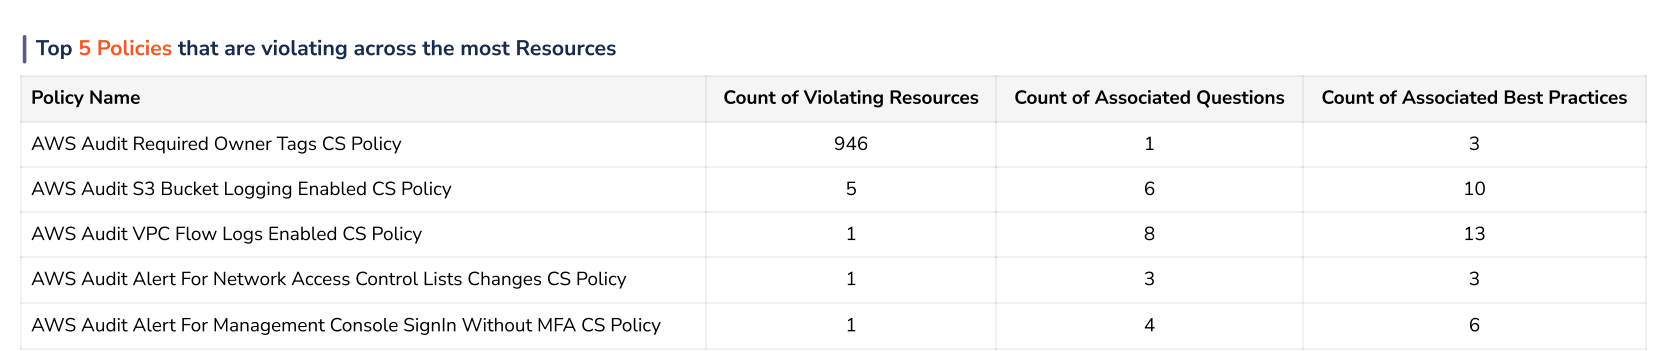
Top 5 Policies that are violating across the most Resources
This section shows the top five policies that have the most violating resources. Counts of the associated questions and best practices are also shown.
Workload Assessment Detailed Report
The Workload Assessment Detailed Report is a detailed report that provides detailed information about a particular workload assessment. This is a huge and detailed report. You can view this report in PDF format.
This first page of the report conveys the assessment name, assessment framework, workload name, and report date. A Table of Content has been added for easy navigation to the required section in the report. The detailed report includes the following information:
- Assessment Summary: This section provides the count of questions and best practices in various status for the available pillars.
- Workload Assessment Summary by Best Practices: This section provides detailed information about the best practices and its status in various pillars (the pillars vary for a report based on the selected framework). Through this section, you will know about the nature, severity, status, and violated resources related to best practices.
- Workload Assessment Details with Resources: This section provides detailed information about various resources for the available pillars (the pillars vary for a report based on the selected framework). Through this section, you can know about the resource violations.
Generating the Workload Assessment Detailed Report
Perform the following steps to generate the Workload Assessment Detailed Report:
-
In the CoreStack application, go to Assessments > Workload Assessments.
-
Browse to a particular assessment, then in the Active Assessment column click view.
-
Click Export > Workload Assessment Detailed Report.
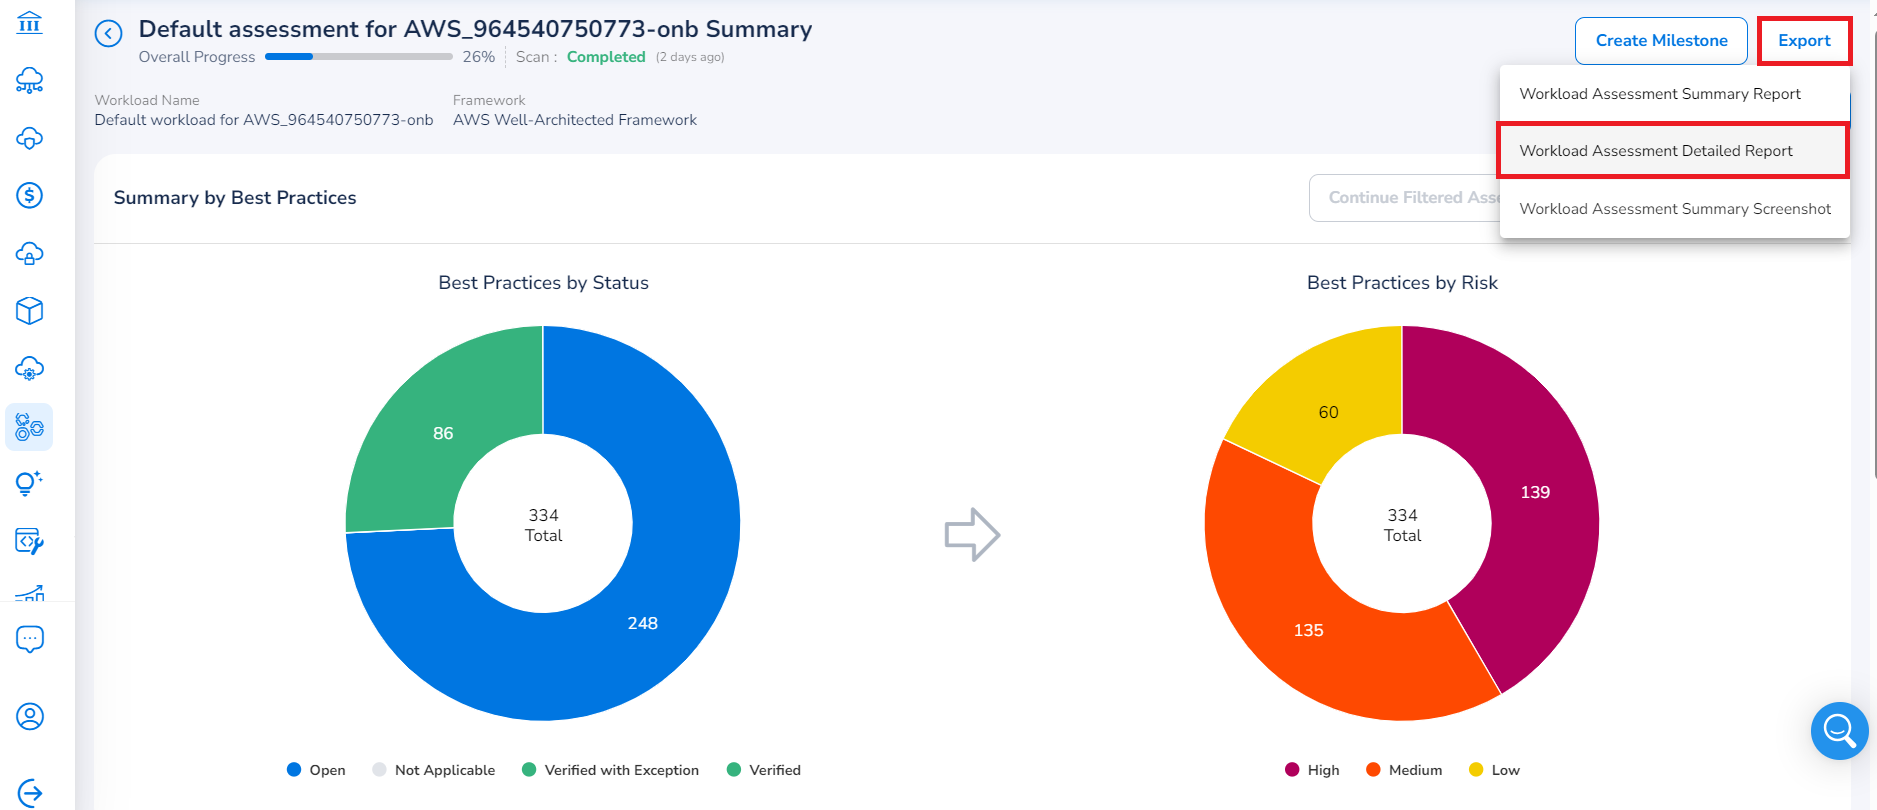
-
Click Download to view the report in PDF format.
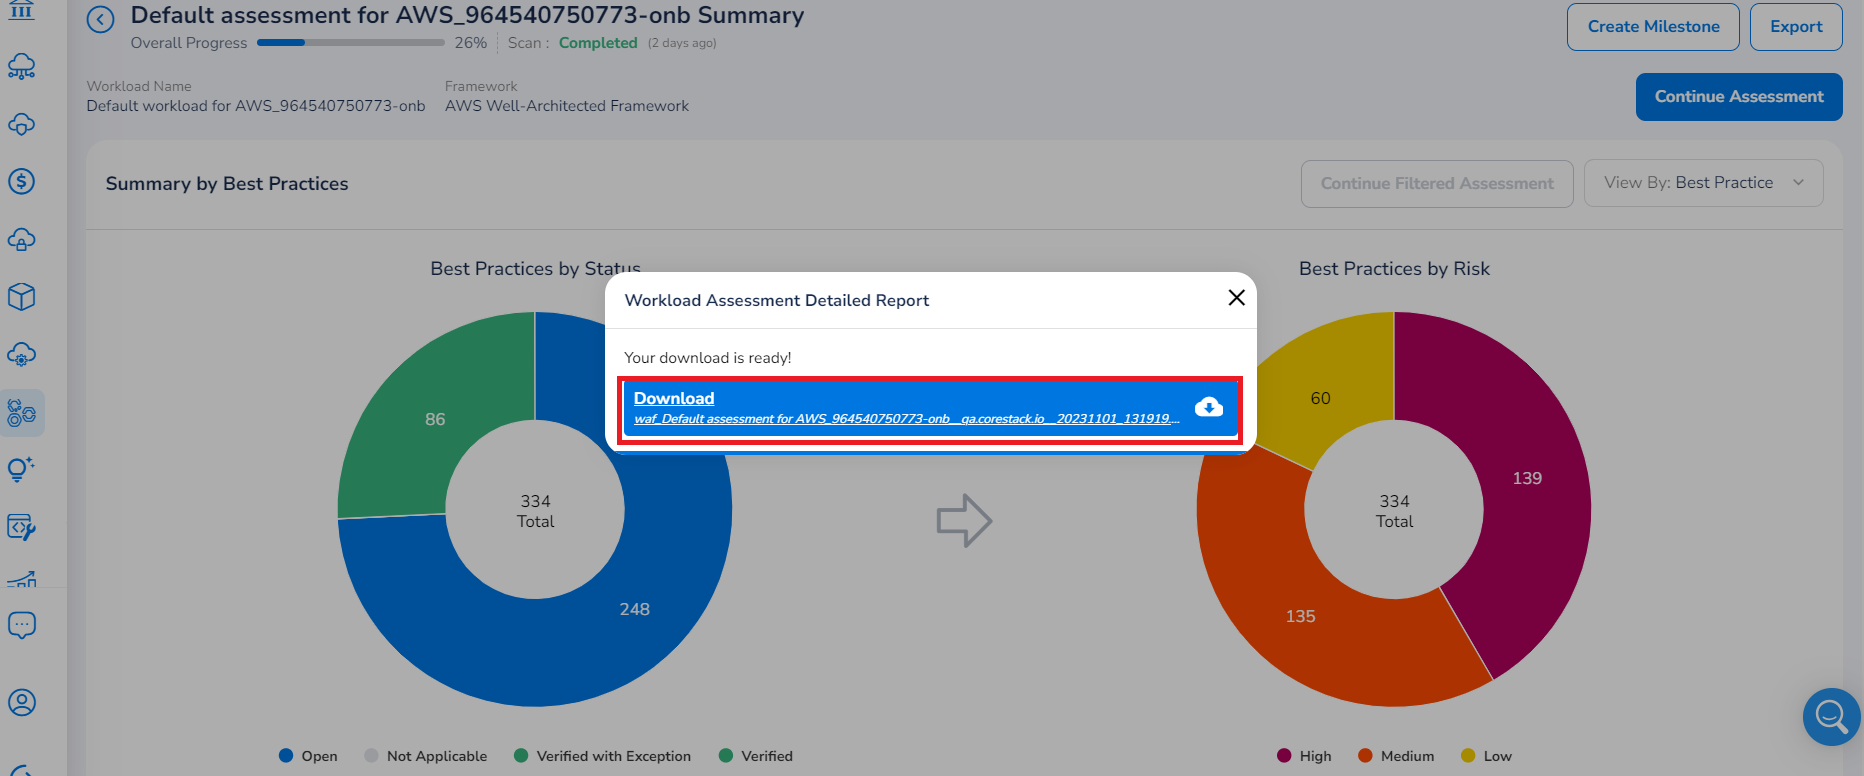
The Workload Assessment Detailed Report can now be downloaded and viewed.
Updated 5 months ago