
Azure prerequisites for CoreStack Assessments
Learn about the onboarding prerequesites for onboarding Azure cloud accounts for CoreStack Assessments.
Introduction
There are certain prerequisites that need to be set up in your Azure Subscription before it can be onboarded into CoreStack and used for Assessments.
While the specific steps vary depending on which type of cloud account you want to onboard form Azure (e.g. PAYG, CSP, etc.), in general for Azure Subscriptions you will have to create an App Registration for CoreStack and then provide the appropriate role assignment for that app for the Assessment + Automation onboarding option.
In this user guide, we'll cover the different steps you need to follow to properly configure the prerequisites in your Azure cloud account(s) based on which type of account(s) you're onboarding.
Prerequisites for Azure Subscriptions (Pay as You Go)
CoreStack uses Daemon Application scenario with Client Credentials flow for OAut2.0 flow and grant type as depicted here. Client Credential flow requires a valid Application registration to be created for a specific Azure subscription to successfully allow access to the required Azure resources.
To onboard your Azure subscription into CoreStack, the following values must be generated/copied from your Azure console and configured in CoreStack.
- Tenant ID
- Application ID
- Application Secret
- Subscription Information
As you retrieve each of these values, keep them ready in a notepad to be able to copy paste into CoreStack while onboarding.
Step 1: Fetch Tenant ID
- Login to the Azure Portal (https://portal.azure.com).
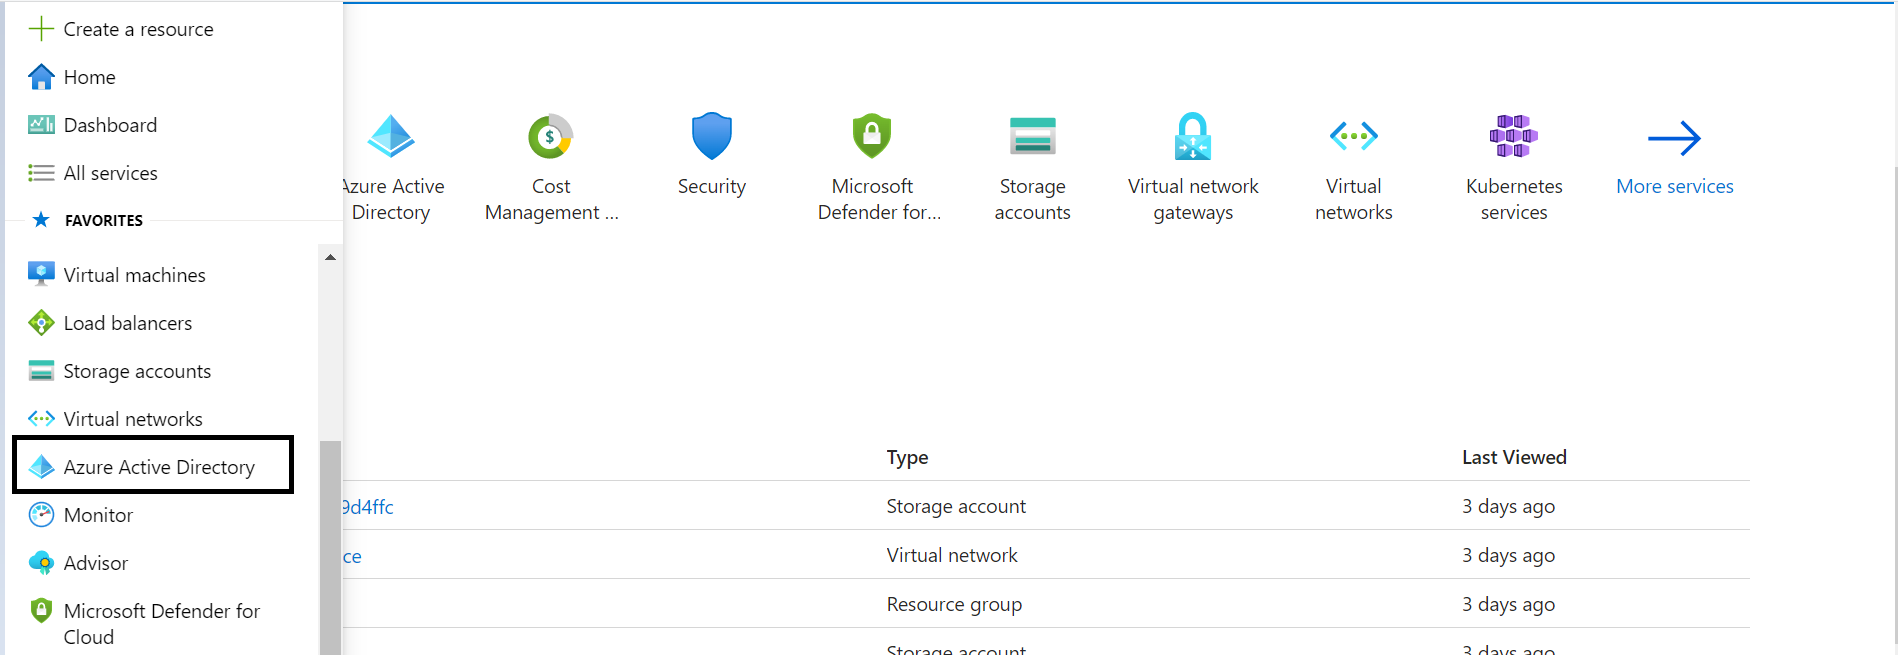
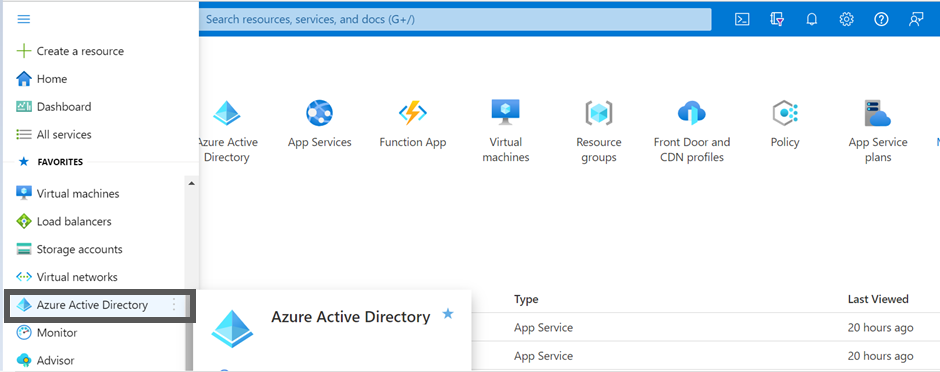
- Navigate to Azure Active Directory.
- Click Properties. The Properties screen appears.
- The Tenant ID value will be displayed on the Properties screen.
- Click on the Copy icon to copy the Tenant ID.
Step 2: Fetch Application ID
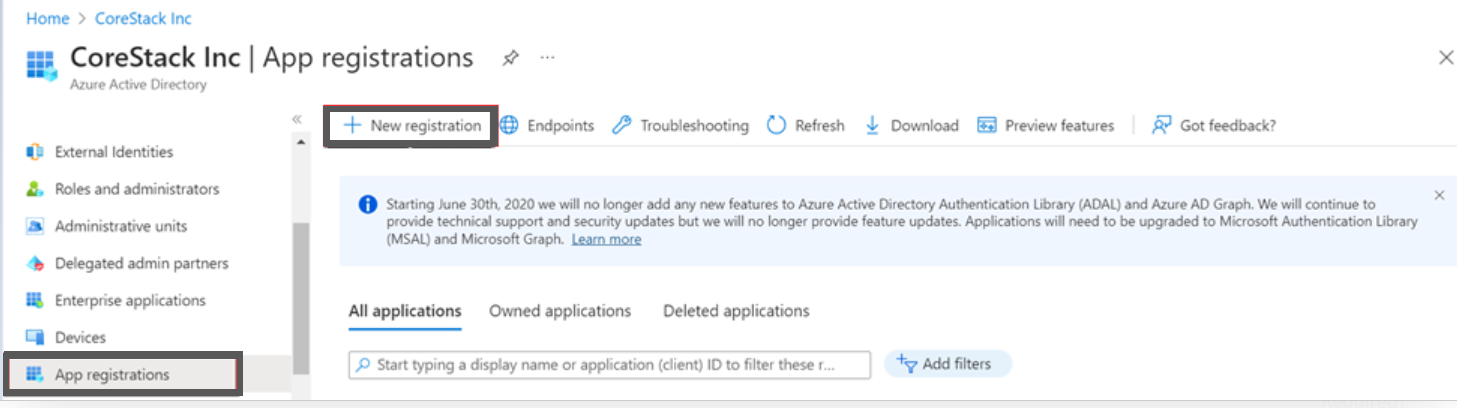
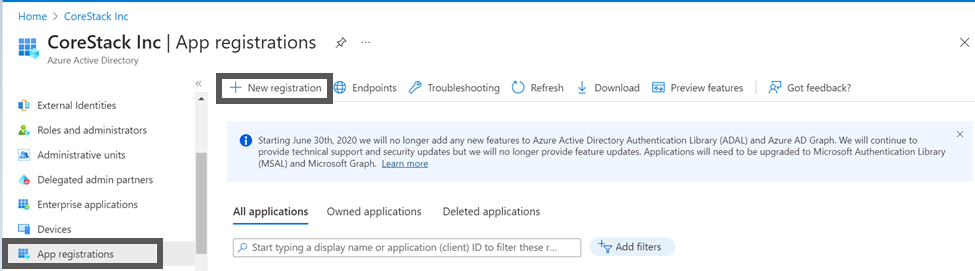
- Navigate to Azure Active Directory > App registrations > New registration in the Azure Portal. The Register an application screen appears.
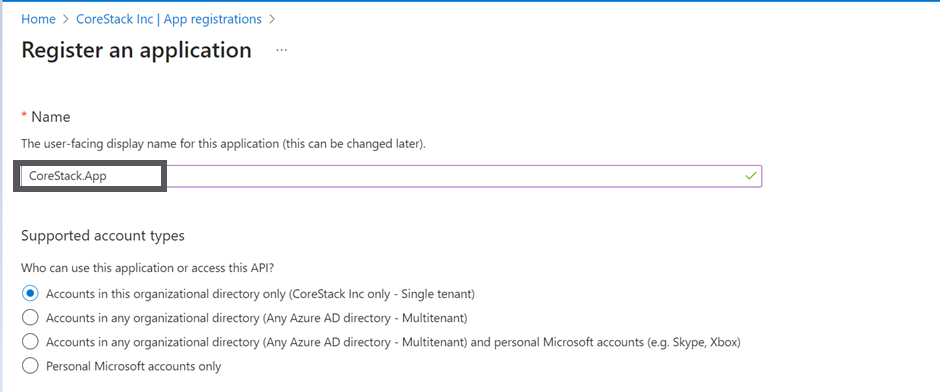
- Provide a name for the application, such as "CoreStack.App".
The other fields can be left with the default options.
- The value of the Supported account types field can be Single Tenant.
- The value of the Redirect URI field can be blank.
- Click Register button.
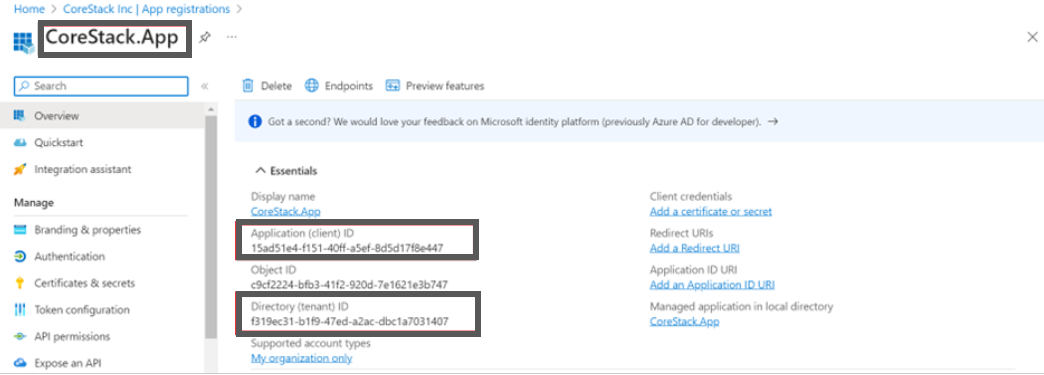
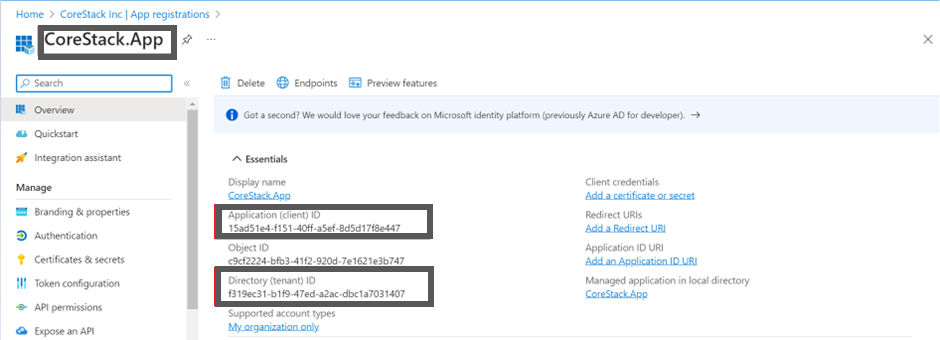
The application will be registered, and the Application ID (Client ID) will be displayed in the Overview screen. Copy the Application ID.
Step 3: Fetch Application Secret
Application Secret is the password or key that you need to provide for the specific app that was just created.
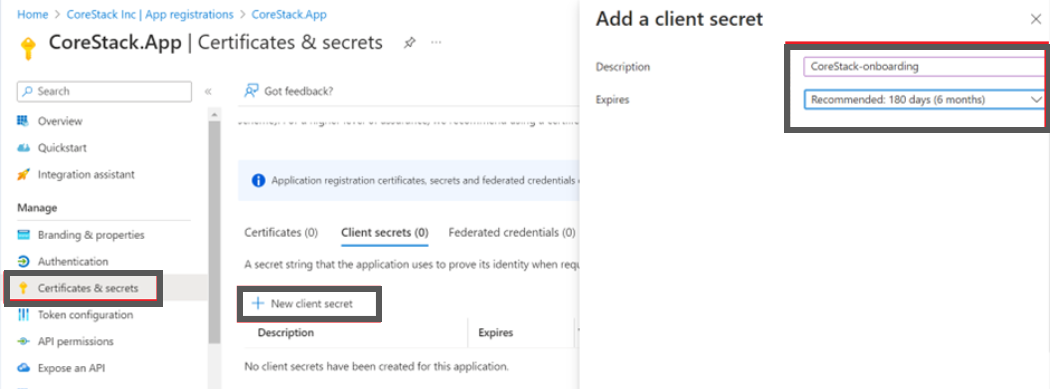
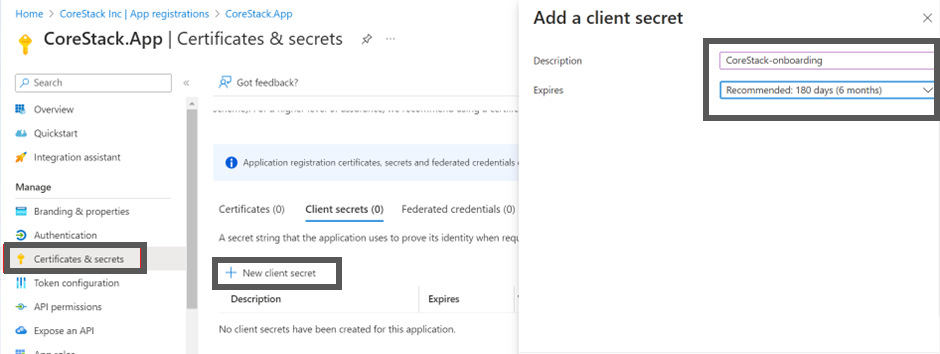
- Navigate to Certificates & secrets from the Overview screen.
- Click New client secret.
- Provide a description and expiry duration for the secret. You can leave the duration with the default value of 1 year. You can revoke this anytime later, if required.
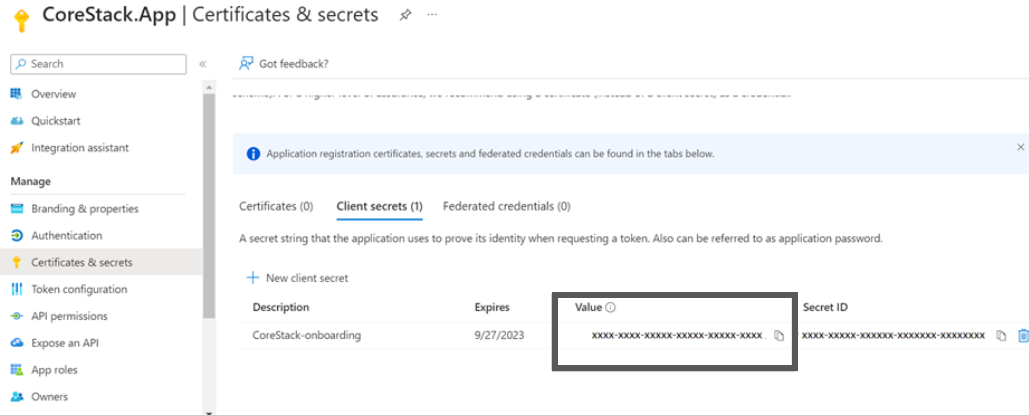
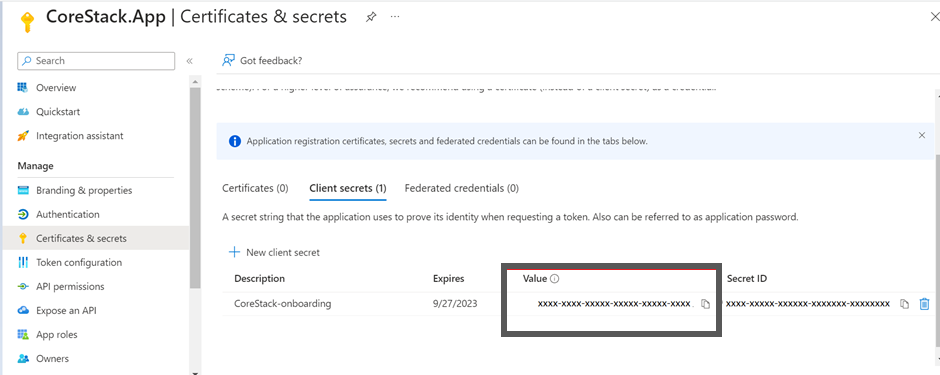
- Click Add button. The Client secret will be created and displayed. Ensure that you copy this value since you cannot retrieve this later.
Step 4: Fetch Subscription Information
- Navigate to Subscriptions in the Azure Portal. A list of subscriptions will be listed under the selected AD Tenant.
- Select the Subscription that will be used for onboarding into CoreStack. The Overview screen appears.
- The subscription details will be displayed in the Overview screen.
- Copy the Subscription ID and Subscription Name values.
Step 5: IAM Access for App
The app that is created in Step 2 must have the required access within the subscription. To provide the access, please follow the below steps:
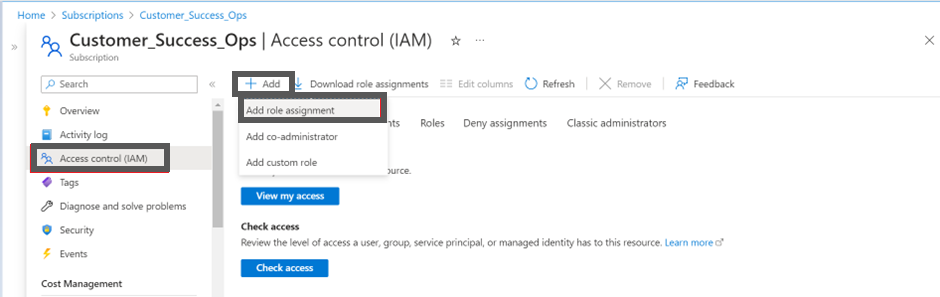
- Navigate to Subscriptions in the Azure Portal.
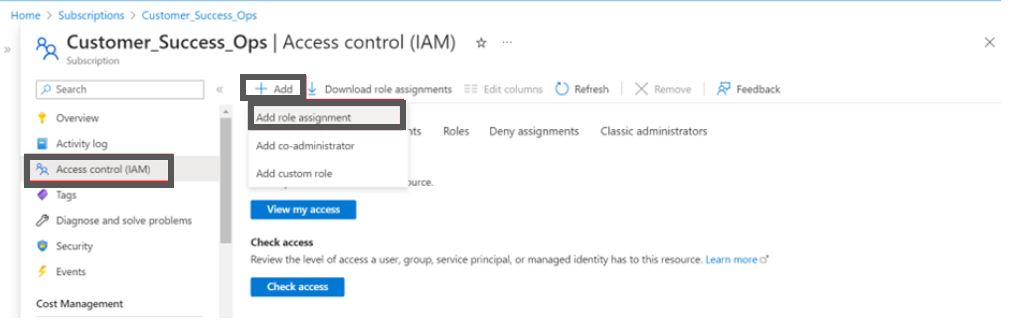
- Select Access Control (IAM).
- Click + Add and select Add role assignment. Add role assignment screen appears.
- Select Reader in the Role drop-down (Contributor can also be selected later, but Reader is required at a minimum).
- Ensure that the Azure AD user, group, or service principal option is selected in the Assign access to field.
- Search and select the app that was created earlier – in this example "CoreStack.App" – in the Select field.
- Click the Save button to assign the role.
Once the role is assigned, it will be listed in the Role Assignments tab.
- Repeat the steps 3 to 7 as specified above, but with Resource Policy Contributor selected in the Role drop-down and everything else remaining the same. This is required for CoreStack to create policies for your Azure subscription.
Note:
In order to properly enable CoreStack Assessments for you Azure cloud accounts, at a minimum you must add the Reader and Resource Policy Contributorroles for subscriptions that will be onboarded with Assessment + Governance option. Other roles can be selected afterwards, but users must select these two at least.
Once the role is assigned, it will be listed in the Role Assignments tab.
Copy all these details and provide them while onboarding your Azure Subscription into CoreStack.
Prerequisites for Azure CSP Direct accounts
Onboarding an Azure CSP Direct account allows you to discover and onboard the Azure CSP Subscriptions and Azure CSP Customer accounts available within the specific Azure CSP Direct account. Also, new Azure CSP Customer accounts can be created under an onboarded Azure CSP Direct account from CoreStack itself.
Once the CSP Direct Account is onboarded, you will need to onboard each CSP Subscription afterwards.
Based on the authentication type you choose while onboarding the Azure CSP Direct account, the following information must be retrieved from the Azure console.
1. App-only based
The following values must be generated/copied from your Microsoft Partner Dashboard (partner.microsoft.com) and configured in CoreStack.
- Login to the Microsoft Partner Dashboard using a global admin account: https://partner.microsoft.com.
- Select Account Settings in the Settings menu in the top right (Gear Symbol).
- Select App management in the Account Settings screen.
- If you do not already have an existing app, add a new web app.
- If you have an existing web app, click Add key button.
- Copy the app registration information such as Application ID and Application Secret.
You can retrieve the Tenant ID (Microsoft ID) from the Azure AD Profile screen in the Microsoft Partner Dashboard.
Copy all these details (Tenant ID, Application ID, and Application Secret) and provide them while onboarding your Azure CSP Direct account into CoreStack using App-only based authentication.
2. Authorization code based
User account permissions (only for Authorization Code based):
The following permissions must be configured in your Azure CSP Direct Account before onboarding.
- You must login as a Global Admin into the Partner Center and create a user for Partner Center with the following privileges:
- Billing Admin: To view rates, usage, and invoice details.
- Sales Agent: To create and manage customers and their subscriptions.
- A secure application registered with necessary API permissions should be provided.
To enable API access for your Azure CSP Direct account:
- Navigate to API permissions from the Overview screen.
- Click Add a permission. The Request API permissions screen appears.
- Search for Microsoft Partner Center API in the Request API permissions screen.
- Select Microsoft Partner Center API and enable user_impersonation checkbox.
- Set the Delegated Permissions to Partner Center.
- Click Add permissions. The Configured permissions screen appears.
- Click Grant admin consent.
The following values must be generated/copied additionally along with the other information while onboarding an Azure CSP Direct account using Authorization Code option.
Redirect URI:
The following redirect URI that is configured while registering an application to generate the application ID must be used: http://localhost/
Authorization Code:
- Construct an URL in the following format:
https://login.microsoftonline.com/<Tenant ID>/oauth2/authorize?client_id=<Client ID>&redirect_uri=<Redirect URI>&response_type=code&prompt=admin_consent - Open an InPrivate_or _Incognito mode of browser window and access the above URL.
- Login using your Admin (GA + Admin Agent) credentials and accept when prompted.
- The page will be redirected to the Redirect URI, but the address bar will have the Authorization Code specified after
code=.
Note:
The values retrieved in the earlier steps can be used instead of
<Tenant ID>,<Client ID>, and<Redirect URI>specified in the URL format.
Copy and provide these details additionally in CoreStack while onboarding your Azure CSP Direct account using Authorization Code based authentication.
Prerequisites for Azure CSP Subscriptions
Once an Azure CSP Direct account is onboarded into CoreStack, the associated Azure CSP Subscriptions will be discovered and listed in CoreStack. An Azure CSP Subscription from the list of discovered subscriptions can then be onboarded into CoreStack. But, there are certain pre-requisites that need to be set up in your Azure CSP Subscription before it can be onboarded into CoreStack.
CoreStack uses Daemon Application scenario with Client Credentials flow for OAut2.0 flow and grant type as depicted here. Client Credential flow requires a valid Application registration to be created for a specific Azure subscription to successfully allow access to the required Azure resources.
To onboard your Azure subscription into CoreStack, the following values must be generated/copied from your Azure console and configured in CoreStack.
- Tenant ID
- Application ID
- Application Secret
- Subscription Information
As you retrieve each of these values, keep them ready in a notepad to be able to copy paste into CoreStack while onboarding.
Step 1: Fetch Tenant ID
- Login to the Azure Portal (https://portal.azure.com).
- Navigate to Azure Active Directory.
- Click Properties. The Properties screen appears.
- The Tenant ID value will be displayed on the Properties screen.
- Click on the Copy icon to copy the Tenant ID.
Step 2: Fetch Application ID
- Navigate to Azure Active Directory > App registrations > New registration in the Azure Portal. The Register an application screen appears.
- Provide a name for the application, such as "CoreStack.App".
The other fields can be left with the default options.
- The value of the Supported account types field can be Single Tenant.
- The value of the Redirect URI field can be blank.
- Click Register button.
The application will be registered, and the Application ID (Client ID) will be displayed in the Overview screen. Copy the Application ID.
Step 3: Fetch Application Secret
The Application Secret is the password or key that you need to provide for the specific app that was just created.
- Navigate to Certificates & secrets from the Overview screen.
- Click New client secret.
- Provide a description and expiry duration for the secret. You can leave the duration with the default value of 1 year. You can revoke this anytime later, if required.
- Click Add button. The Client secret will be created and displayed. Ensure that you copy this Secret Value since you cannot retrieve this later. We will use this later, NOT the Secret ID.
Step 4: Fetch Subscription Information
- Navigate to Subscriptions in the Azure Portal. A list of subscriptions will be listed under the selected AD Tenant.
- Select the Subscription that will be used for onboarding into CoreStack. The Overview screen appears.
- The subscription details will be displayed in the Overview screen.
- Copy the Subscription ID and Subscription Name values.
Step 5: IAM Access for App
The app that is created in Step 2 must have the required access within the subscription. To provide the access, please follow the below steps:
- Navigate to Subscriptions in the Azure Portal.
- Select Access Control (IAM).
- Click + Add and select Add role assignment. Add role assignment screen appears.
- Select Reader in the Role drop-down (Contributor can also be selected later, but Reader is required at a minimum).
- Ensure that the Azure AD user, group, or service principal option is selected in the Assign access to field.
- Search and select the app that was created earlier – in this example "CoreStack.App" – in the Select field.
- Click Save button to assign the role.
Once the role is assigned, it will be listed in the Role Assignments tab.
- Repeat the steps 3 to 7 as specified above, but with Resource Policy Contributor selected in the Role drop-down and everything else remaining the same. This is required for CoreStack to create policies for your Azure subscription.
Note:
In order to properly enable CoreStack Assessments for you Azure cloud accounts, at a minimum you must add the Reader and Resource Policy Contributorroles for subscriptions that will be onboarded with Assessment + Governance option. Other roles can be selected afterwards, but users must select these two at least.
Once the role is assigned, it will be listed in the Role Assignments tab.
Copy all these details and provide them while onboarding your Azure Subscription into CoreStack.
Prerequisites for Azure EA Parent Accounts
There are certain pre-requisites that need to be set up in your Azure Subscription before it can be onboarded into CoreStack.
CoreStack uses the Daemon Application scenario with Client Credentials flow for OAuth2.0 flow and grant type as depicted here. Client Credential flow requires a valid Application registration to be created for a specific Azure subscription to successfully allow access to the required Azure resources.
There are two authentication options available to onboard an Azure EA account to CoreStack, with two options to choose from:
- Application Method
- API Key Method
Note:
- If the Azure subscription's value is $0, this will not be displayed under the Azure EA Parent Account in CoreStack for onboarding. However, this will start listing after the cost data is available in the subscription.
- This kind of account is used for Billing Purposes only. No resources will be associated.
Prerequisites for Application Method of Onboarding
- The resource provider Microsoft.CostManagementExports should be registered in the subscription level (it is part of the script in step 1).
- The storage account is needed to store the exported cost data under the same tenant subscription.
- Run the script in the billing scope level to export the last three months cost and daily month-to-date cost (script available in step 1).
Application Method
To onboard your Azure Enrollment subscriptions into CoreStack, the following values must be generated/copied from your Azure console and configured in CoreStack:
- Tenant ID
- Application ID
- Application Secret
As you retrieve each of these values, keep them ready in a notepad to be able to copy and paste into CoreStack during the onboarding steps.
Step 1: Fetch Storage Account and Report Path
A data export must be created to export cost data of the subscription. To configure the data export and retrieve its storage account and report path information, perform the following steps:
-
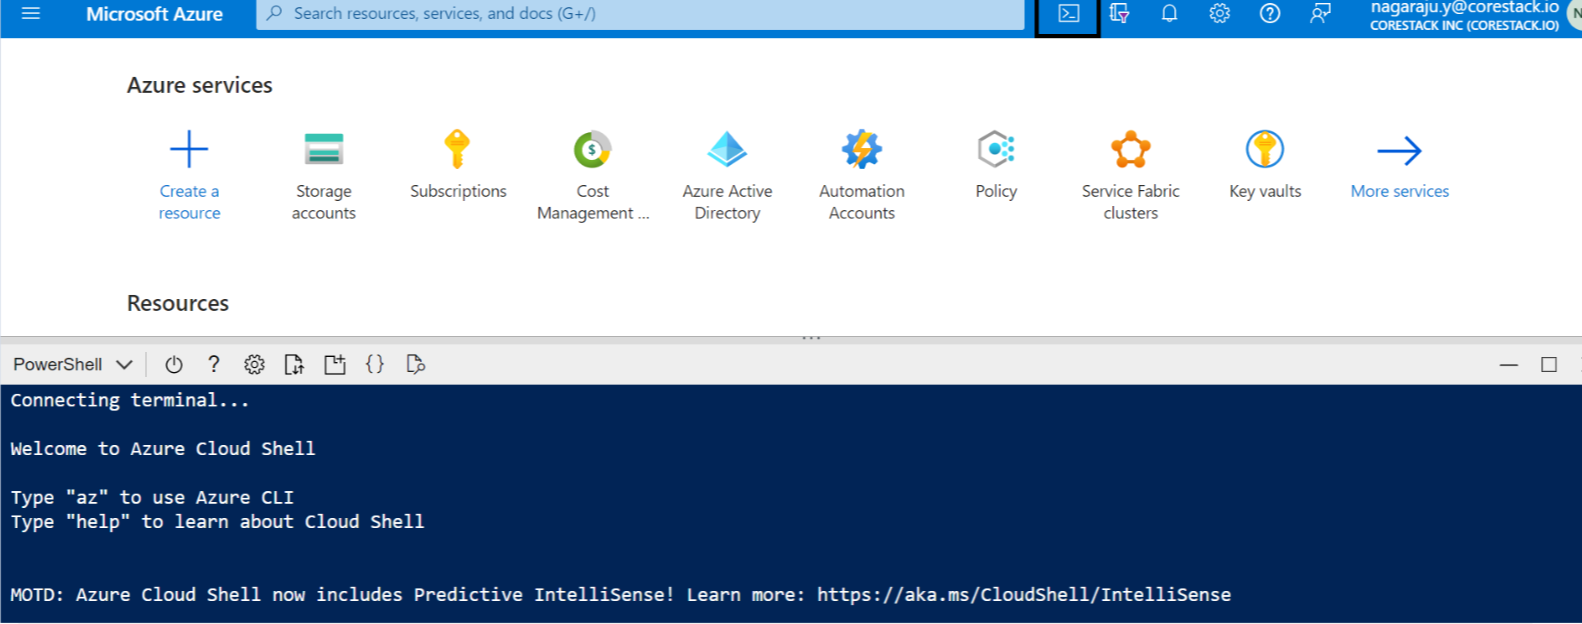
Login to the Azure portal: https://portal.azure.com/
-
Open the CloudShell on the top.
-
Run the below script to create required cost exports automatically. Some of the fields are explained below:
Note:
- The script will create a new export along with the new storage blob container and directory. It will also create an export for the last three months and store it in a storage blob container for each and every month and month-to-date costs.
- The below script will take 15 - 20 minutes to complete the cost export. Meanwhile, proceed with "Step 2: Fetch Storage Account and Report Path".
- {billingAccountId} = Azure EA Enrollment ID
- {subscription_id} = Subscription ID of where the storage account was created.
- {storageAccount_name} = Name of the storage account that is created for cost export.
- {resourcegroup_name} = Mention the resource group name where the storage account is created.
- {TimePeriodFrom} = Mention the start date of the previous three month to export (for example, February '2023-02-01T00:00:00Z').
- {TimePeriodTo} = Mention the end date of previous three month to export (for example, February '2023-02-28T00:00:00Z').
Register-AzResourceProvider -ProviderNamespace Microsoft.CostManagementExports
Start-Sleep -Seconds 100
Install-Module Az.CostManagement
Start-Sleep -Seconds 90
$Params = @{
  Name = 'cscostexport'
  DefinitionType = 'ActualCost'
  Scope = 'providers/Microsoft.Billing/billingAccounts/{billingAccountId}'
  DestinationResourceId = '/subscriptions/{subscription_id}/resourceGroups/{resourcegroup_name}/providers/Microsoft.Storage/storageAccounts/{storageAccount_name}'
  DestinationContainer = 'cscostcontainer'
  DefinitionTimeframe = 'Custom'
  TimePeriodFrom = '2023-02-01T00:00:00Z'
  TimePeriodTo = '2023-02-28T00:00:00Z'
  DestinationRootFolderPath = 'csdirectory'
  Format = 'Csv'
}
New-AzCostManagementExport @Params
Invoke-AzCostManagementExecuteExport -ExportName cscostexport -Scope 'providers/Microsoft.Billing/billingAccounts/{billingAccountId}'
Start-Sleep -Seconds 120
$Params = @{
  Name = 'cscostexport'
  DefinitionType = 'ActualCost'
  Scope = 'providers/Microsoft.Billing/billingAccounts/{billingAccountId}'
  DestinationResourceId = '/subscriptions/{subscription_id}/resourceGroups/{resourcegroup_name}/providers/Microsoft.Storage/storageAccounts/{storageAccount_name}'
  DestinationContainer = 'cscostcontainer'
  DefinitionTimeframe = 'Custom'
  TimePeriodFrom = '2023-03-01T00:00:00Z'
  TimePeriodTo = '2023-03-31T00:00:00Z'
  DestinationRootFolderPath = 'csdirectory'
  Format = 'Csv'
}
New-AzCostManagementExport @Params
Invoke-AzCostManagementExecuteExport -ExportName cscostexport  -Scope 'providers/Microsoft.Billing/billingAccounts/{billingAccountId}'
Start-Sleep -Seconds 120
$Params = @{
  Name = 'cscostexport'
  DefinitionType = 'ActualCost'
  Scope = 'providers/Microsoft.Billing/billingAccounts/{billingAccountId}'
  DestinationResourceId = '/subscriptions/{subscription_id}/resourceGroups/{resourcegroup_name}/providers/Microsoft.Storage/storageAccounts/{storageAccount_name}'
  DestinationContainer = 'cscostcontainer'
  DefinitionTimeframe = 'Custom'
  TimePeriodFrom = '2023-04-01T00:00:00Z'
  TimePeriodTo = '2023-04-30T00:00:00Z'
  DestinationRootFolderPath = 'csdirectory'
  Format = 'Csv'
}
New-AzCostManagementExport @Params
Invoke-AzCostManagementExecuteExport -ExportName cscostexport  -Scope 'providers/Microsoft.Billing/billingAccounts/{billingAccountId}'
Start-Sleep -Seconds 120
$Params = @{
  Name = 'cscostexport'
  DefinitionType = 'ActualCost'
  Scope = 'providers/Microsoft.Billing/billingAccounts/{billingAccountId}'
  DestinationResourceId = '/subscriptions/{subscription_id}/resourceGroups/{resourcegroup_name}/providers/Microsoft.Storage/storageAccounts/{storageAccount_name}'
  DestinationContainer = 'cscostcontainer'
  DefinitionTimeframe = 'MonthToDate'
  DestinationRootFolderPath = 'csdirectory'
  Format = 'Csv'
}
New-AzCostManagementExport @Params
Invoke-AzCostManagementExecuteExport -ExportName cscostexport -Scope 'providers/Microsoft.Billing/billingAccounts/{billingAccountId}'
Start-Sleep -Seconds 10
Exit
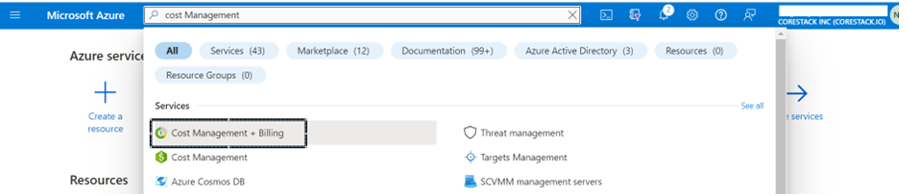
- In the search bar at the top of the screen, search for Cost Management + Billing.
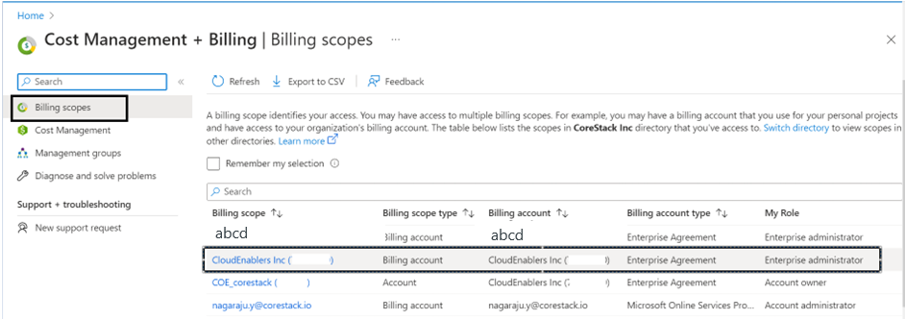
- In the Billing scopes field, ensure that the required enrollment account is selected.
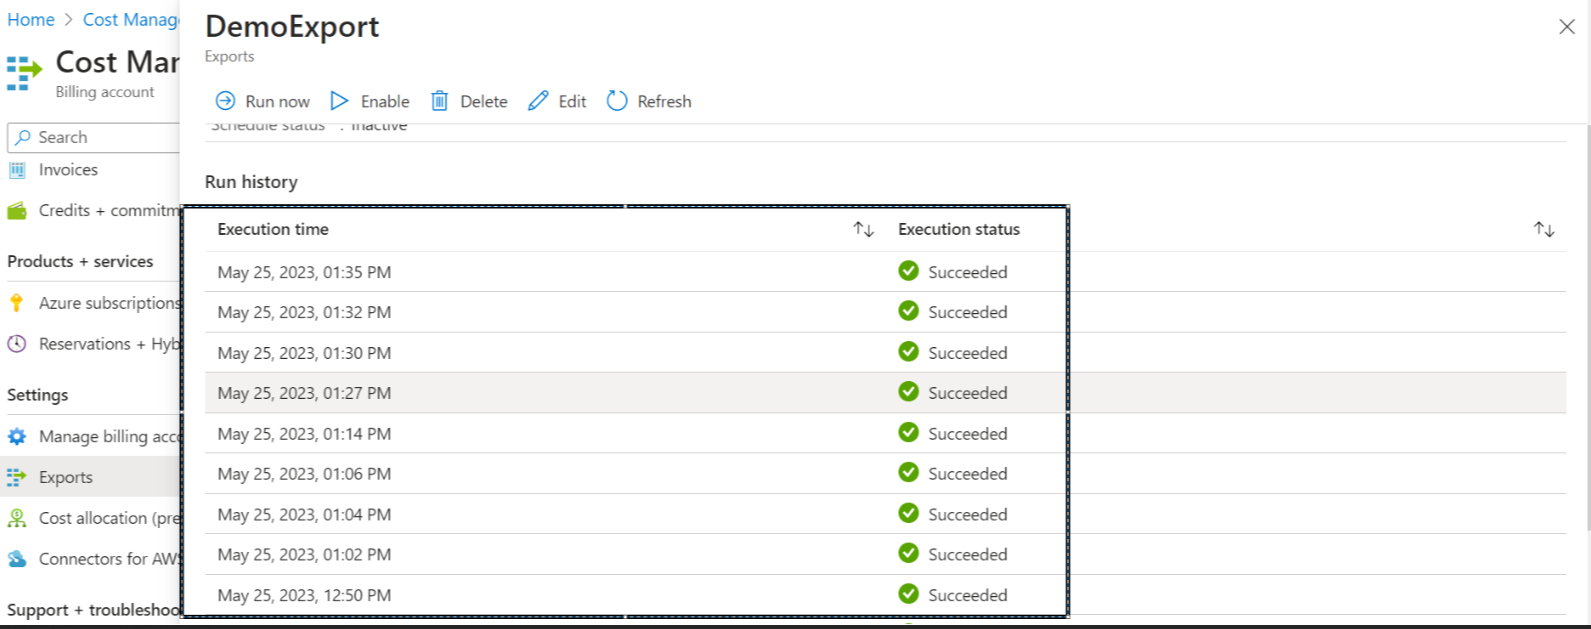
- Select Settings > Exports and select the export that is created using the above script. For example, cscostexport.
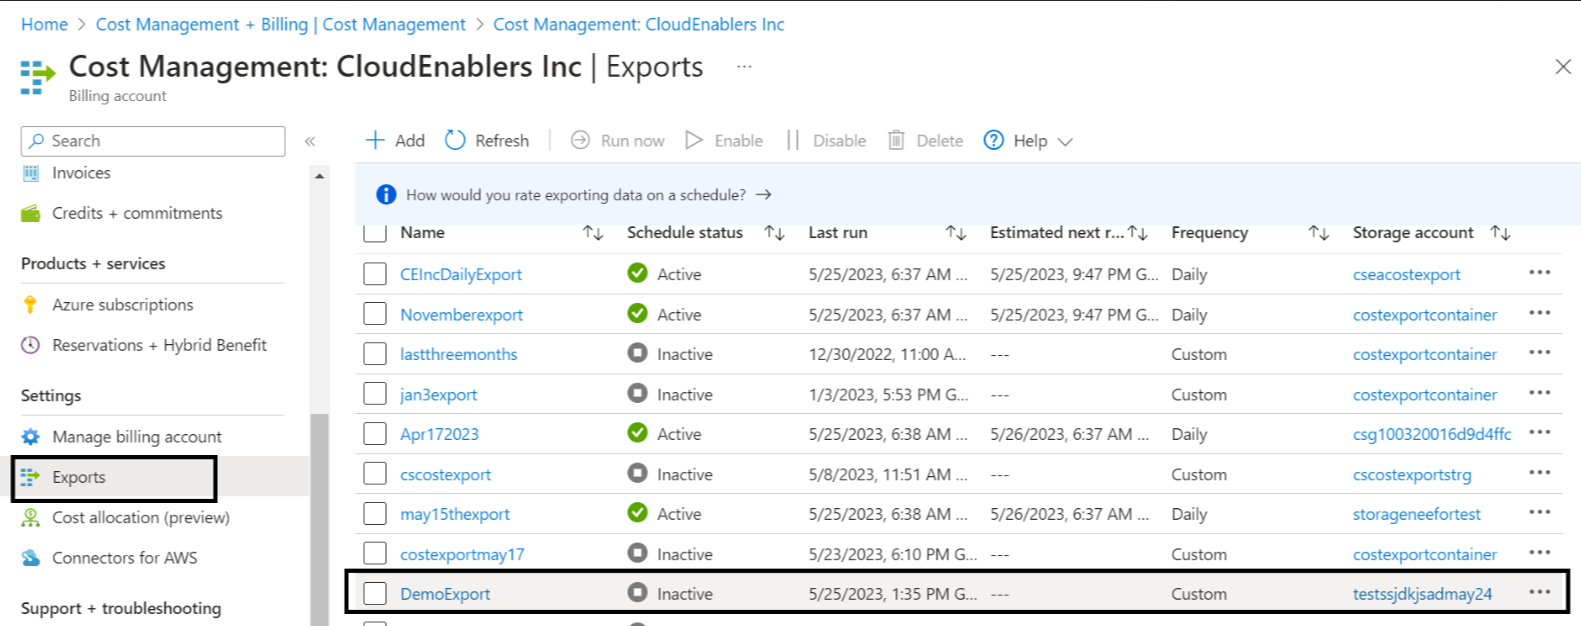
- Verify the exports execution run history; count should be 4.
- Select the storage account used for cscostexport.
- Copy the values from the Export name, Storage account, Container, and Directory fields that were used while creating the data export.
- The Storage account name will be used in the Storage Account field in CoreStack.
- The Export name, Container, and Directory values will be used for the Report Path field in CoreStack. The Report Path must be entered in this format:
<container name>/<directory path>/<export name>
Copy all the details from the above step in a safe location and provide them while onboarding your Azure Subscription account in CoreStack.

Note:
The last three months export and daily export data will be available for reference.
For example: in the location costexport/costdataexport/cscostexport.
Step 2: Fetch Application ID and Tenant ID
- In the Azure Portal, navigate to Azure Active Directory > App registrations > New registration. The Register an application screen appears.
- On the left pane, click App registration and click + New registration.
- In the Name box, type a name for the application, for example, CoreStack.App.
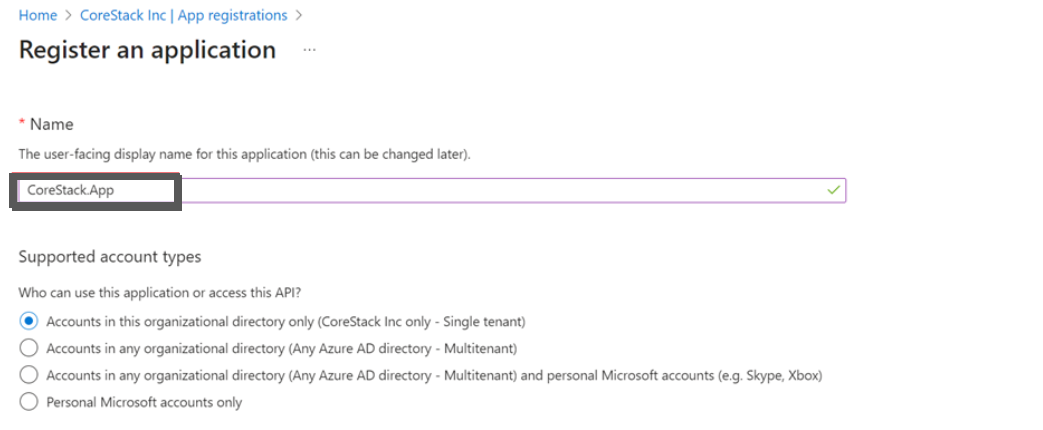
The other fields can be left with the default options.
- The value of the Supported account types field can be Single Tenant.
- The value of the Redirect URI field can be blank.
- Click Register.
The application will be registered, and the Application (client) ID and Directory (tenant) ID will be displayed on the Overview screen. Copy the Application ID and the Tenant ID and paste the details in a notepad.
Step 3: Fetch Application Secret
The Application Secret is the password or key that you need to provide for the specific app that was just created.
- On the Overview screen, click Certificates & secrets.
- Click + New client secret.
- Provide a description and expiry duration for the secret. You can leave the duration with the default value of 1 year. You can revoke this anytime later, if required.
- Click Add. The Client secret will be created and displayed.
Note:
Ensure that you copy this secret value and paste it in a notepad, since you cannot retrieve this later.
Step 4: IAM Access for App
The app that is created in Step 1 must have the required access within the subscription. To provide that access, follow the below steps:
-
In the Azure Portal, navigate to Subscriptions .
-
Select the Subscription that will be used for onboarding into CoreStack. The Overview screen appears.
-
Click Access Control (IAM).
-
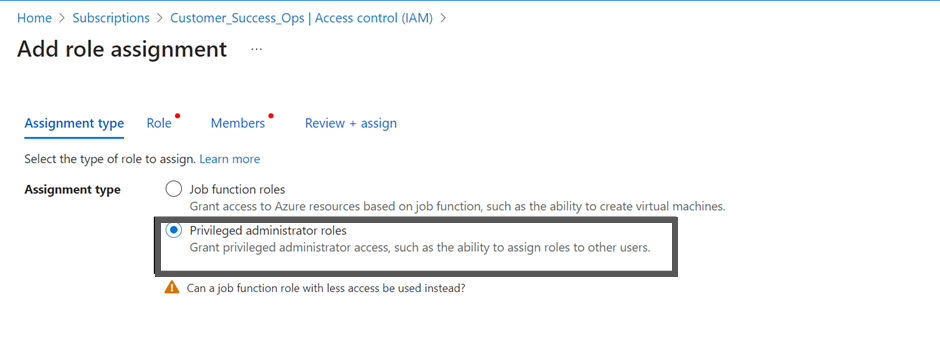
Click + Add and then click to select Add role assignment. The Add role assignment screen appears.
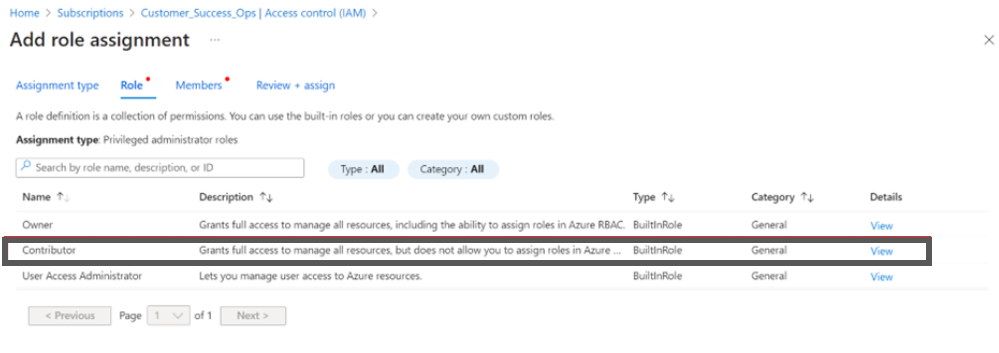
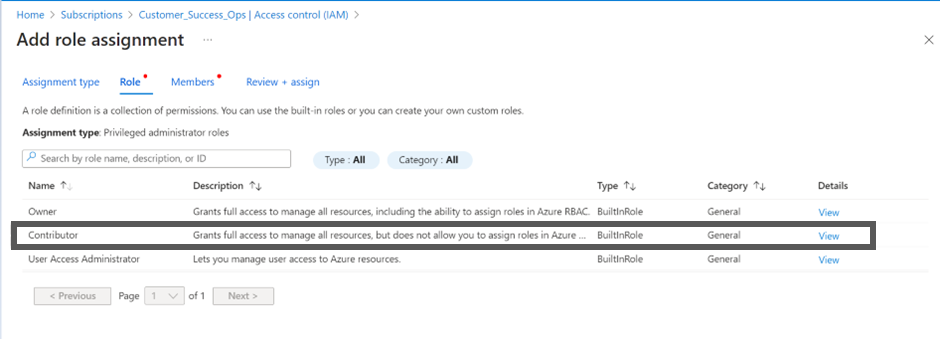
- Select the privileged administrator roles.
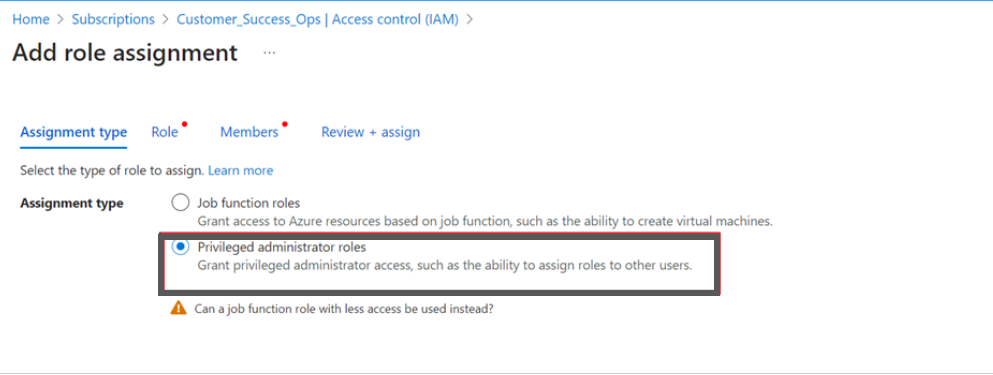
- Select Contributor.
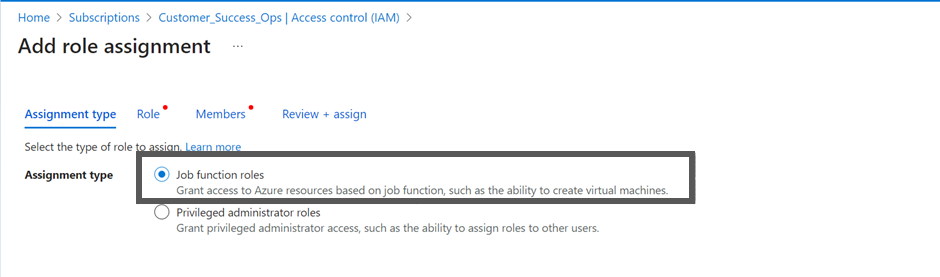
- Select job function roles.
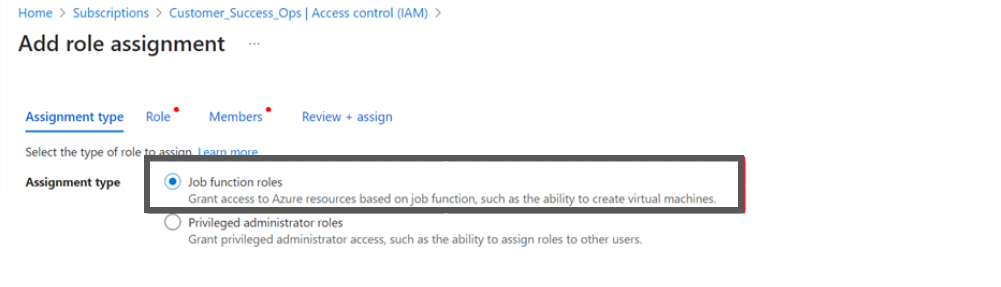
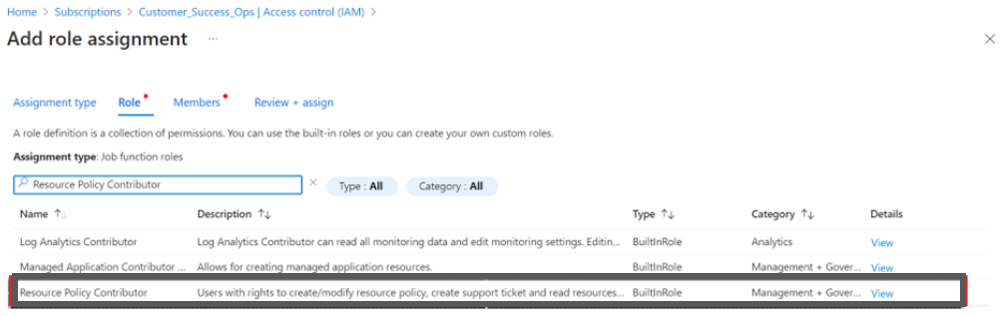
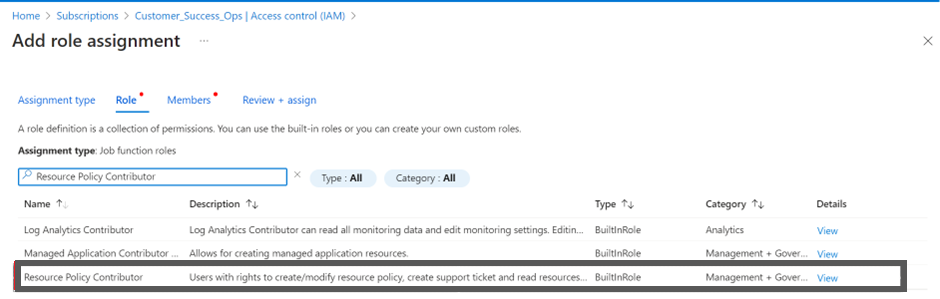
- Select the Resource Policy Contributor.
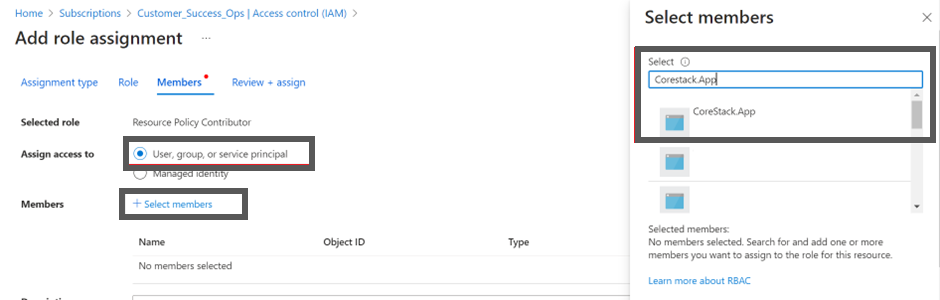
- Ensure that the User, group, or service principal option is selected in the Assign access to field.
- Click + Select members and in the Select field, search and select the app that was created earlier. In this example, select CoreStack.App.

- Click the Save button to assign the role.
After the role is assigned, it will be listed in the Role Assignments tab.
Note:
The "Resource Policy Contributor" role assignment is required for CoreStack to create policies for your Azure subscription.
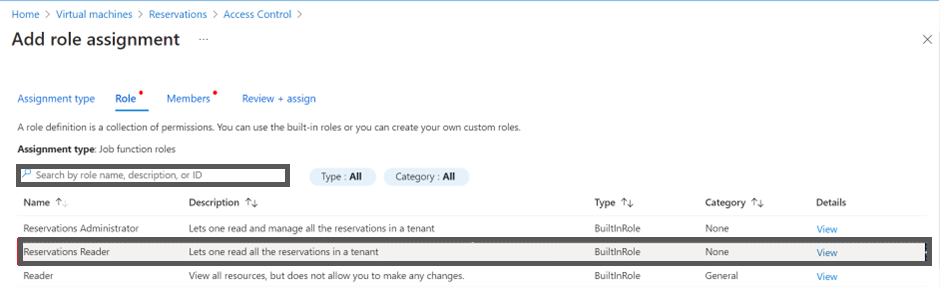
Step 5: Reservation Reader Role
Note:
You can skip this step if you don’t have any reserved instances in your subscription.
CoreStack requires the Reservation Reader role for the CoreStack.App to fetch the reserved instances in the subscription.
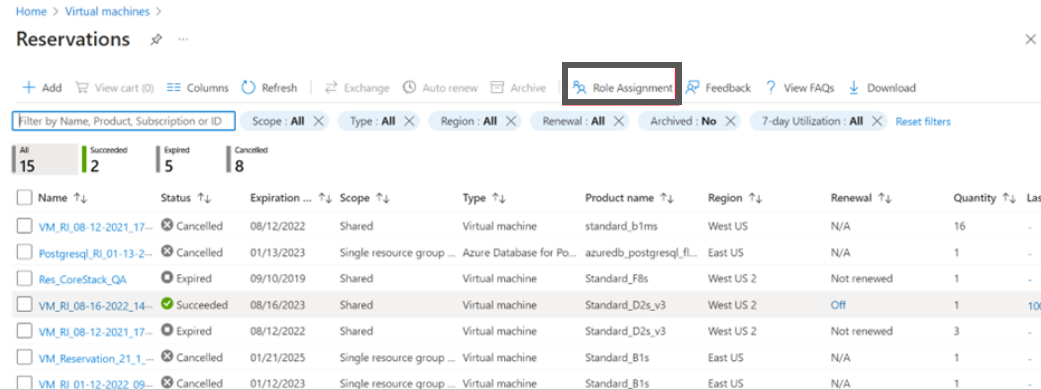
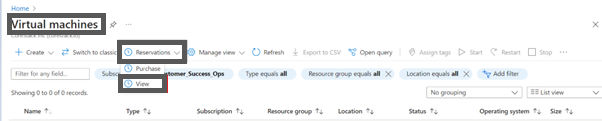
- Navigate to Virtual machines > Reservations > View.

You can now see all the reserved instances in your subscription.
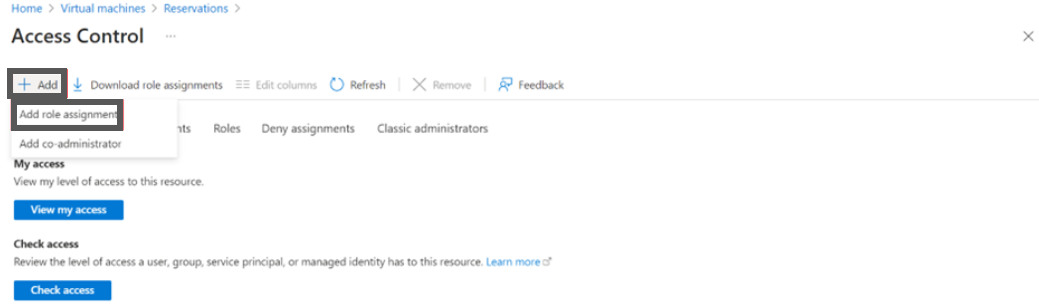
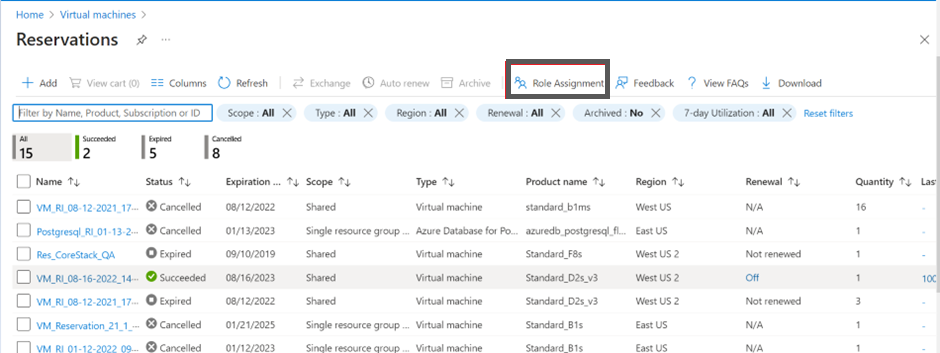
- Click Role Assignment.
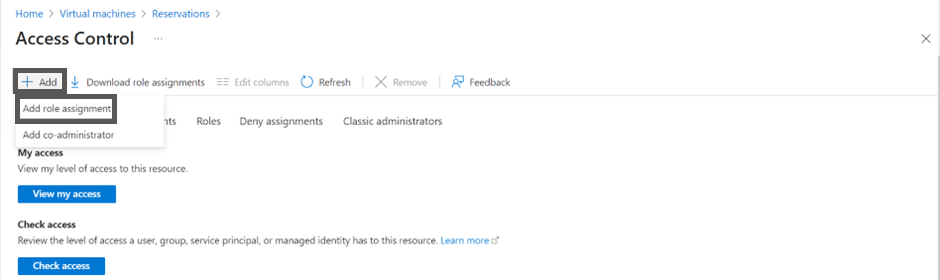
- Click +Add and then click Add role assignment.
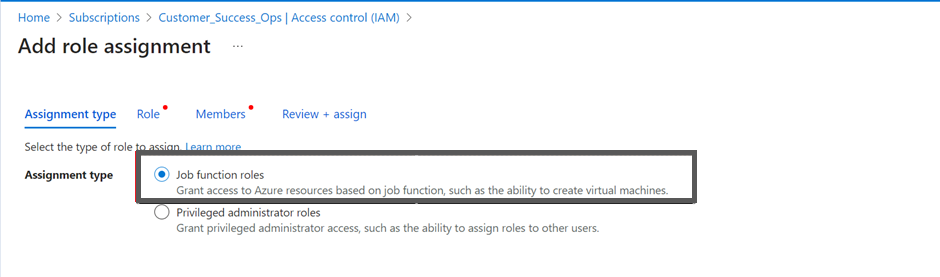
- In the Assignment type field, select Job function roles.
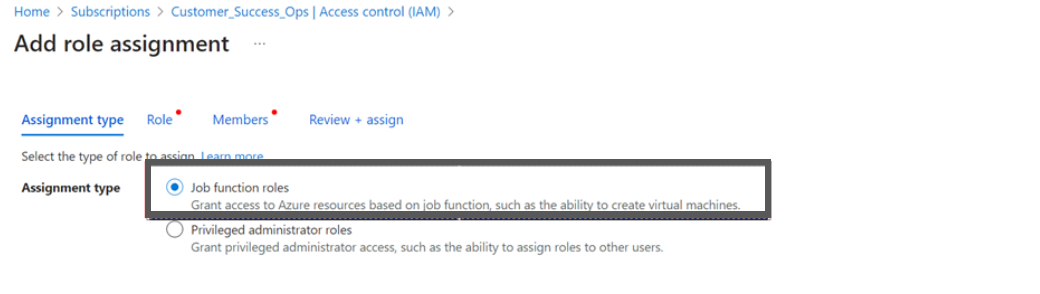
- In the Search box, type Reservations Reader and select it from the search result and then click Next.

-
Ensure that the User, group, or service principal option is selected in the Assign access to field.
-
Search and select the app that was created earlier. In this example, select CoreStack.App in the Select field.
-
Click Save button to assign the role.
API Key Method
For onboarding an Azure EA account into CoreStack using the API Key method, the following steps need to be performed:
Step 1: Fetch Enrollment ID
To retrieve the Enrollment ID of the subscription, perform the following steps:
- Login to the Azure EA portal: https://ea.azure.com/
- On the left-side menu, click Manage.
- Select the Enrollment tab at the top of the page. The Enrollment screen appears.
- Copy the Enrollment Number from the Enrollment screen.
Step 2: Fetch API Key
To generate and retrieve the API Key from the subscription, perform the following steps:
Note:
Azure EA is read-only and all operations are moved to the Azure portal.
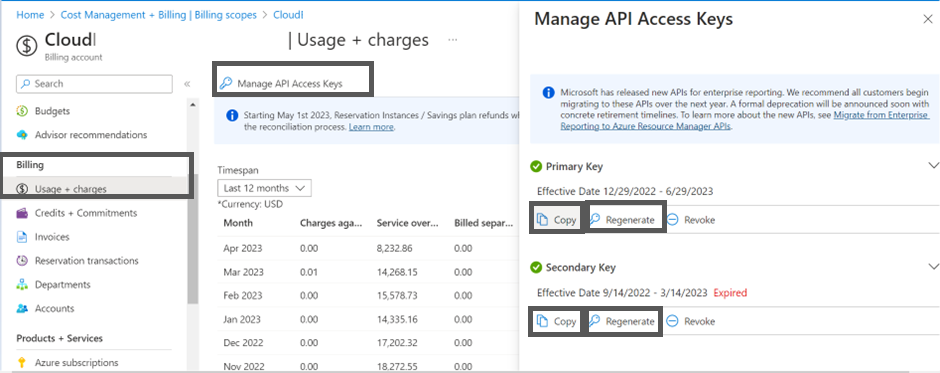
- Login to the Azure portal: https://portal.azure.com/
- Navigate to Cost Management + Billing > select Billing Scope > Billing > select the Usage + charges > select Manage API Access Keys on the top > perform the appropriate action:
- To copy the existing primary or secondary key, click Copy in the Primary Key or Secondary Key section.
- To regenerate a new key, click Regenerate in the Primary Key or Secondary Key section.
Prerequisites for Azure EA Subscriptions
There are certain prerequisites that need to be set up in your Azure Enrollment Subscription tenant before it can be onboarded into CoreStack.
CoreStack uses Daemon Application scenario with Client Credentials flow for OAut2.0 flow and grant type as depicted here. Client Credential flow requires a valid Application registration to be created for a specific Azure Enrollment subscription. This will successfully allow access to the required Azure resources.
To onboard your Azure Enrollment subscriptions into CoreStack, the following values must be generated/copied from your Azure console and configured in CoreStack:
- Tenant ID
- Application ID
- Application Secret
As you retrieve each of these values, keep them ready in a notepad to be able to copy and paste into CoreStack while onboarding.
Note:
Before onboarding the Azure Enrollment (EA) subscription, it is mandatory to onboard the Azure Enrollment (EA) parent account in CoreStack. This is covered in the previous section of this user guide.
Step 1: Fetch Application ID and Tenant ID
- On the Azure Portal, navigate to Azure Active Directory > App registrations > New registration. The Register an application screen appears.
- On the left pane, click App registration and click + New registration.
- In the Name box, type a name for the application, for example, CoreStack.App.
The other fields can be left with the default options.
- The value of the Supported account types field can be Single Tenant.
- The value of the Redirect URI field can be blank.
- Click Register.
The application will be registered, and the Application (client) ID and Directory (tenant) ID will be displayed on the Overview screen. Copy the Application ID and the Tenant ID and paste the details in a notepad.
Step 2: Fetch Application Secret
Application Secret is the password or key that you need to provide for the specific app that was just created.
- On the Overview screen, click Certificates & secrets.
- Click + New client secret.
- Provide a description and expiry duration for the secret. You can leave the duration with the default value of 1 year. You can revoke this anytime later, if required.
- Click Add. The Client secret will be created and displayed.
Note:
Ensure that you copy this secret value and paste it in a notepad, since you cannot retrieve this later.
Step 3: IAM Access for App
The app that is created in Step 1 must have the required access within the subscription. To provide the access, follow the below steps:
-
In the Azure Portal, navigate to Subscriptions .
-
Click Access Control (IAM).
-
Click + Add and then click to select Add role assignment. The Add role assignment screen appears.
- Select the privileged administrator roles.
- Select Contributor.
- Select job function roles.
- Select the Resource Policy Contributor.
- In the Assign access to field, ensure that the User, group, or service principal option is selected.
- Click + Select members and in the Select field, search and select the app that was created earlier. In this example, select CoreStack.App.
- Click the Save button to assign the role.
After the role is assigned, it will be listed in the Role Assignments tab.
Note:
The "Resource Policy Contributor" role assignment is required for CoreStack to create policies for your Azure subscription.
Step 4: Reservation Reader Role
CoreStack requires Reservation Reader role for CoreStack.App to fetch the reserved instances in the subscription.
Note:
You can skip this step if you don’t have any reserved instances in your subscription.
- Navigate to Virtual machines > Reservations > View.
You can now see all the reserved instances in your subscription.
- Click Role Assignment.
- Click +Add and then click Add role assignment.
- In the Assignment type field, select Job function roles.
- In the Search box, type Reservations Reader and select it from the search result and then click Next.
-
Ensure that the User, group, or service principal option is selected in the Assign access to field.
-
Search and select the app that was created earlier. In this example, select CoreStack.App in the Select field.
-
Click Save button to assign the role.
Copy all these details and provide them while onboarding your Azure Subscription into CoreStack.
Next steps
Now that you understand how to create the necessary roles and permissions in your Azure environment to onboard your Azure cloud account(s) into CoreStack so that you can fully utilize CoreStack Assessments, you can proceed to the Azure onboarding for CoreStack Assessments user guide.
Updated 6 months ago