
AWS SSM Documents
Introduction
The AWS Simple System Manager (SSM) Documents within AWS SSM help to manage various resources by automating the execution of specific tasks.
CoreStack offers integration with AWS SSM Documents that enables the user to view the list of documents and execute them to complete certain defined tasks. These are pre-defined documents which are already available in AWS, but they can be custom documents as well. Having these documents available in the CoreStack interface can help users save time and execute tasks more quickly.
Automation documents trigger a set of tasks that are completed automatically as per the details specified by the user. The user can select the document version and provide the appropriate details to run the automation documents. Tasks can be run on single or multiple instances.
Note:
As of November 2023, CoreStack offers integration with the Automation and Command SSM document categories for the execution of tasks. While the AWS SSM Documents service currently offers multiple document types, these additional types will be made available in CoreStack over time.
SSM - Automation Documents
From CoreStack, you can select an Automation Document that will run on your cloud instances to carry out tasks. Each automation document has its own set of fields or sections that need to be filled.
Please perform the following steps to execute a document:
Note:
Ensure you fill all mandatory fields. Mandatory fields have a red asterisk or star symbol next to it. Fields marked as optional can be filled depending on your needs, or can be left blank.
-
Login to the CoreStack application.
-
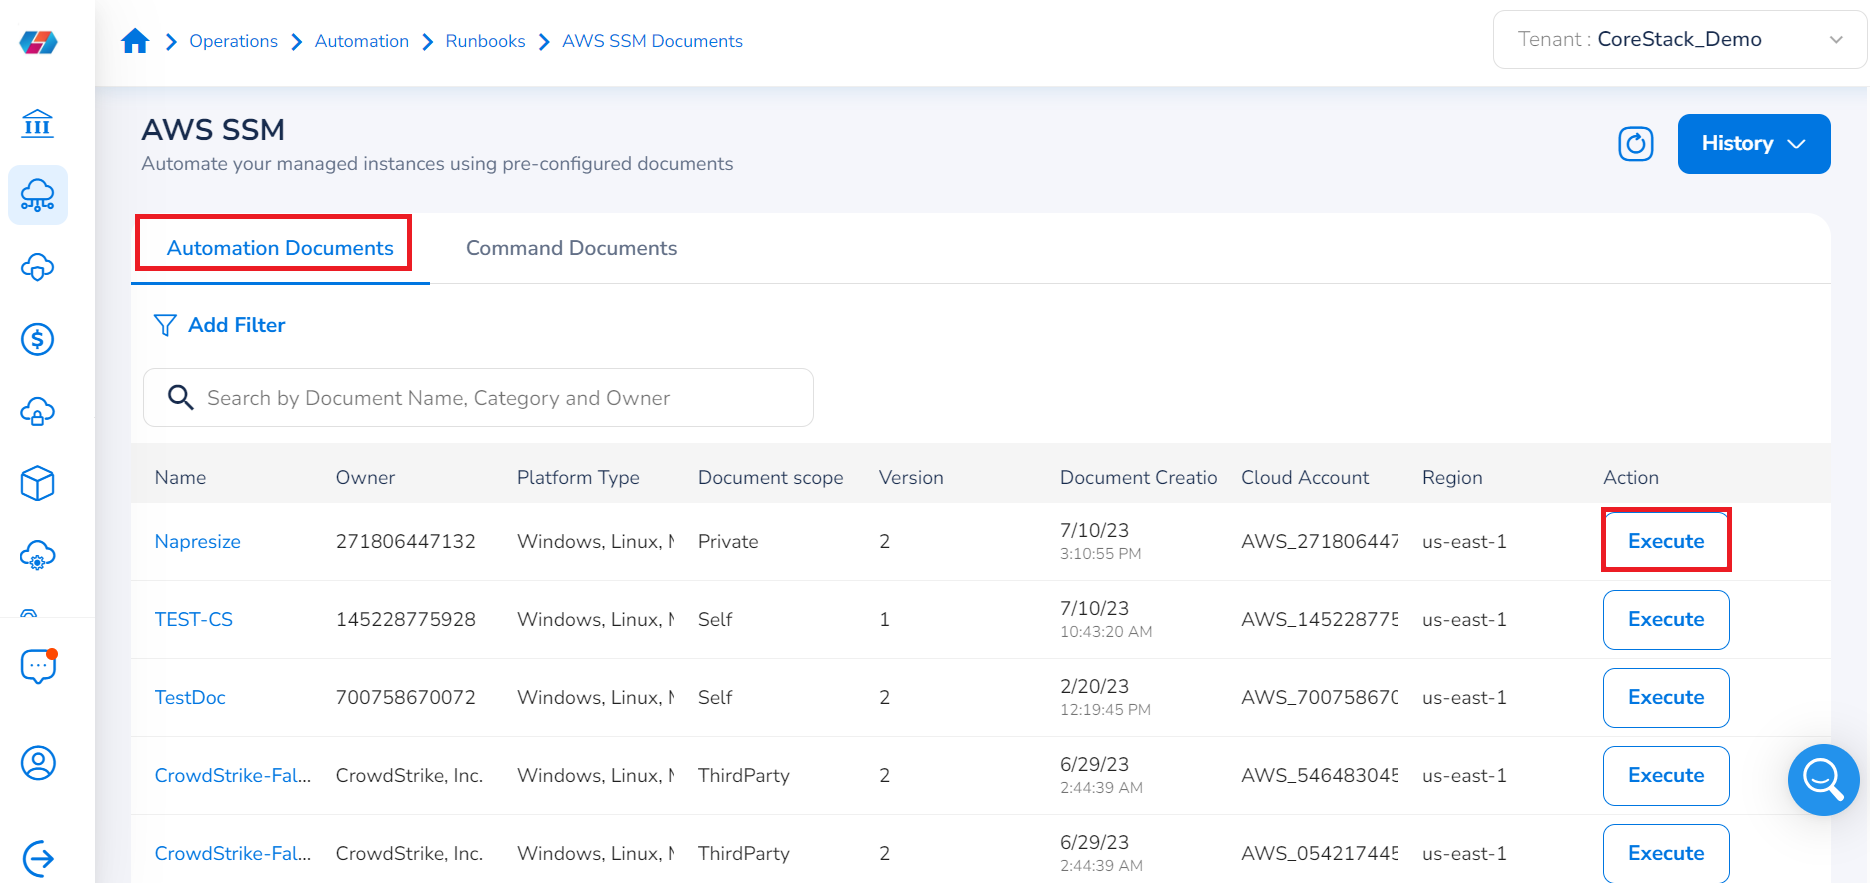
On the left navigation pane, go to Operations > Runbooks > AWS SSM Documents. The AWS SSM screen shows Automation Documents.

- On the Automation Documents tab, click Execute for the corresponding automation document.
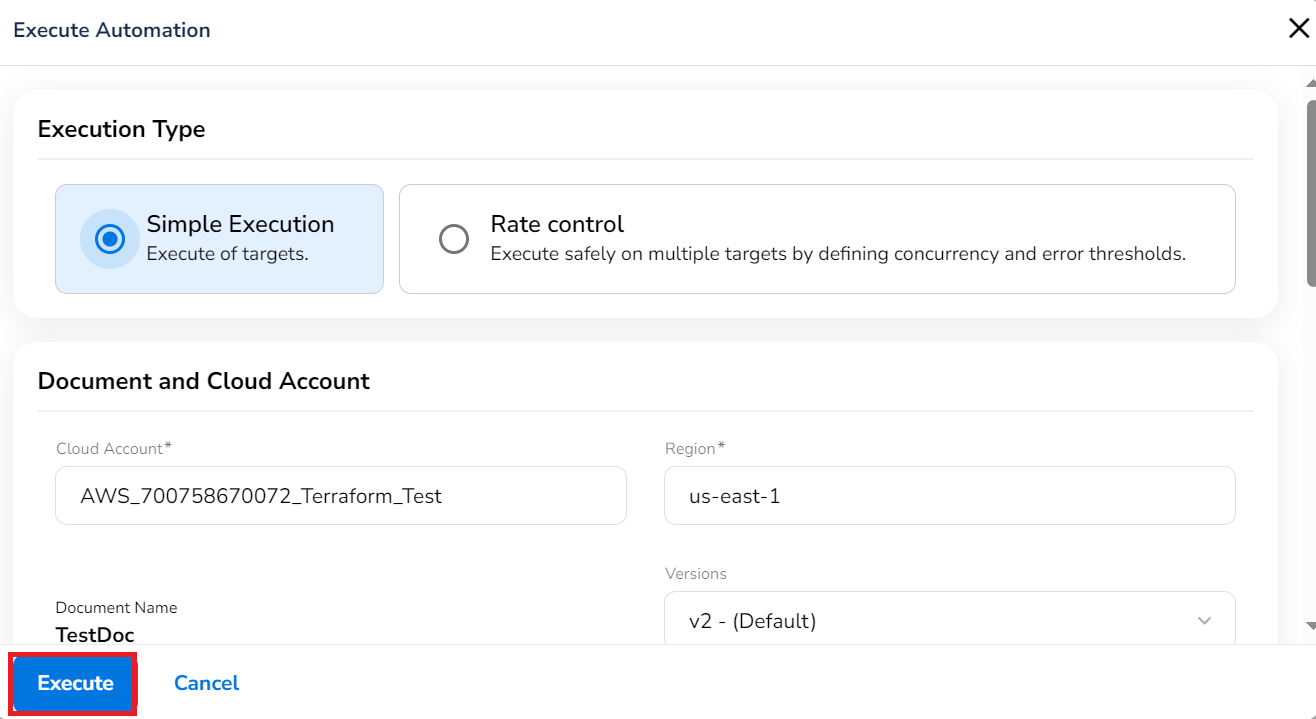
- In the Execution Type field, click to select either Simple Execution or Rate control.
- Simple Execution: Run the document on a single instance.
- Rate control: Run the document in multiple instances.
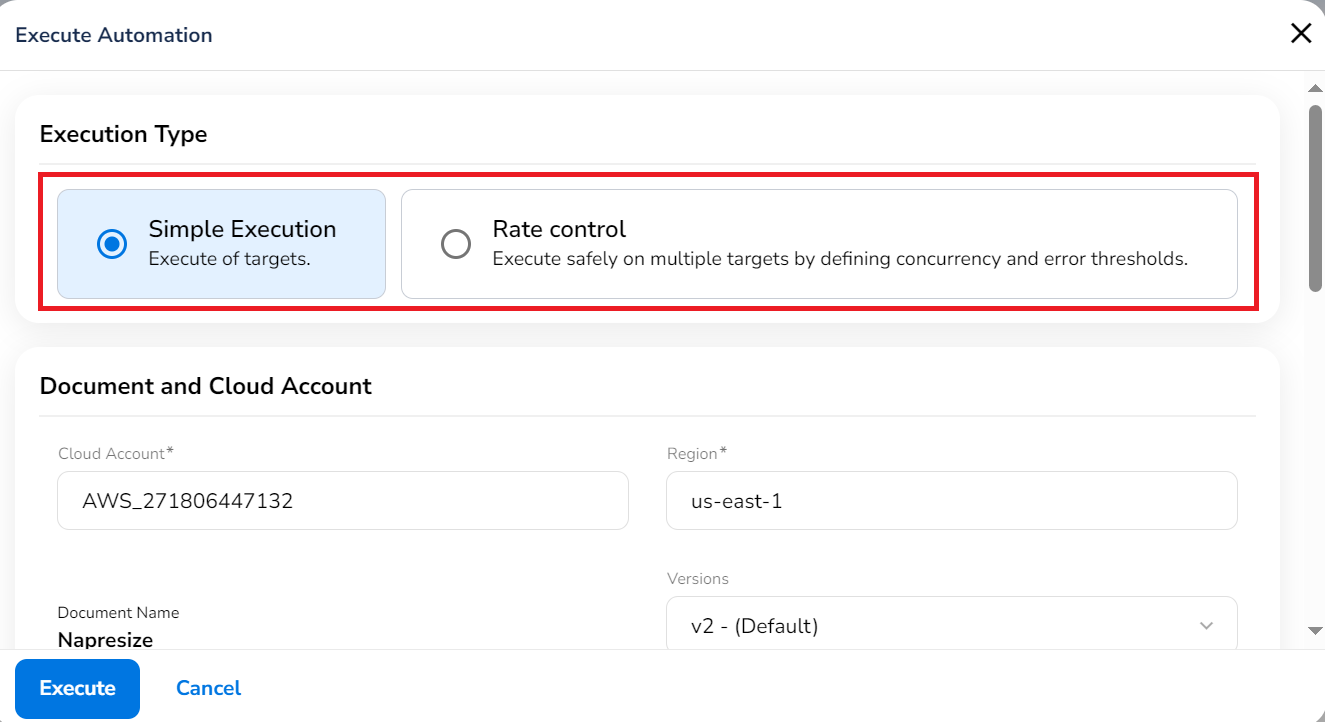
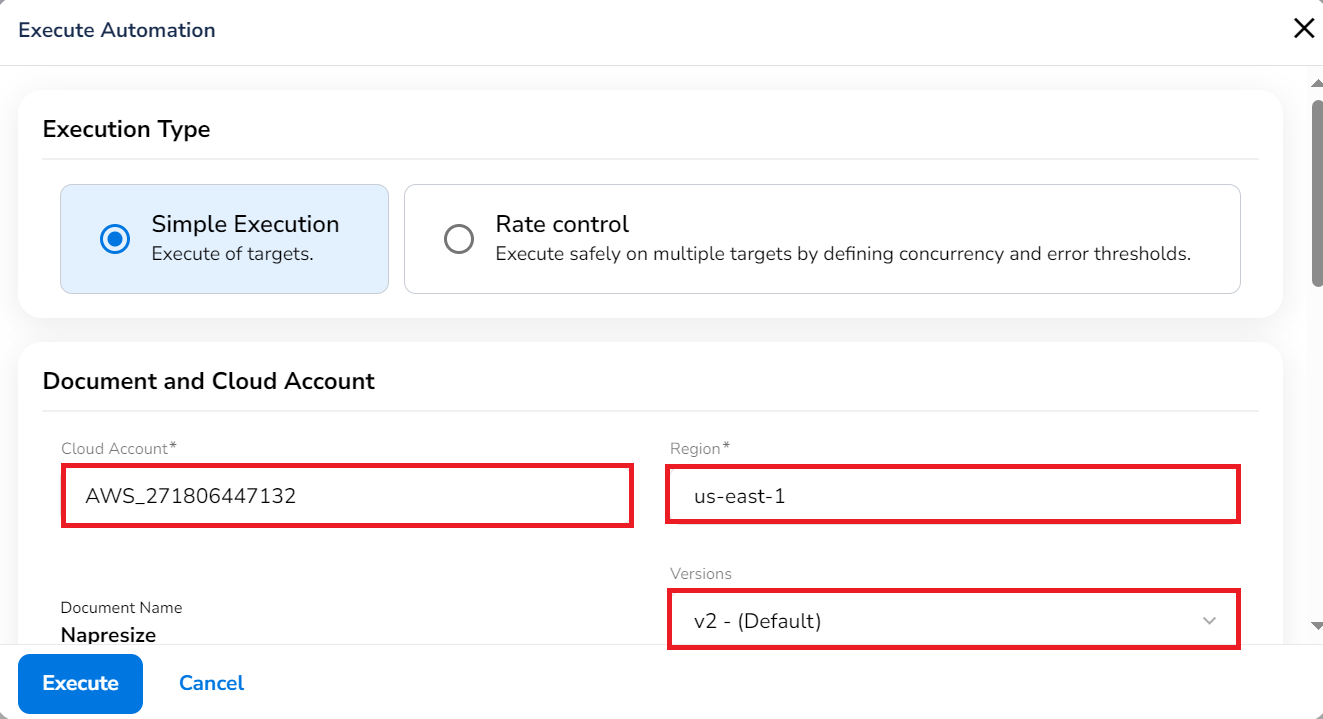
- In the Document and Cloud Account section, fill the following fields:
- In the Cloud Account list, click to select the cloud account.
- In the Region list, click to select the region of the cloud account.
- In the Versions list, click to select the version of the document.
-
In the Targets section, fill the following fields:
Note:
This section appears only if "Rate control" is selected as the "Execution Type" in step 4.
- In the Parameter list, click to select a parameter.
- In the Target list, click to select a target.
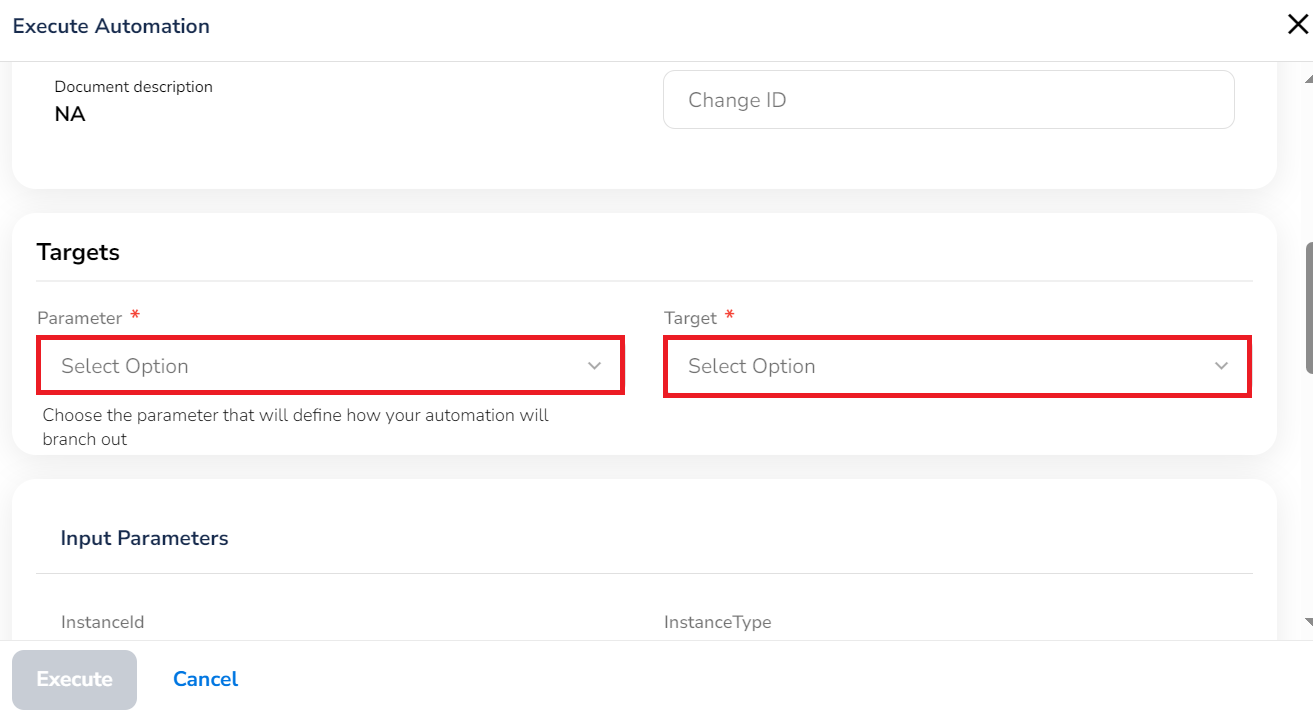
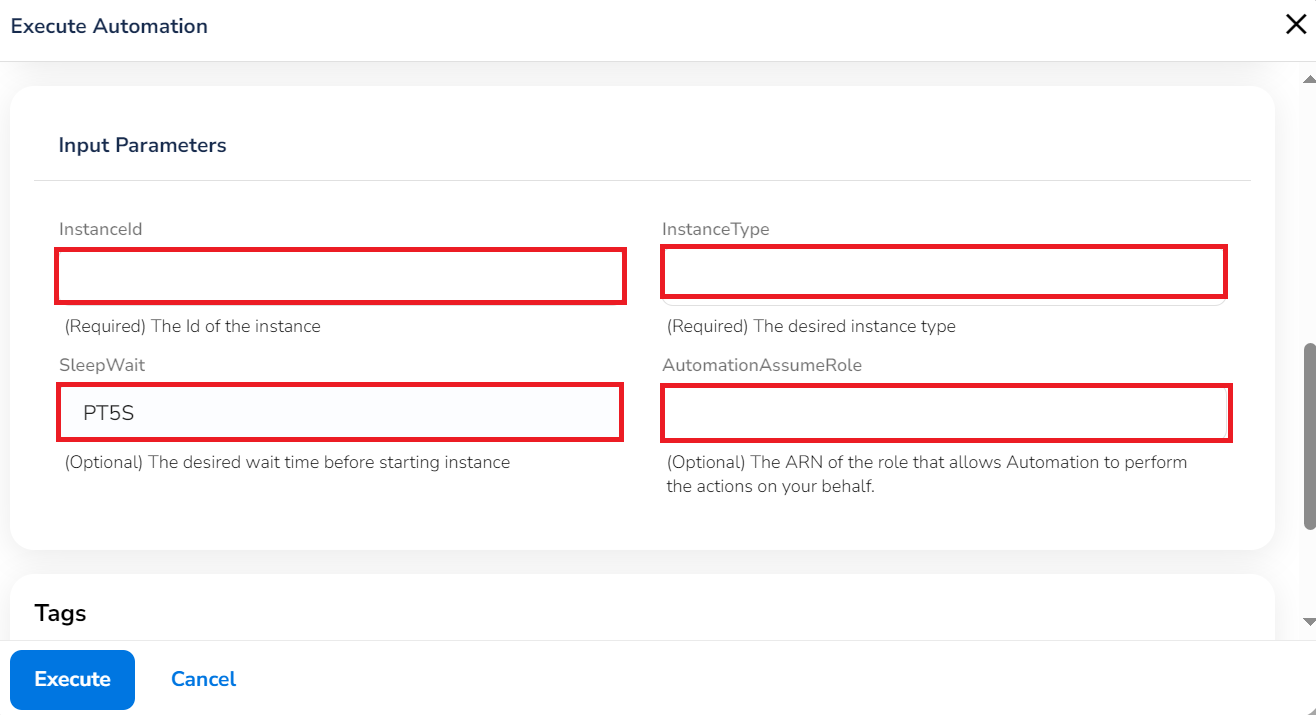
- In the Input Parameters section, fill the following fields:
- In the InstanceId box, type the instance ID on which the document will be executed.
- In the InstanceType box, type the desired instance type.
- In the SleepWait box, type the wait time value before starting the instance.
- In the AutomationAssumeRole list, click to select the ARN of the role for performing automation tasks.
Note:
Different Automation Documents will show different field names. Depending on what appears, please be sure to fill all applicable fields.
-
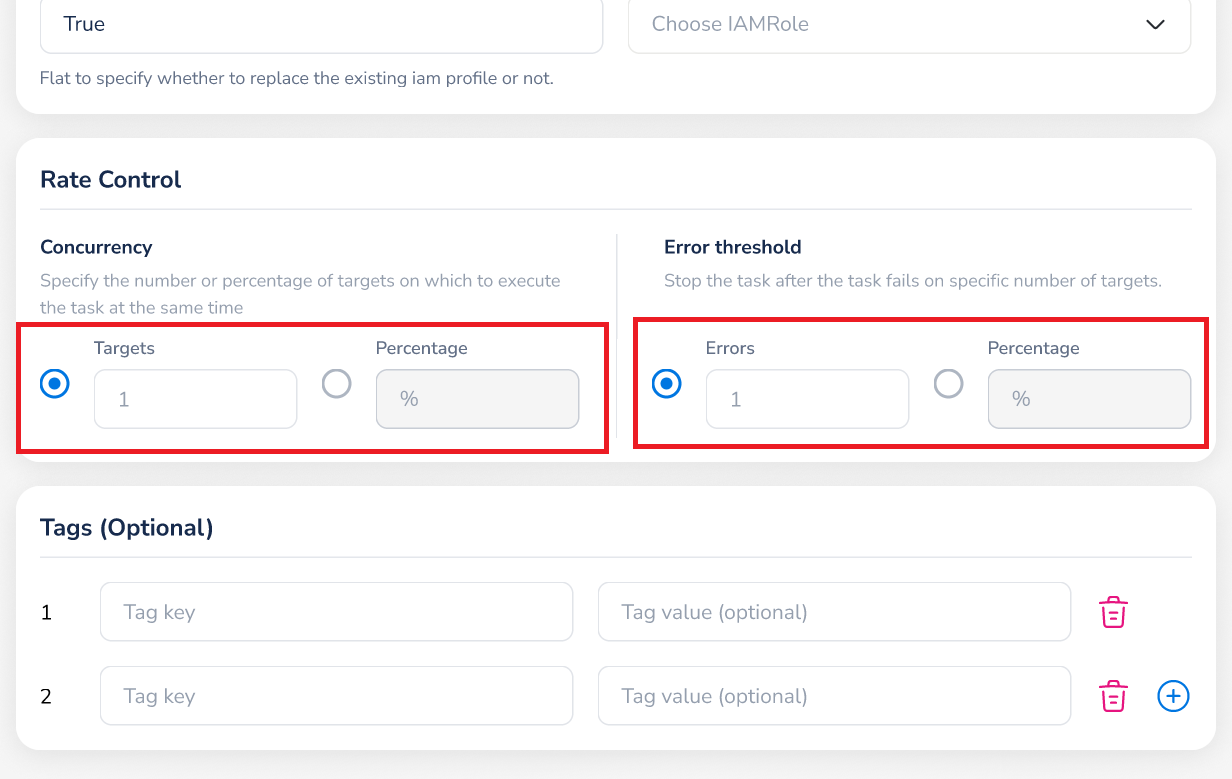
In the Rate Control section, fill the following fields:
Note:
This section appears only if "Rate control" is selected as the "Execution Type" in step 4.
- In the Concurrency field, select either Targets or Percentage and type a value for the selected option. This field specifies the number of targets on which a task can be run.
- In the Error threshold field, select either Errors or Percentage and type a value for the selected option. After the task receives either the total number or percentage of errors specified in this field, it will stop.
For example, if you select Errors then enter 5, the task will stop running after encountering the sixth error. If you select Percentage then enter 10%, then run the task against 50 resources (for example), it will stop when the sixth error is received.
-
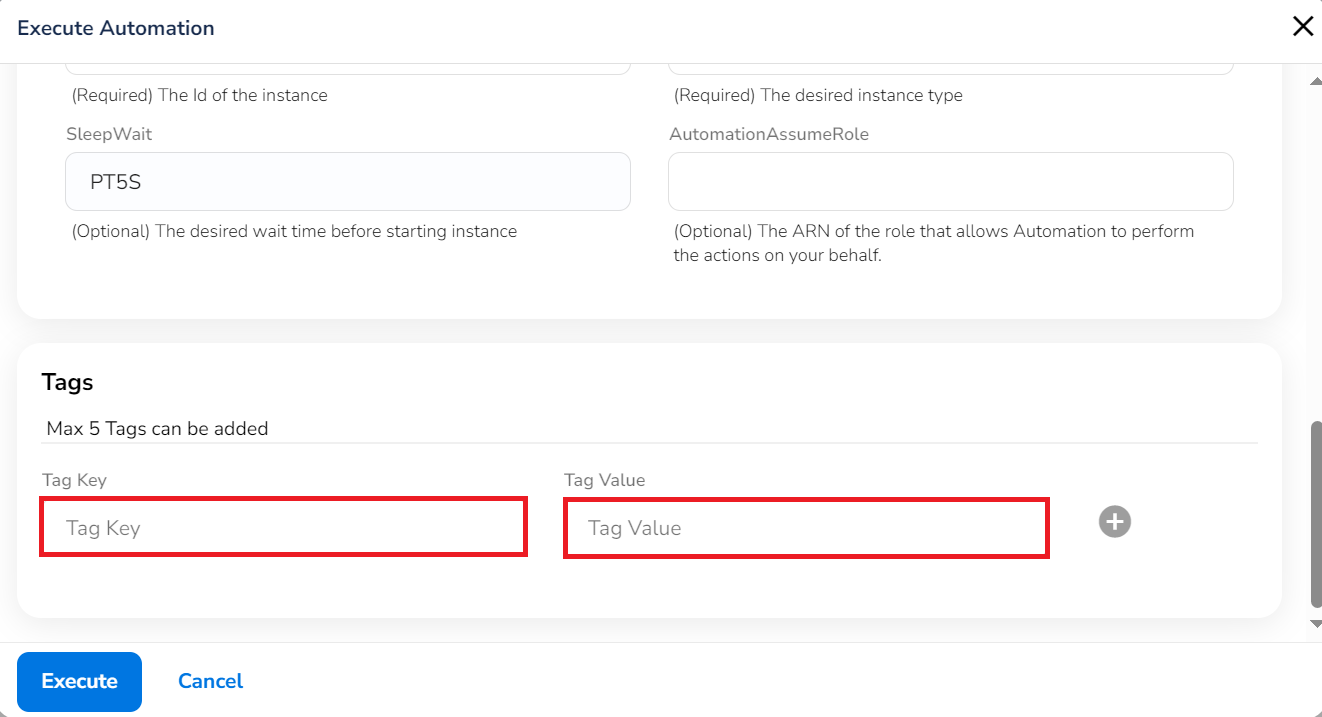
In the Tags section, fill the following:
Note:
It is not mandatory to fill this section, but if users want to use tag key and tag value for the execution of a file, then they can add details here.
- In the Tag Key box, type the tag key and in the Tag value box, type the related tag value.
- If another tag key and tag value needs to be added, then in the next blank row, you can type the details.
- To add an additional row for tag key and tag value, click the plus icon at the bottom-right side of the screen.
- To delete a row, click the bin icon.
- Click Execute.
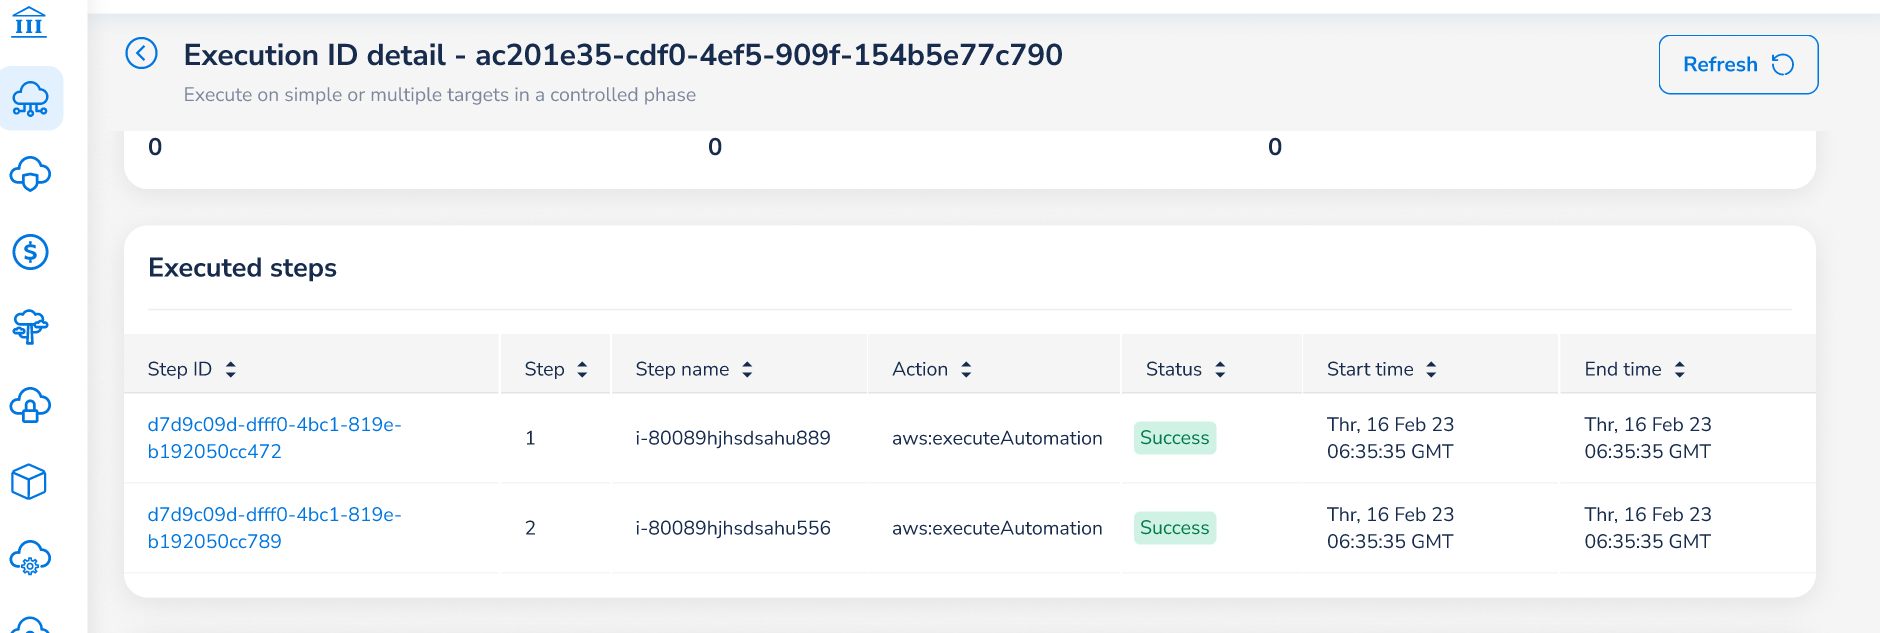
Users can view the execution details on the next screen. Users can see the execution ID, mode of execution, start and end time of execution, document scope, execution status, details of input parameters, details of executed steps, etc.
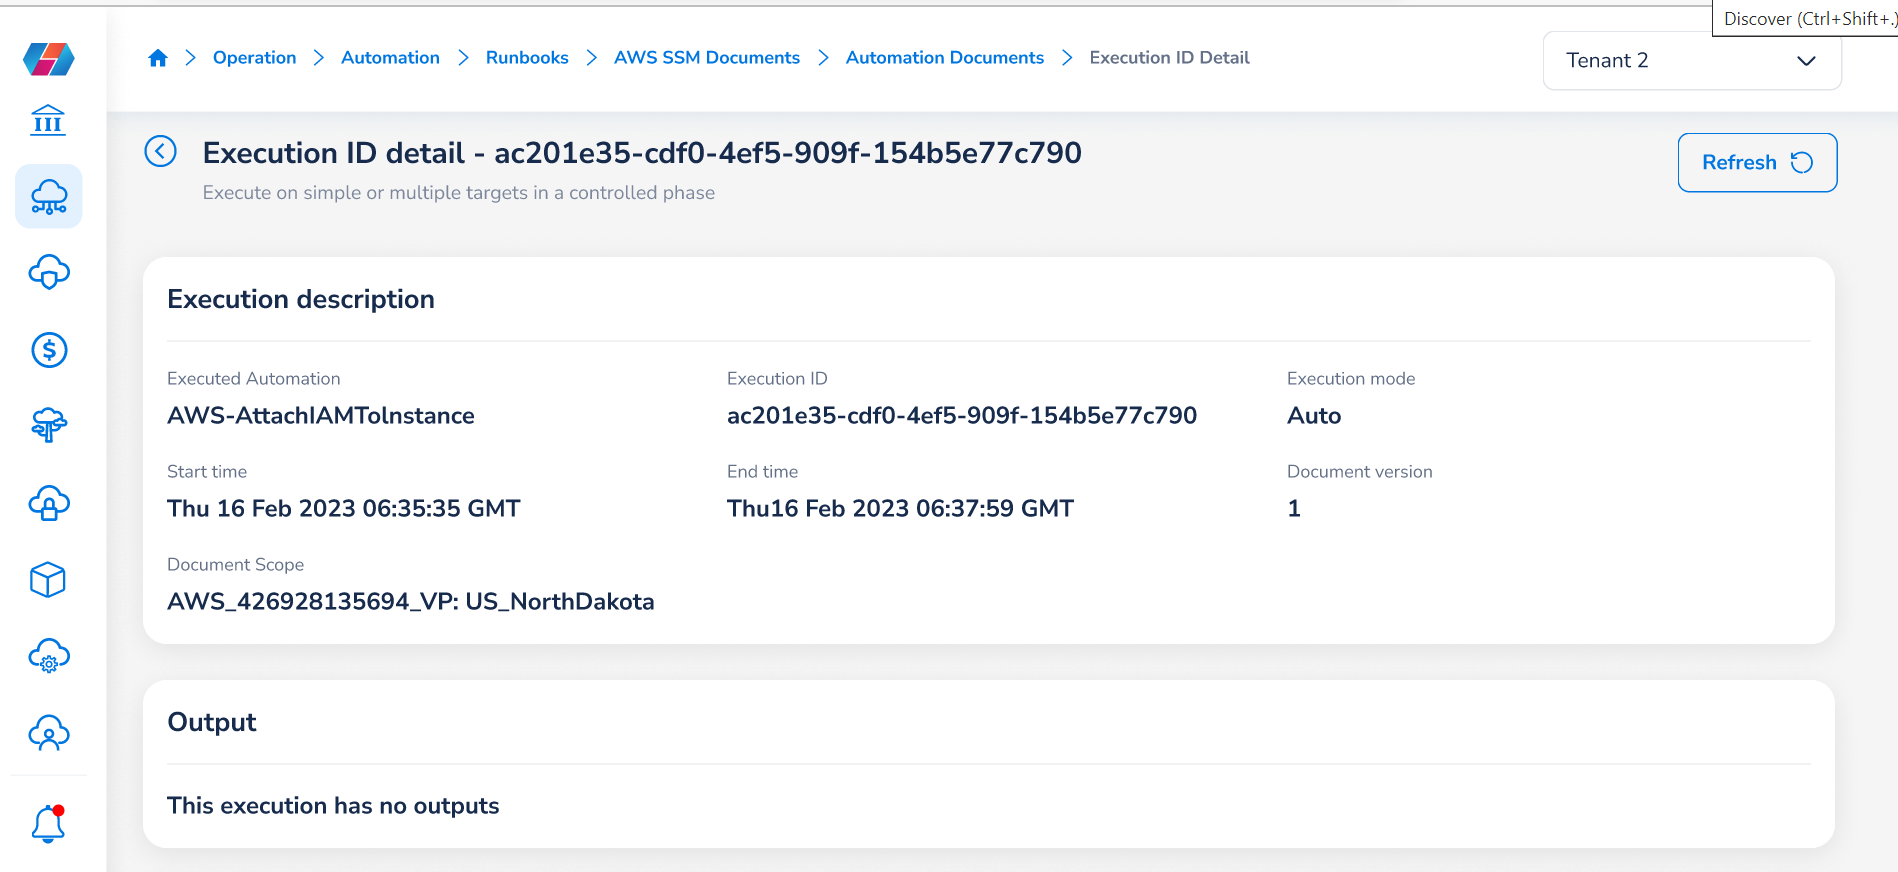
In the Executed steps section, users can click a step to view the step details.
Viewing Execution History
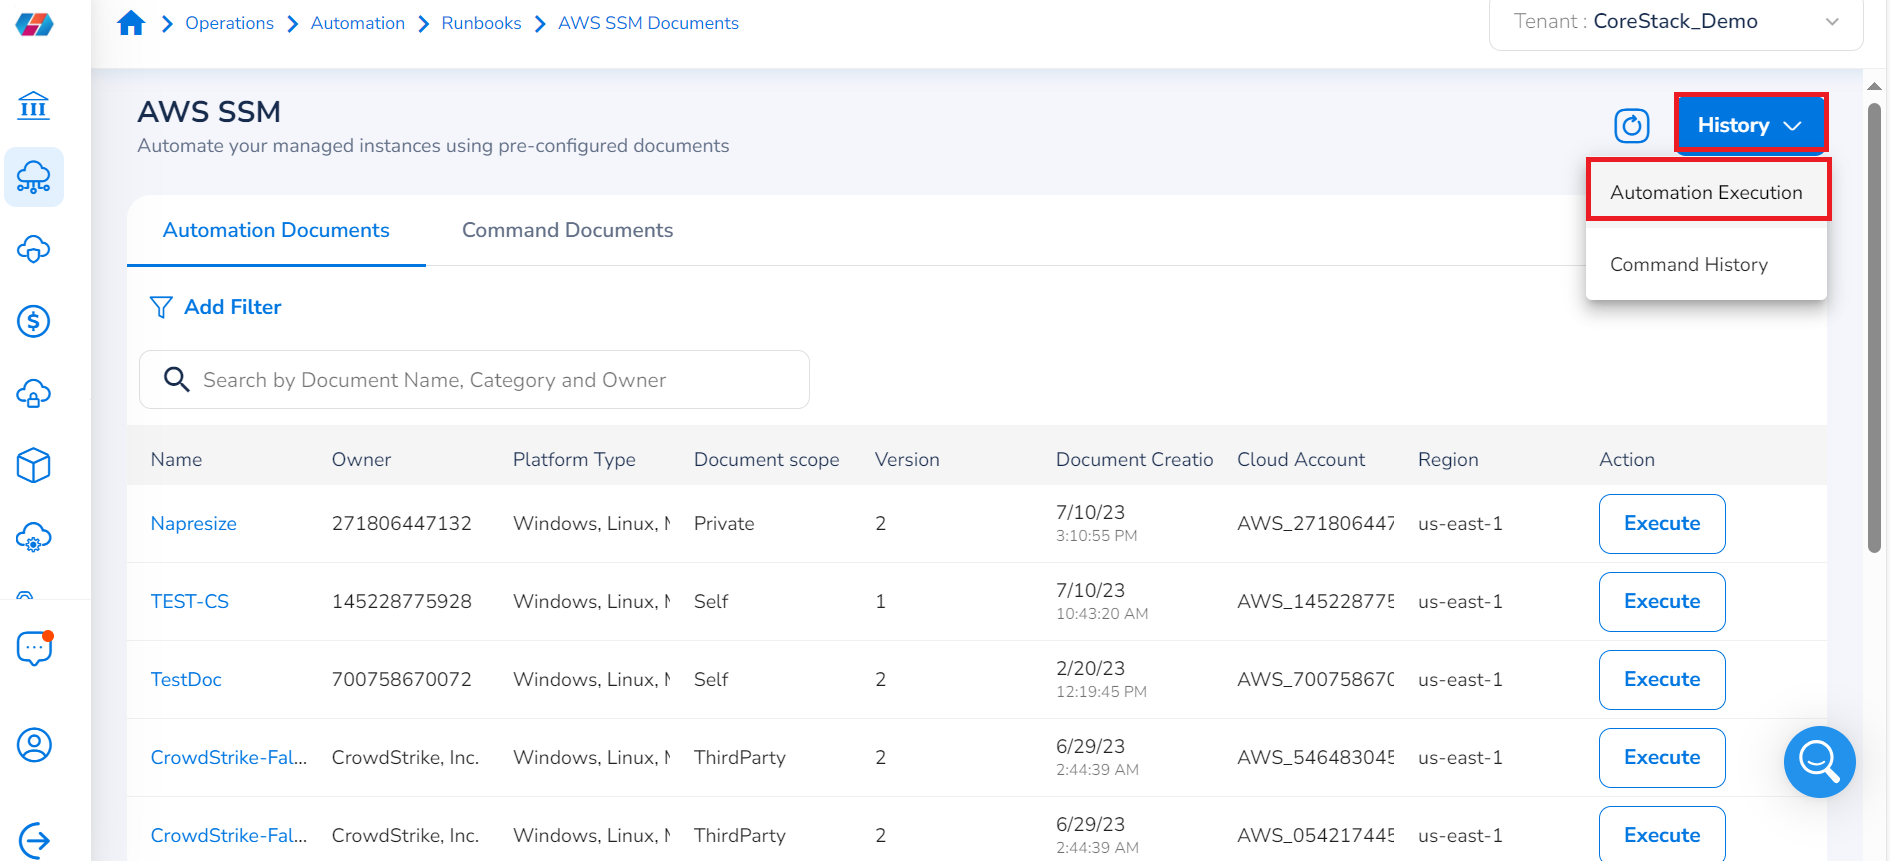
Users can view the execution history of Automation Documents on the AWS SSM Documents screen. To view the history of documents, click the History list on the top of the screen and then select Automation Execution.
If you select History > Automation Execution, then you can see the list of automation documents executed. You can see the details like execution ID, document name, cloud account name, region of the cloud account, status of execution, start and end time of execution, and who it was executed by.
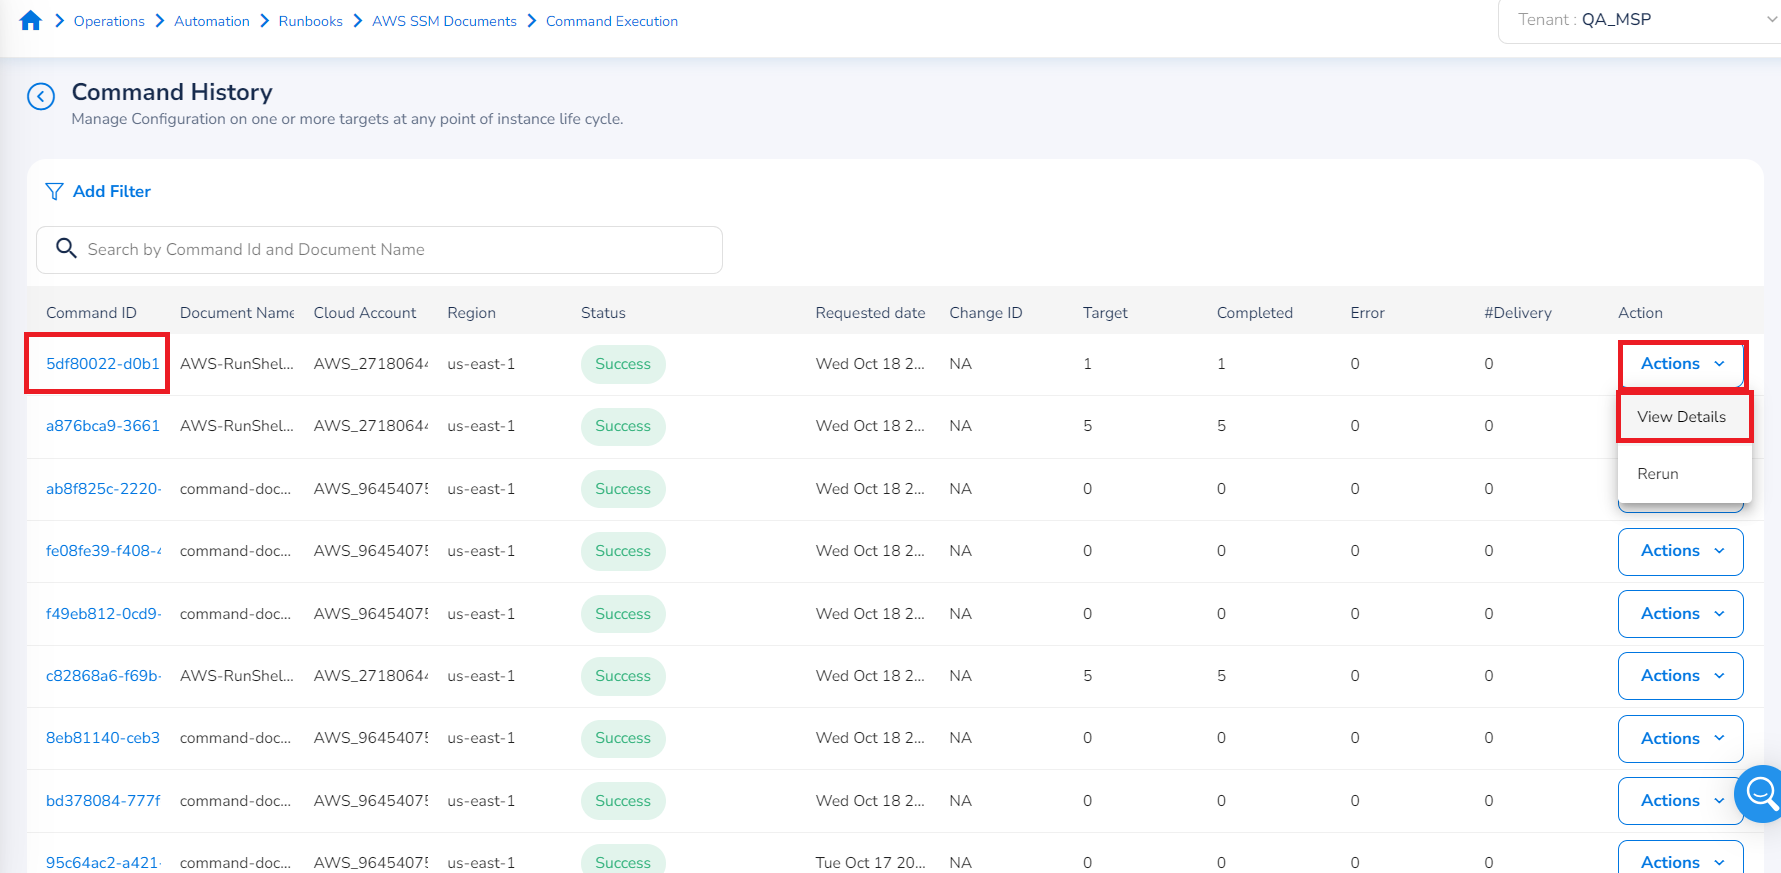
To view detailed execution information, you can click on a particular execution ID or click Action > View Details.
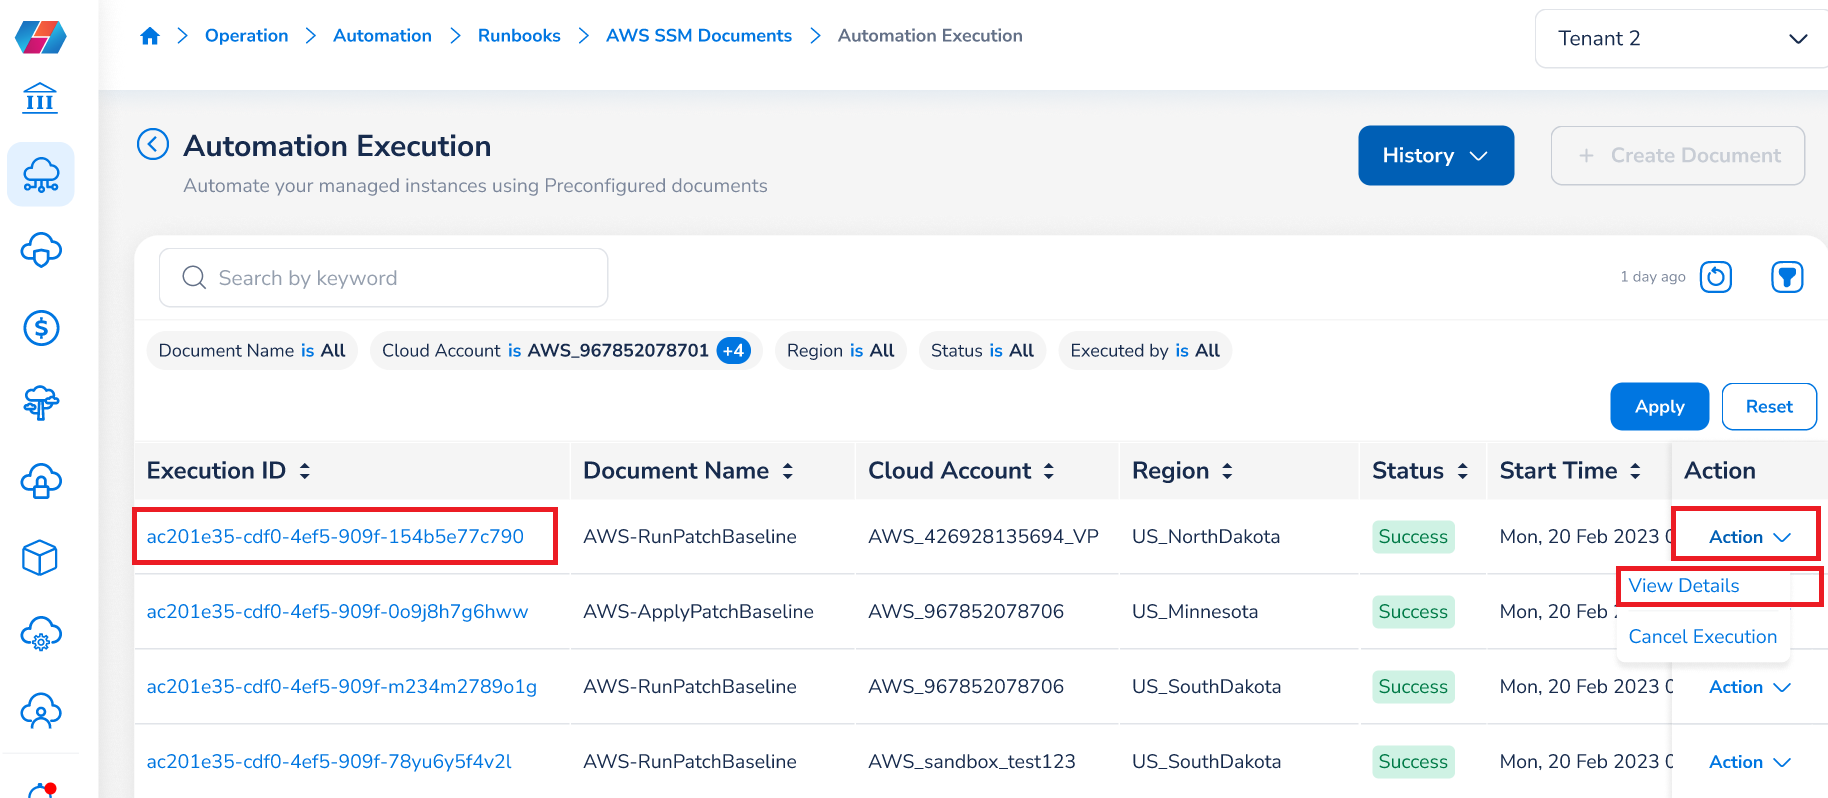
If you want to stop the execution of a document, then click Action > Cancel Execution at any time.
Note:
- Document execution in AWS portal will not be synced with CoreStack.
- Documents are synced from AWS every 12 hours each day.
Email Notification about AWS SSM Execution Failure
SSM now supports email notifications to users who have triggered the SSM documents. If there is a failure in execution, users will receive a notification about the failure through an email. They will receive all the details in the email and will be able to navigate to the respective execution for mitigation.
Command Documents
The AWS Systems Manager (SSM) Documents service offers multiple document types, and the command document is one of the types available in CoreStack used for executing specific commands. Users can view all available AWS command documents in CoreStack, but they can only execute one command document at a time.
Note:
Execution of command documents is applicable for SSM managed instances only.
Execution of Command Documents
Perform the following steps to execute command documents:
Note:
- Ensure you fill all mandatory fields. Mandatory fields have a red asterisk or star symbol next to it. Fields marked as optional can be filled depending on your needs, or can be left blank.
- Use the Add Filter option to filter and search for the required command document.
-
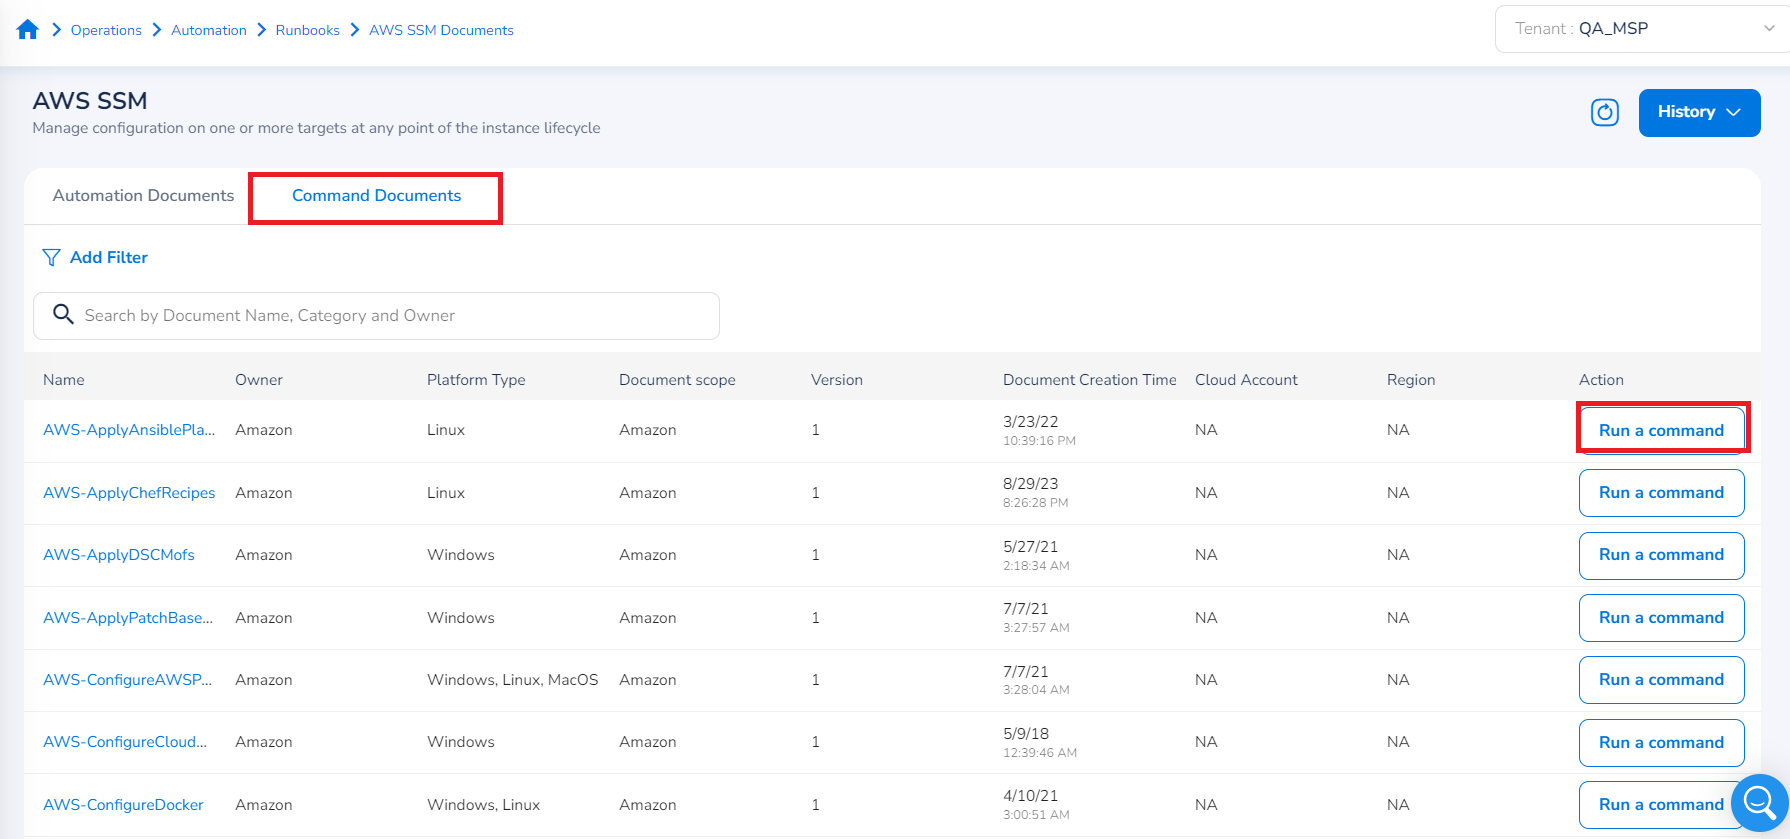
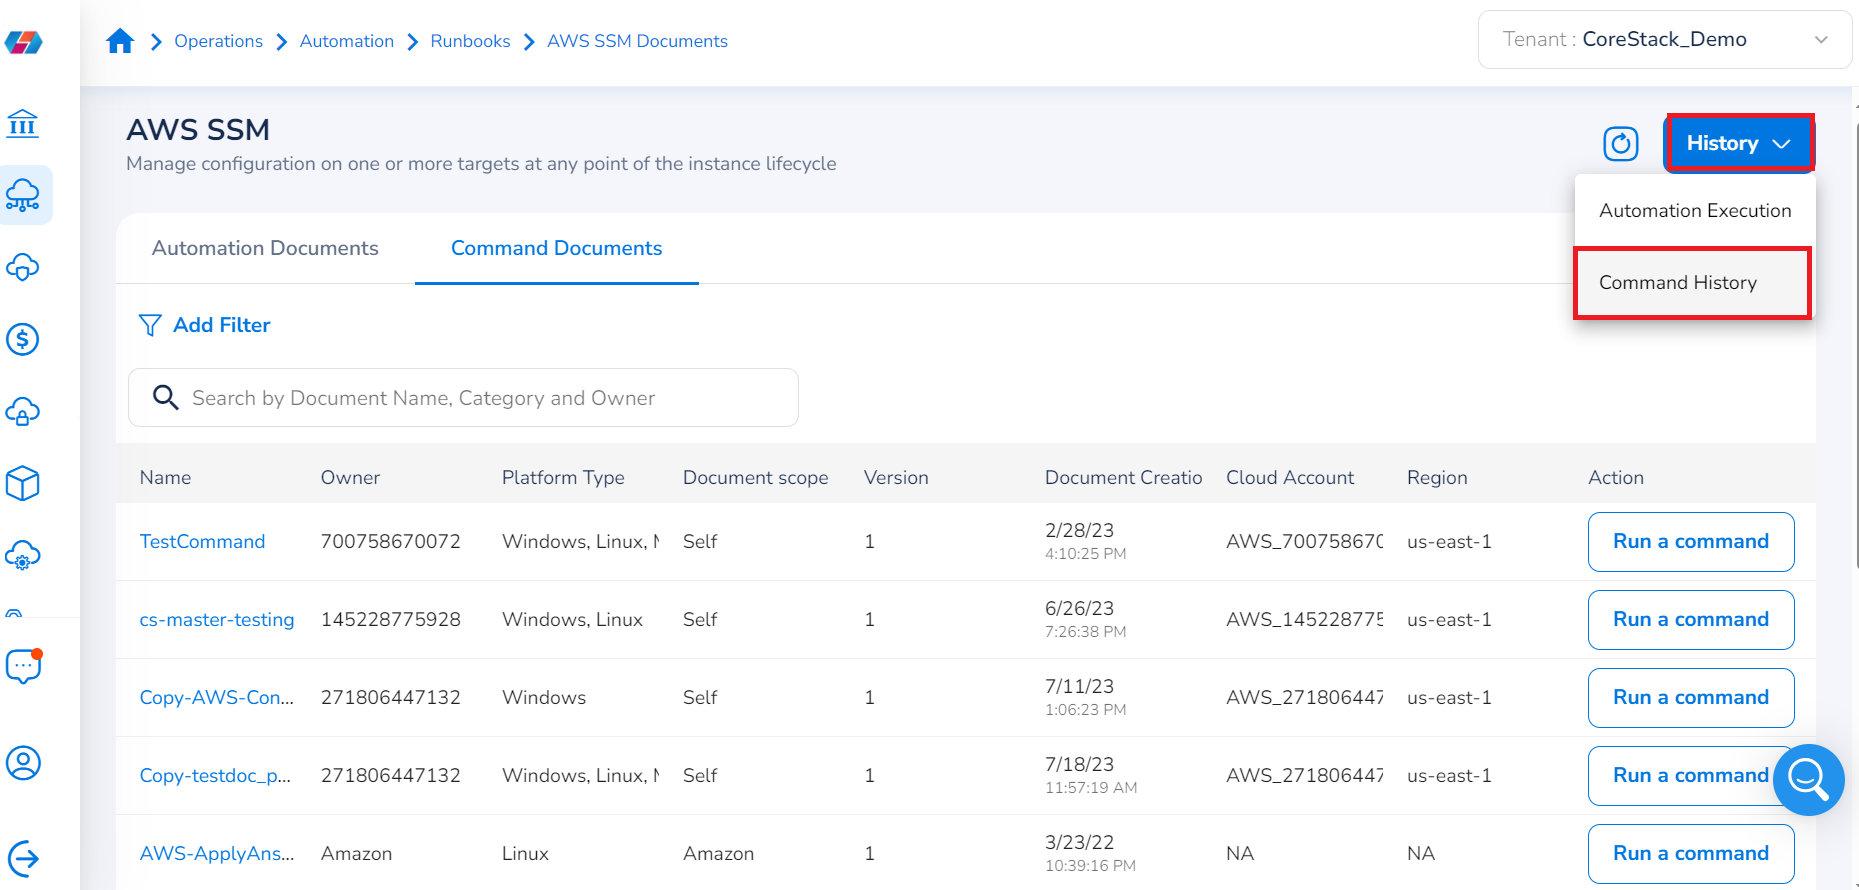
On the AWS SSM Documents screen, go to the Command Documents tab. Here you can view the list of available command documents. This screen shows the document name, owner, platform type, document scope, version, cloud account, region, and more for each command document.
-
Click on Run a command corresponding to a particular command name.
You must fill all relevant details in the Run a command dialog box.
Alternatively, click the command name and on the Command details screen, click Run a command.
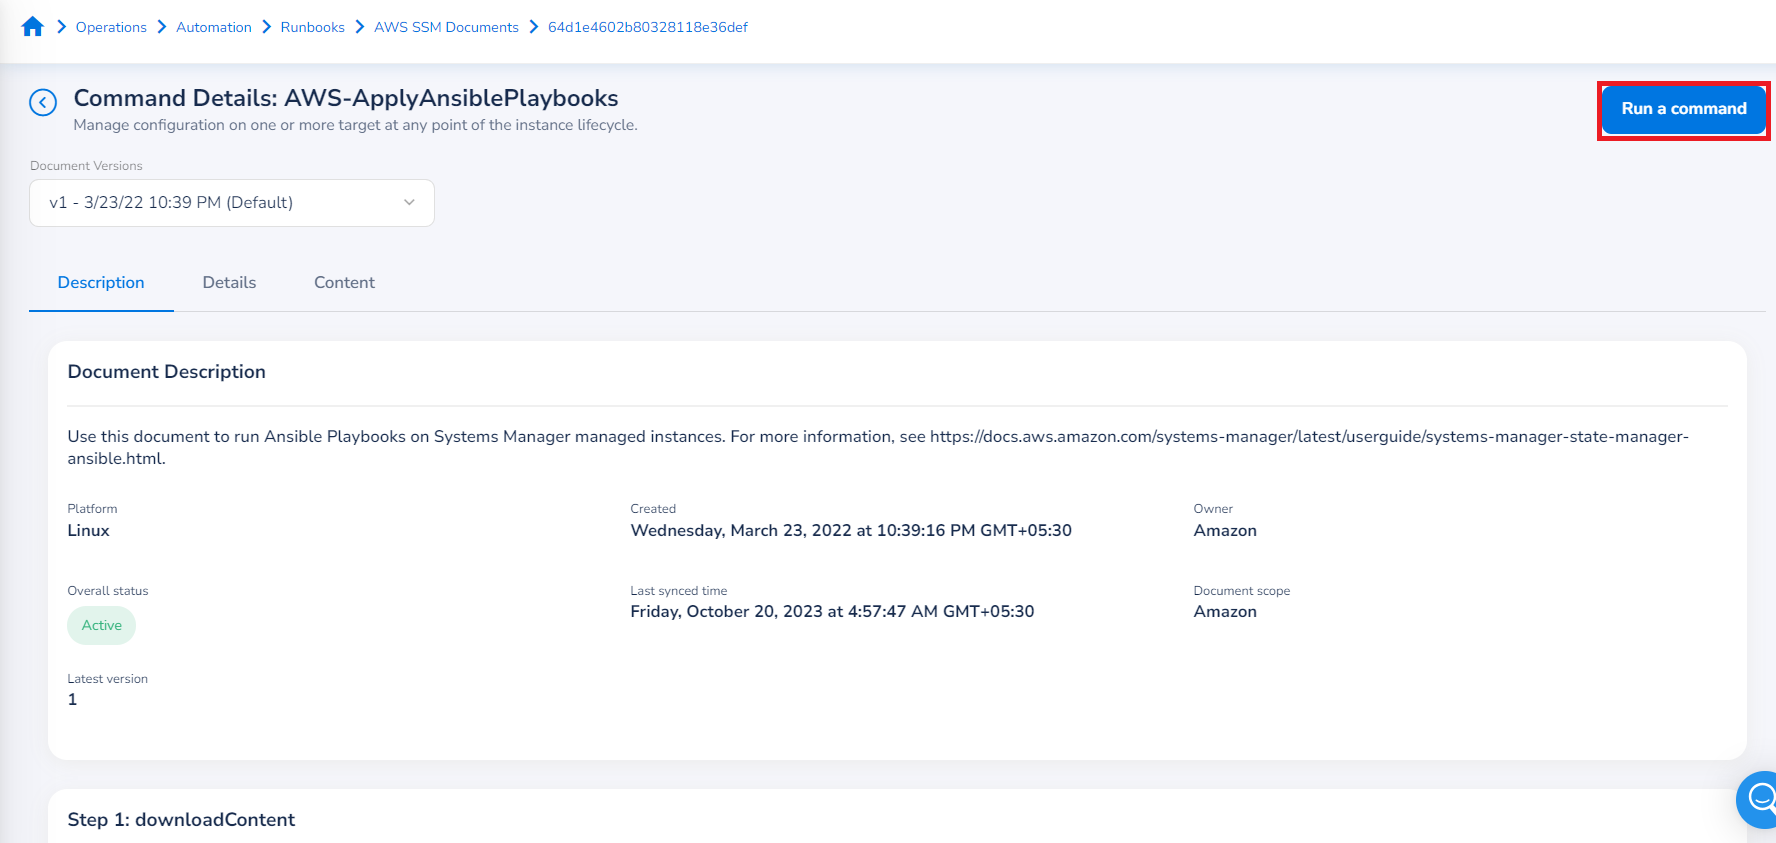
The Command Detail screen shows three tabs: Description, Details, and Content.
- The Description tab shows the description of the document (what this document is about) along with the execution steps and version. You can change the version of the document from the Document Version list and view a description of the selected version.
- The Details tab shows the details of the document such as parameters, permissions, attachments, tag info, categories, etc. You can change the version to view details.
- The Content tab shows the code or script of the document. Users can click Download to get a copy of the document.
-
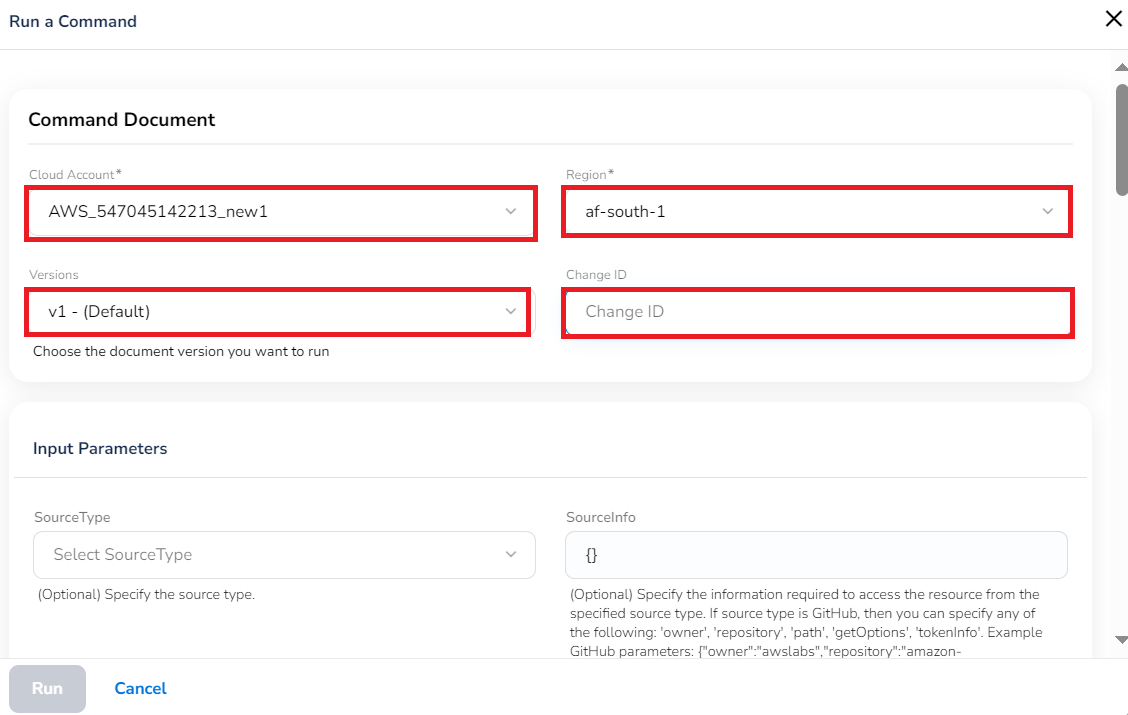
In the Command document section, fill the following fields:
- In the Cloud Account list, click to select a cloud account and then click Ok.
- In the Region list, click to select a region of the cloud account and then click Ok.
- In the Version list, click to select the version of the document and then click Ok.
- In the Change ID box, type the change ID.
-
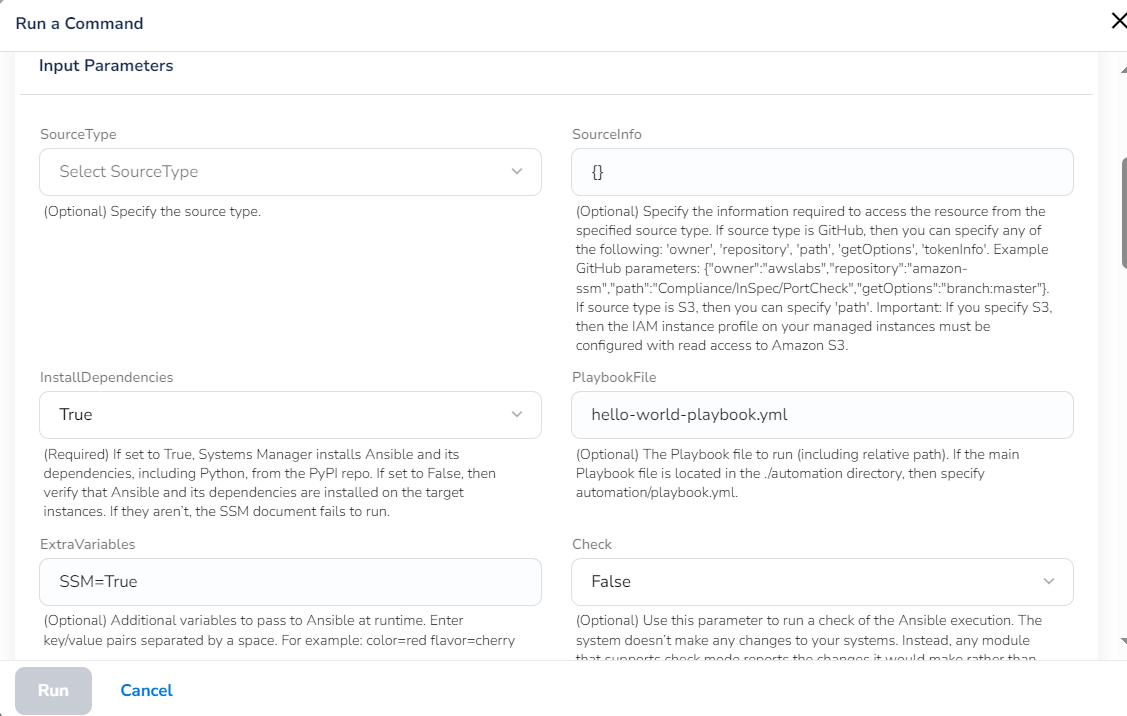
In the Input Parameters section, fill all the relevant fields:
- SourceType: click to select the source type for the resource and click Ok.
- SourceInfo: type the source details to access the resource.
- RunList: type the details.
- JsonAttributesSources: type relevant source JSON attribute.
- JsonAttributesContent: type the JSON attribute content.
- InstallDependencies: click True or False and then click Ok.
- PlaybookFile: type the correct path.
- ExtraVariables: type a variable value in the format shown.
- Check: click True or False and then click Ok. Refer to the field details explained right below this field.
- Verbose: click to select the verbosity level and then click Ok.
- TimeoutSeconds: type the time out value.
Note:
Different Command Documents will show different field names. Depending on what appears, please be sure to fill all applicable fields.
Note:
- Fields marked as Optional can be left blank, whereas fields marked as Mandatory must be filled out.
- Refer to the details provided below each field name to know about what it is and what has to be filled out.
- In the Target Selection section, select one of the following options:
- Specify instance tags: Select this option to run a task on instances with the specified tag-key value. If you select this option, then type the details in Tag Key and Tag Value boxes.
- Choose instance manually: Select this option to select instances manually. If you select this option, then ensure to select the instances from the Instances list and click Ok.
- Choose a resource group: Select this option to select the resource group that includes the resources. If you select this option, then select the resource group from the Resource Group list and click Ok.
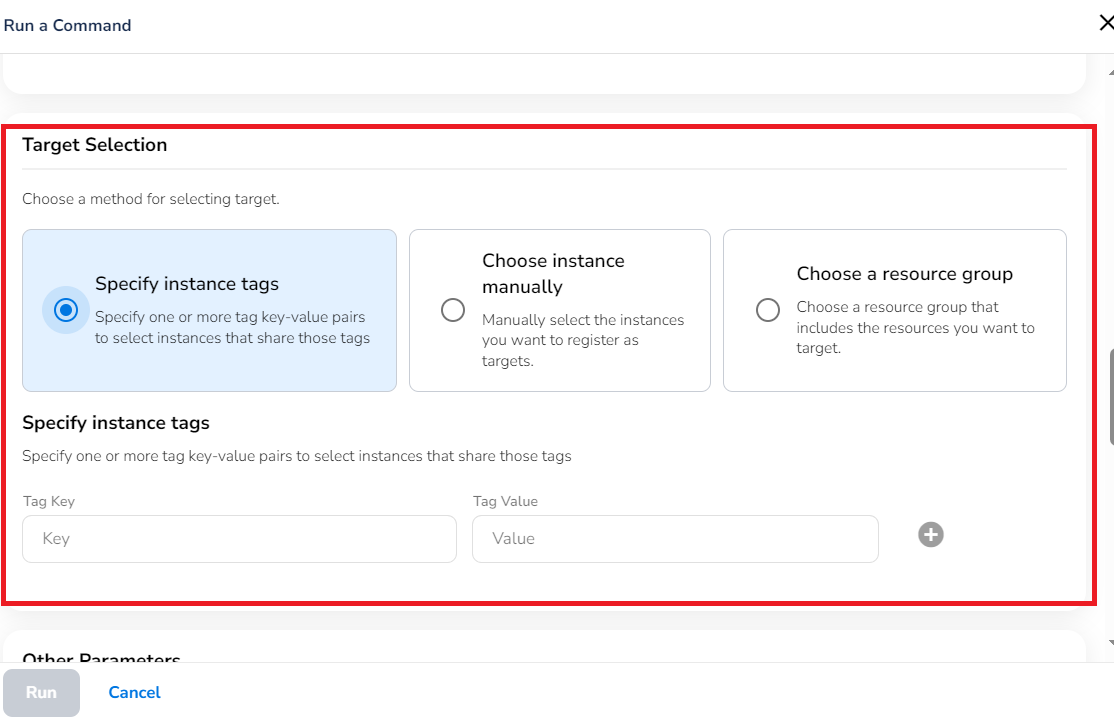
Note:
- To add an additional row for tag key and tag value, click the plus icon at the bottom-right side of the screen.
- To delete a row, click the bin symbol.
-
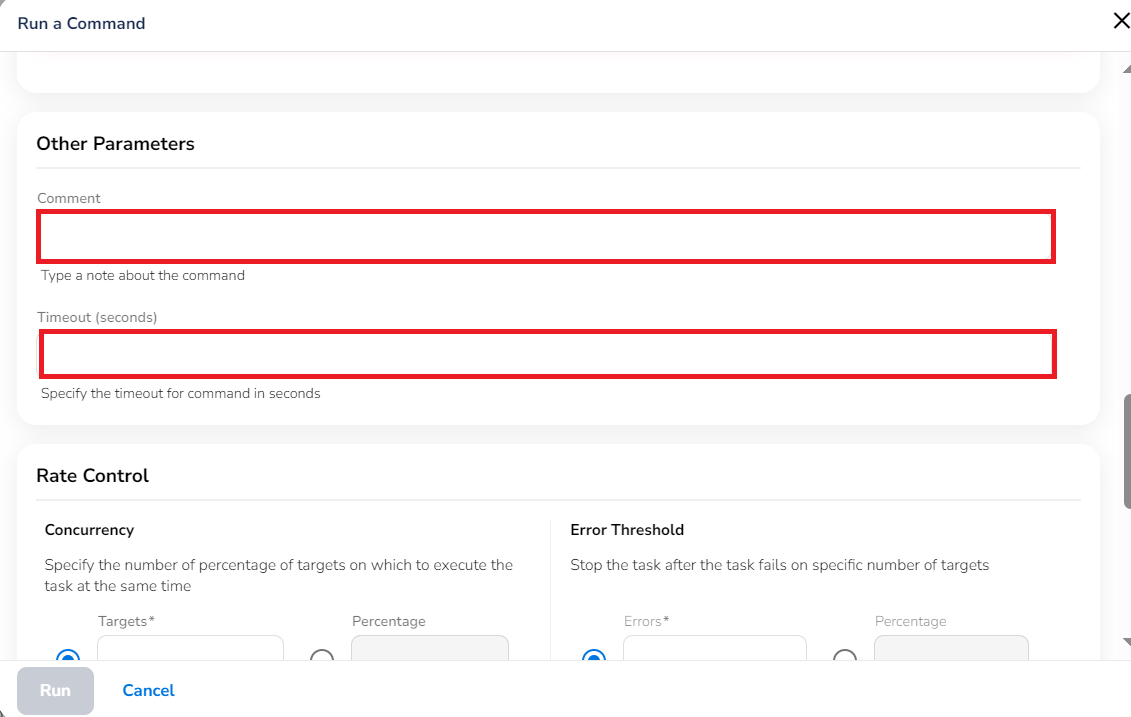
In the Other Parameters section, fill the following fields:
- In the Comment box, type a relevant comment.
- In the Timeout (seconds) box, type the timeout value in seconds.
-
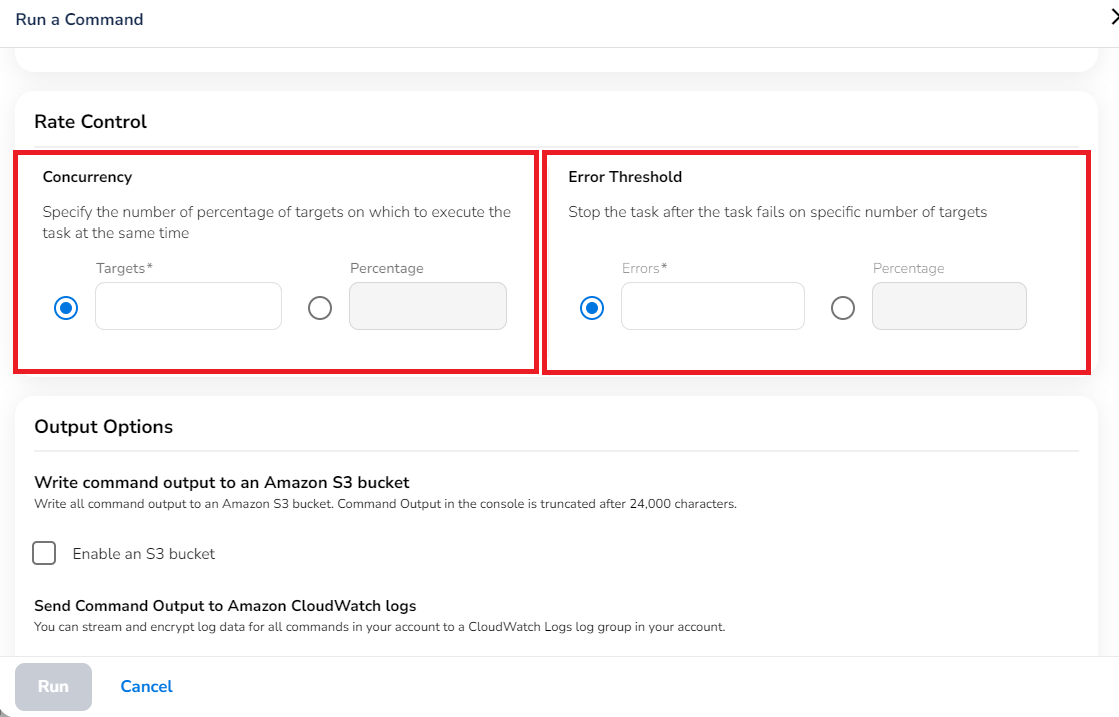
In the Rate Control section, fill the following fields:
-
In the Concurrency field, select either Targets or Percentage and type a value for the selected option. This field specifies the number of managed instances on which a task can be run.
-
In the Error threshold field, select either Errors or Percentage and type a value for the selected option. After the command receives either the total number or percentage of errors specified in this field, it will stop.
For example, if you select Errors then enter 5, the command will stop running after encountering the sixth error. If you select Percentage then enter 10%, then run the command against 50 managed nodes (for example), it will stop when the sixth error is received.
-
-
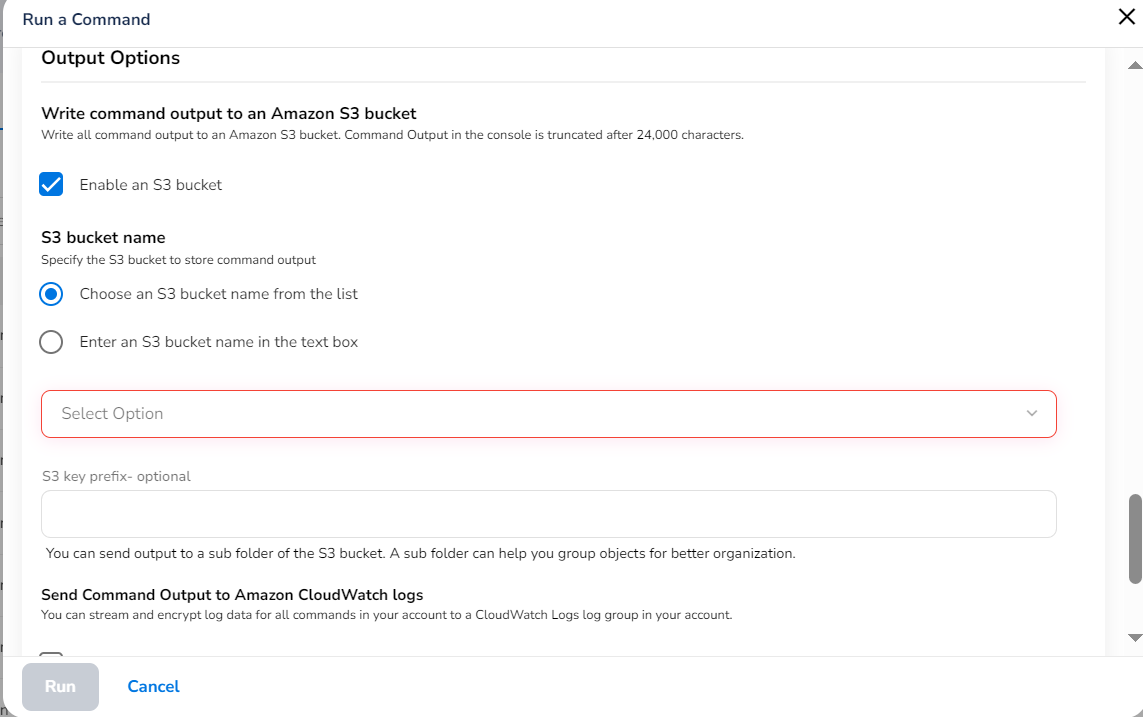
In the Output Options section, fill the following fields:
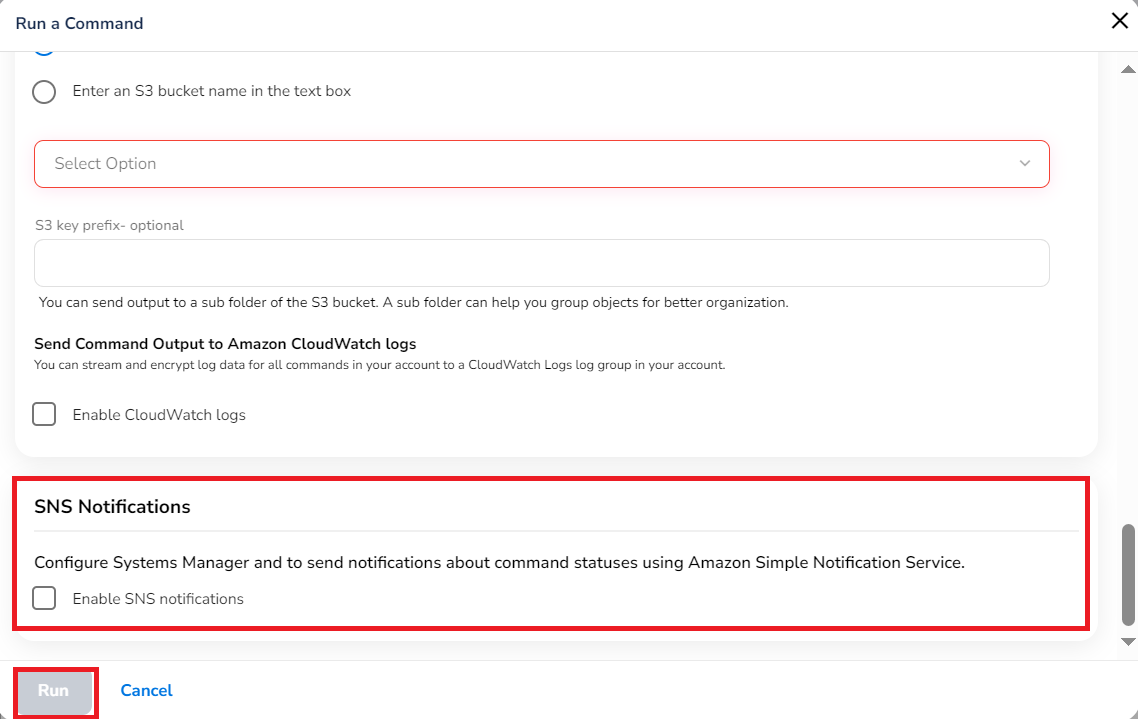
- Ensure that the Enable an S3 bucket check box is selected. The S3 bucket is where the command execution responses will be stored.
- In the S3 bucket name field, select either Choose an S3 bucket name from the list or Enter an S3 bucket name in the text box and then select/type the S3 bucket name in the field that appears below.
- In the S3 key prefix box, type the subfolder name of S3 bucket. This is an optional field.
- Click to select Enable CloudWatch logs if you want to enable it and fill the Log group name box, if required.
- Ensure that the Enable an S3 bucket check box is selected. The S3 bucket is where the command execution responses will be stored.
- In the SNS notifications section, click to select Enable SNS notifications to send command notifications using Amazon simple Notification service.
- Click Run.
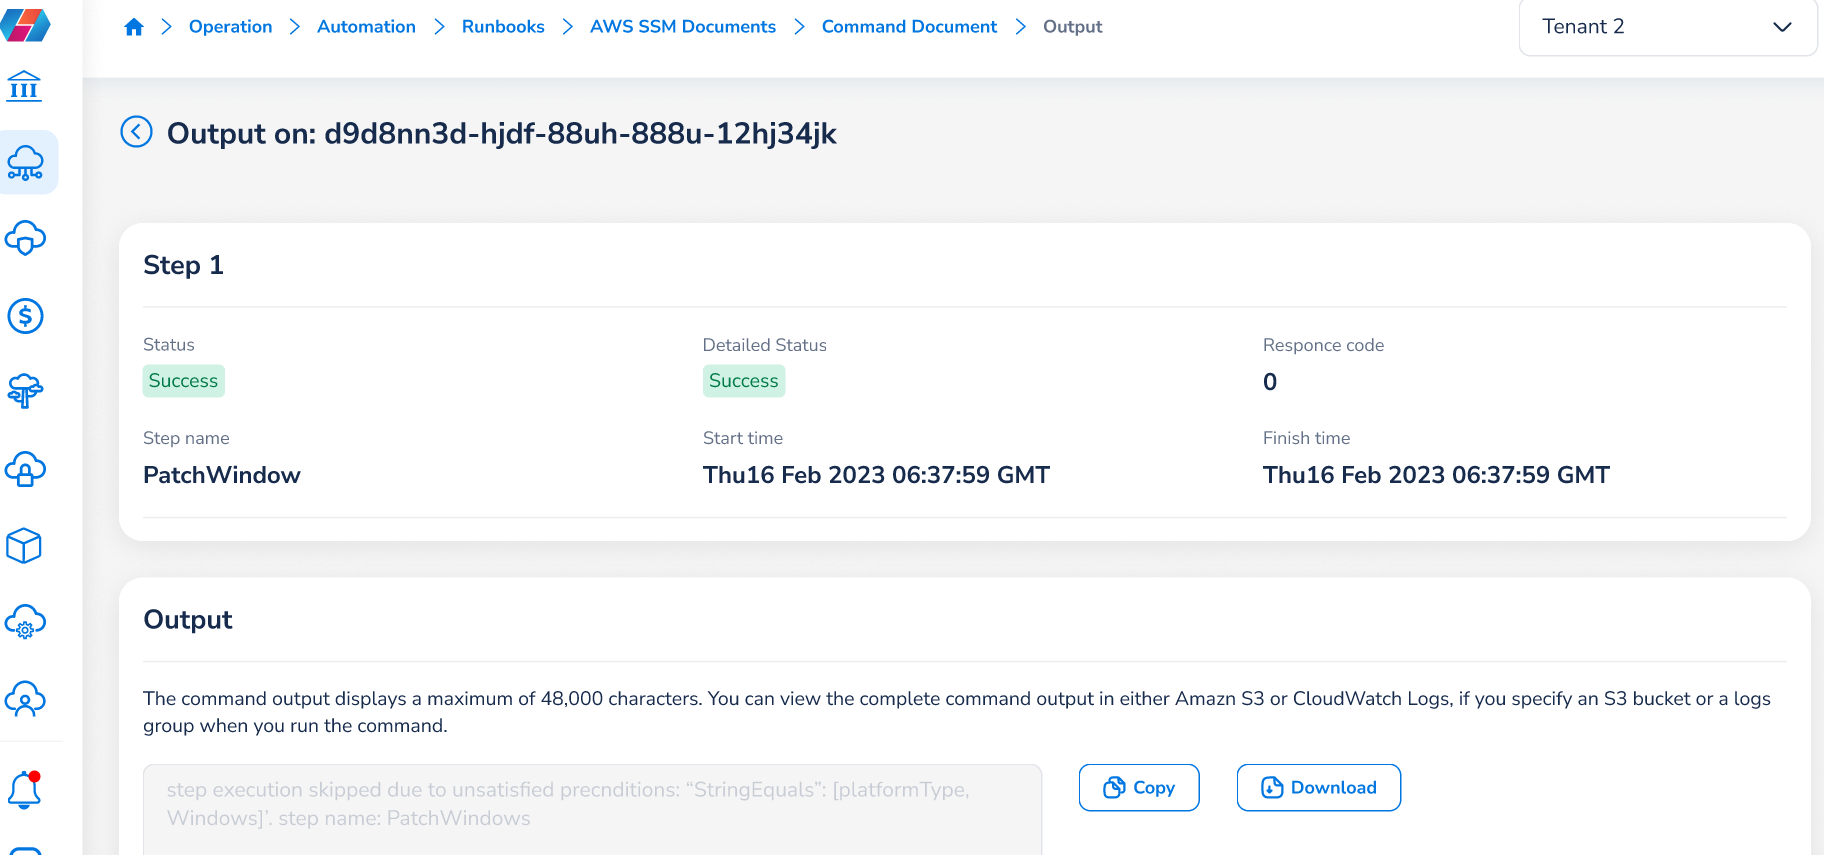
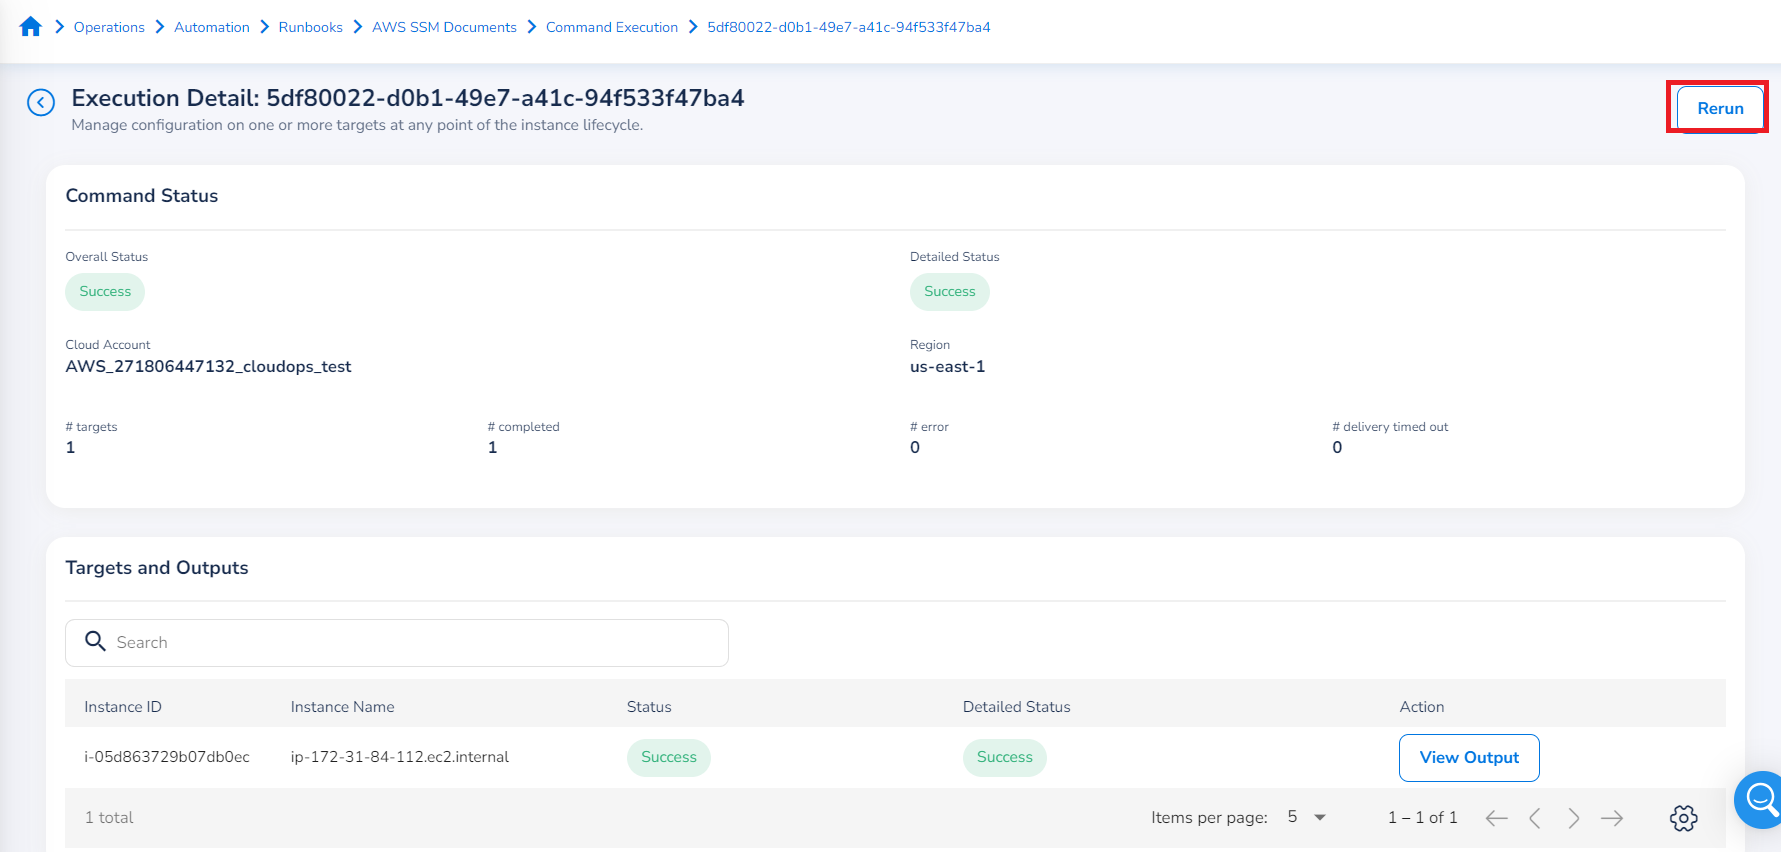
The execution details can be viewed on the next screen – Execution Detail. The number you see next to Execution Detail title is the identification number of that command execution. You can see status, targets and outputs, etc. You can click View Output corresponding to an instance ID to view more detailed output information.
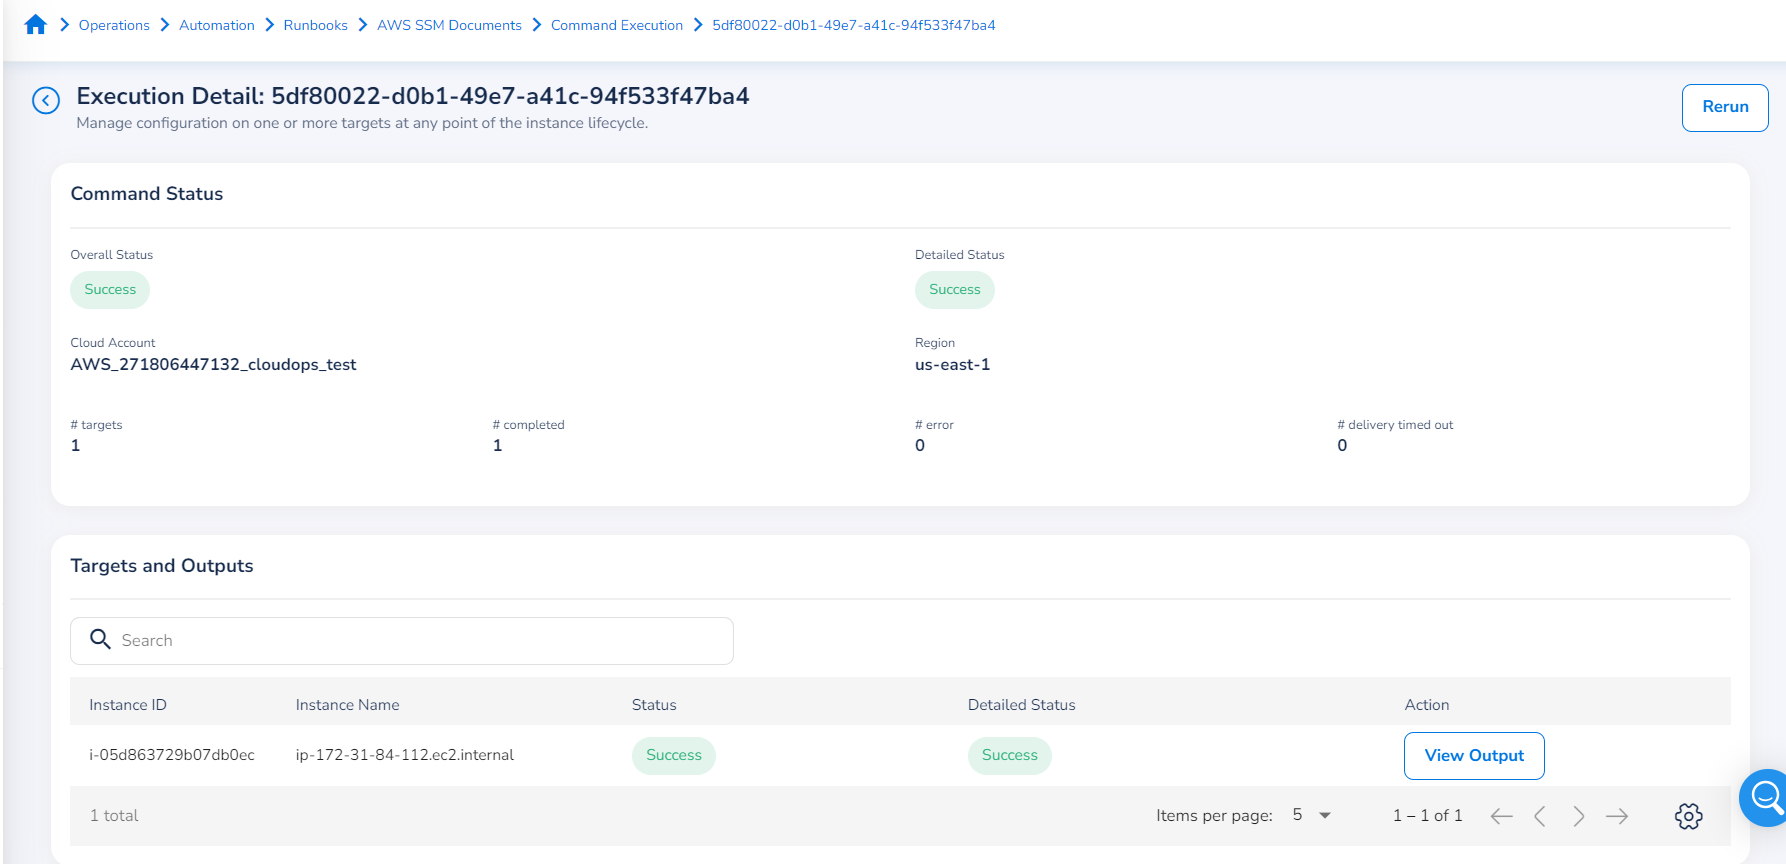
You also have the option to copy or download the command output.
Viewing Execution History of Command Documents
Users can view the execution history of Command Documents on the AWS SSM Documents screen. To view the history of documents, click the History list on the top of the screen and then select Command History.
You can see the list of command documents that were run. You can also see details like command ID that is the unique execution ID for each job, cloud account name, region of the cloud account, status of execution, run date, comments, count of task details, etc.
To view detailed execution information, you can click on a particular command ID or click Action > View Details.
Note:
To rerun a command, click Action > Rerun. A dialog box displays where you can click Yes to execute a command without making any changes. If you click No, then the Run a Command screen appears where you can make additional changes and then rerun the command.
Alternatively, you can also rerun a command from the Execution Detail screen. For example, when you select a command ID from Command History screen, you will be directed to Execution Detail screen of that particular command. Here you can view all command details. On the top right side of screen, click Rerun to execute the command again.
Note:
- The Synchronize icon on the left of the History button is used to synchronize the documents in the cloud account at any time. This is a manual sync process. Manual sync happens only for custom documents.
- Auto sync happens every 12 hours for both AWS documents and custom documents.
Updated 5 months ago