
User Management
Overview
By default, the account you have signed up has the "Account Admin" role and can create multiple users within the tenant. Users can be assigned one or more roles. Based on the roles mapped, the user(s) will have the super-set of access to the functions and actions. As the Account Admin, you can also create custom roles if required and define granular level of access to functions and actions. Read more on this in Role-Based Access section.
Navigation
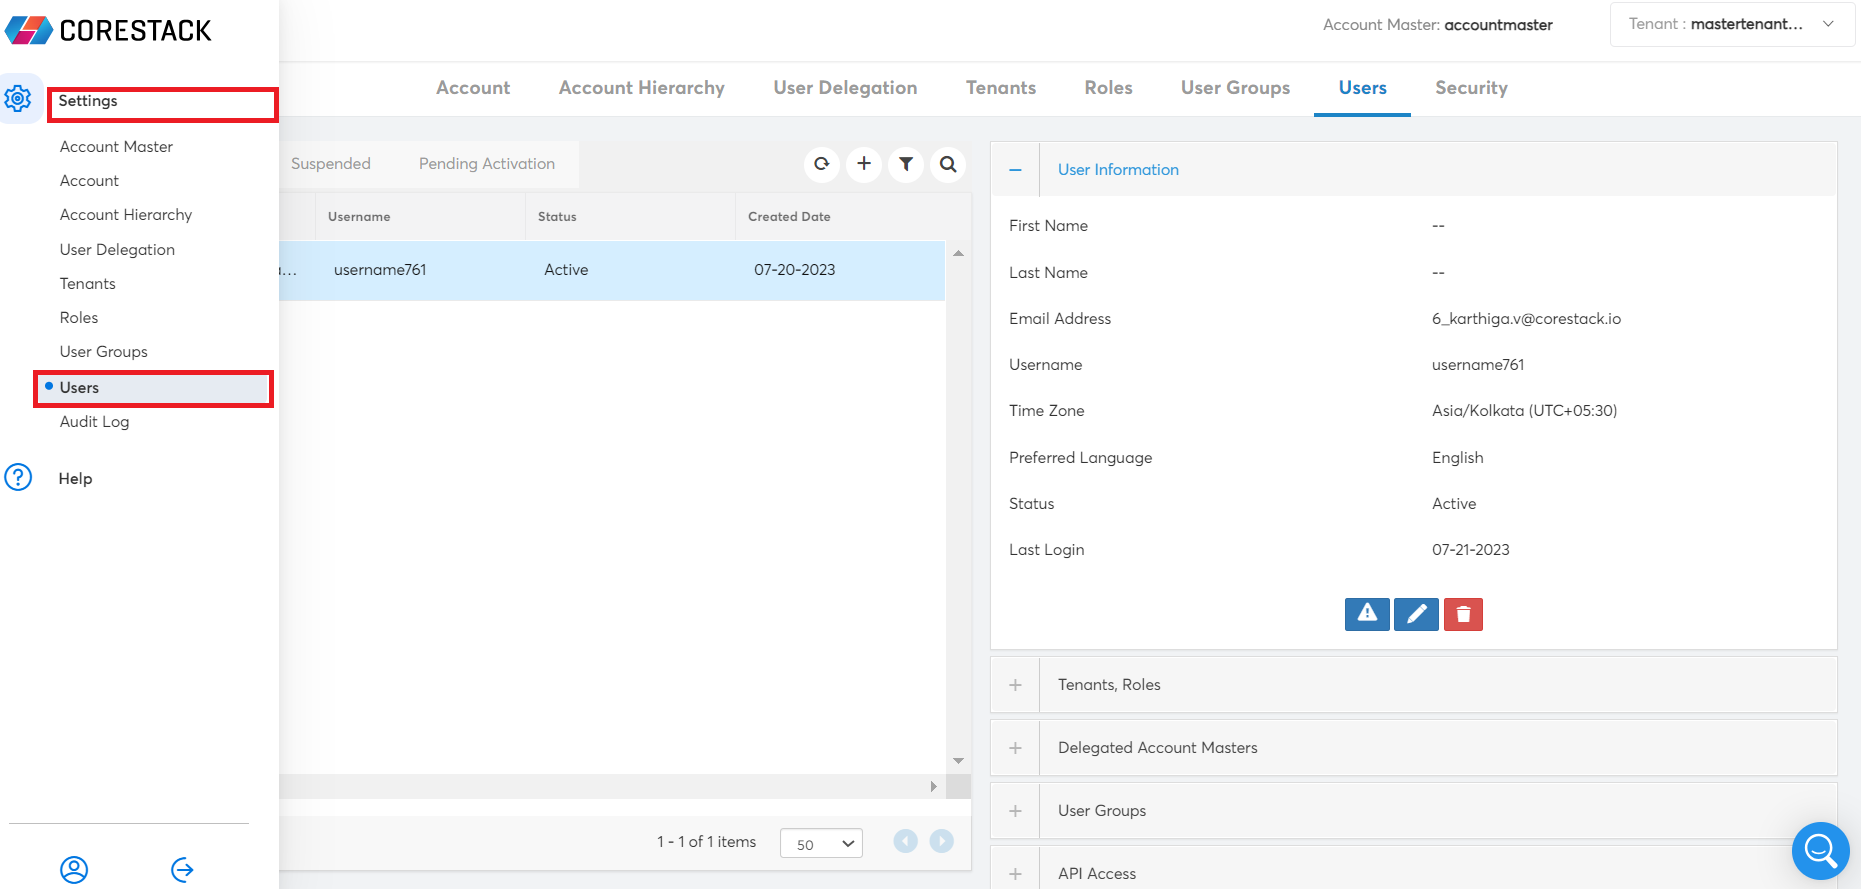
Click on the settings  icon on the top left of CoreStack and select Users from the menu. User Management screen will be displayed. It allows you to create and manage users. There are 4 sub-tabs available in the User Management screen: All, Active, Suspended, and Registered.
- All: All the users available under the tenants will be listed.
- Active: Users that are currently in active state will be listed.
- Suspended: Users that are currently suspended will be listed.
- Registered: Users that have been created, but to be activated yet will be listed.
Creating a New User
The following steps need to be performed to create a new user in CoreStack.
- Login to CoreStack and click on the “ Settings” tab.

- Click on the “ Users” option from the list displayed.

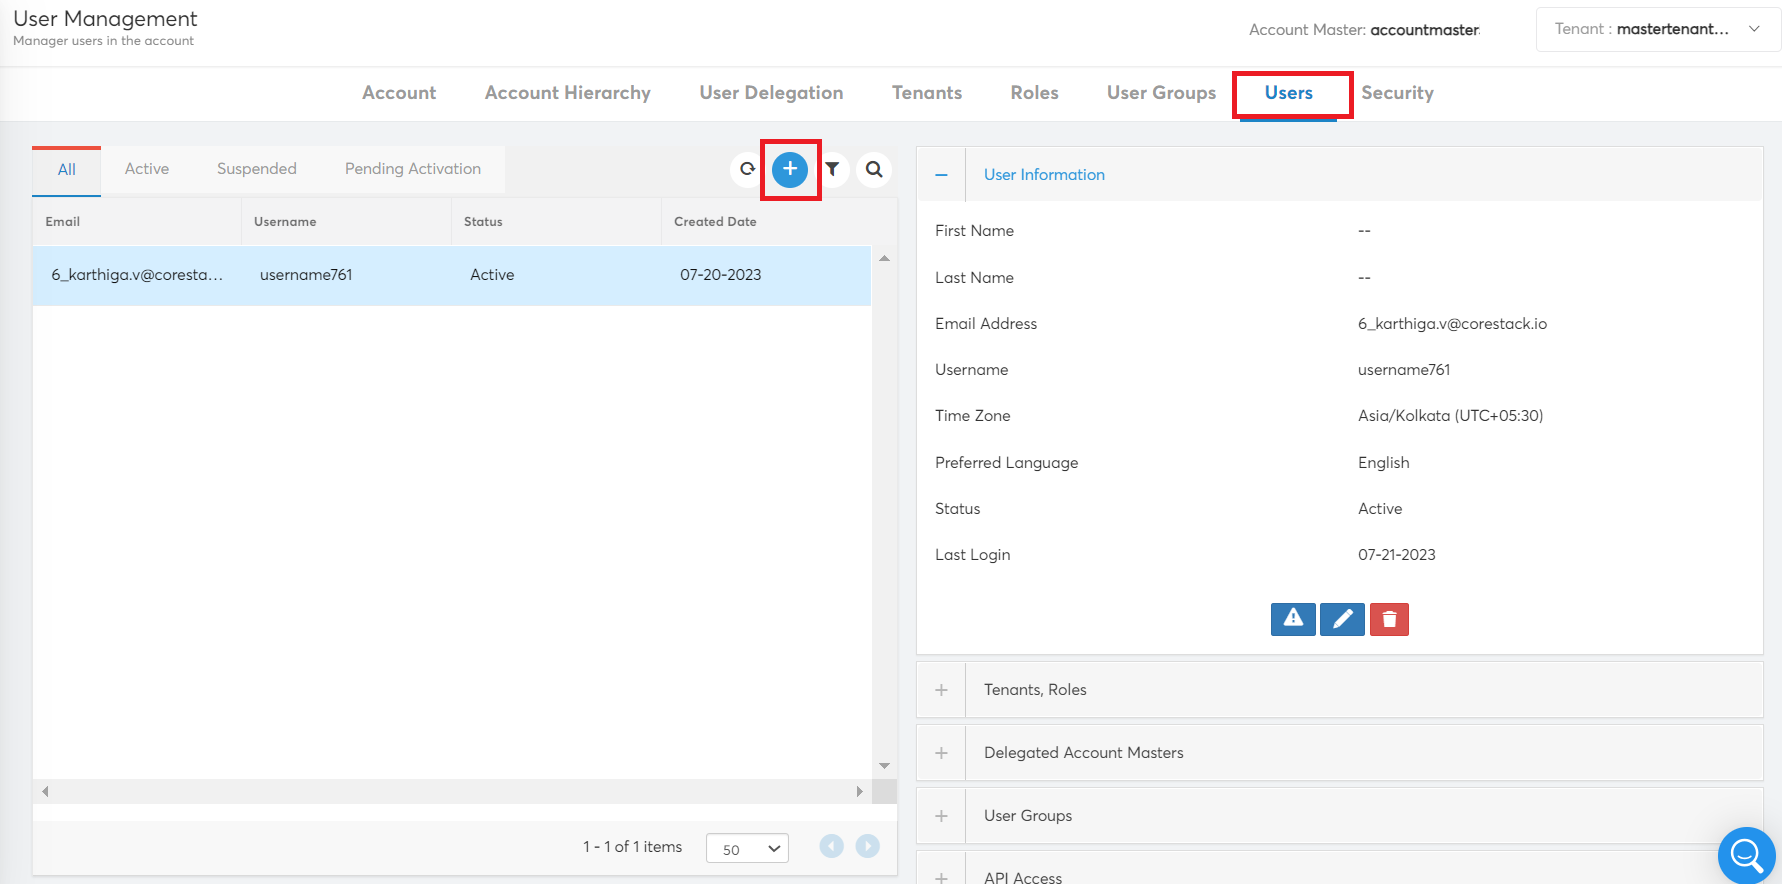
- This leads to a page displaying all the user IDs already in the system.

- Click on the “+” icon to create a new user.

- The following page will be displayed. You will need to update the fields here to create a new user.

- Provide the following details to create the user.
| Field | Description |
|---|---|
| First Name | Specify the first name of the user. It is an optional field. |
| Last Name | Specify the last name of the user. It is an optional field. |
| Email Address | Specify the email address to which all the notifications to be sent. |
| Username | Specify the unique username for the user to login with. |
| Timezone | Select the time zone in which the user would be present for capturing the time stamp in the portal. |
| Preferred Language | Select the language the user will want the options to be displayed in within the portal. |
| Tenants | You can add multiple roles for different tenant accounts for a user. Select a tenant in the Tenants drop-down list and select the required roles in the 'Select one or more roles' field. Click on 'Add to User' button to map the selected tenant-roles combination for the user. Multiple such tenant-roles combinations can be assigned for a user using the 'Add to User' button. |
| Password | The default password generated using which the user needs to log in for the first time. Note: Password length should be of 8 characters with at least 1 special character ( _ $ ^ @ * ! # & . ) present. Also, starting character must be alphanumeric. |
| Tenants | You can add multiple roles for different tenant accounts for a user. Select a tenant in the Tenants drop-down list and select required roles in the 'Select one or more roles' field. Click on 'Add to User' button to map the selected tenant-roles combination for the user. Multiple such tenant-roles combinations can be assigned for a user using the 'Add to User' button. |
| Select one or more roles | Select the roles that must be assigned to the user for a specific tenant. |
| Generate API Access | Enable the checkbox to generate API Access for the user. |
- Click on the Create User button to create the new user.

- After the user has been created in CoreStack, they will receive an email to activate their account. The email contains a link which needs to be clicked to activate the account. This link will be available for 24hrs upon receiving the email, however if the link is disabled after 24hrs please coordinate with the admin to resend the activation link.
a. If the user has been created in sandbox the mail would be sent from [email protected].
b. If the user has been created in production the mail would be sent from [email protected].
Note:
If the SMTP has been configured in CoreStack, please check with the administrator regarding the ID from which the activation mail would be received.
- After the account is created the ID created will be listed under User Management screen.
Managing Existing Users
You can manage the users created by utilizing the below explained options.
- Select the hamburger button (three horizontal bars) and enable or disable the columns to display or hide them for viewing in the table.
There are 3 sub-tabs available for each user – User Information, Tenants-Roles, API Access – that provides options to modify relevant information. You can perform the following actions in the respective sub-tabs. Select a user from the list before performing the following actions.
User Information Tab
This section displays all the details pertaining to a specific user, including – First and Last Names, Email Address, Username, Time Zone, Active/Inactive Status and Last Login.
- To edit the information provided for the user, click on the Edit icon available in the User Information tab listed in the right-hand side.
- To reset the password of the user, click on the Reset Password icon available in the User Information tab listed in the right-hand side.
- To suspend/reactivate a tenant, click on the Suspend/Reactivate icon available in the User Information tab listed in the right-hand side.
- To delete a tenant, click on the Delete icon available in the User Information tab listed in the right-hand side.
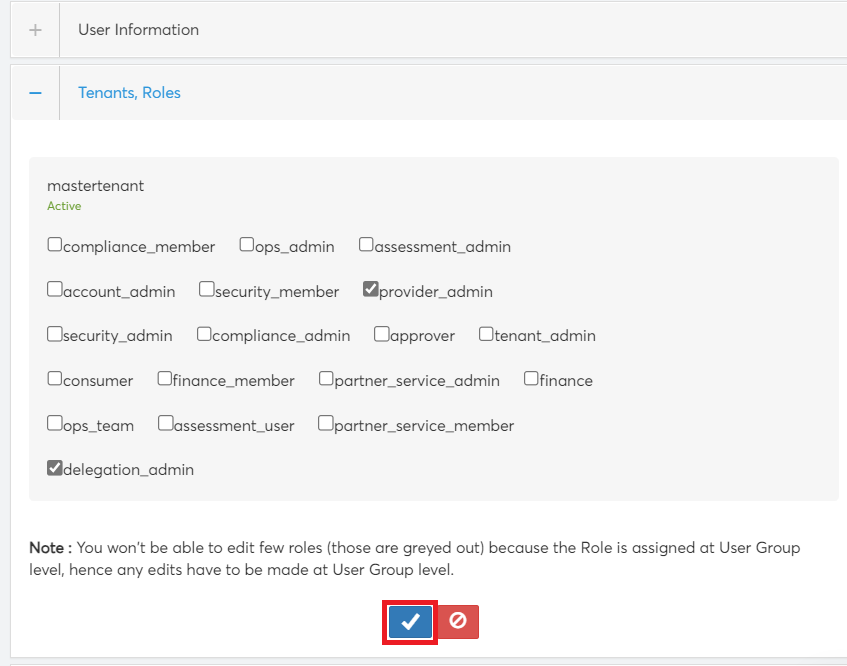
Tenants-Roles Tab
This section displays the information about all the roles assigned to different tenant accounts for a user.
- To modify the roles assigned to the user for a specific tenant, click on the Edit icon available in this tab for the corresponding tenant. Click on Apply icon to save the changes.
- To remove a tenant-roles combination assigned to the user, click on the Delete icon available in this tab for the corresponding tenant.
API Access Tab
This section lists the access keys generated for the user and with an option to regenerate access keys.
- Click on Generate Key button to generate the API access key required by the user for authentication.
- Once the user is terminated or suspended in the CoreStack portal, the associated user's "Access Key" and "Secret Key" will no longer be working. If the user authentication is enabled using SSO, the user will be created in the CoreStack portal but the authentication will be using the user organization LDAP. Once the user is terminated or suspended in the organization LDAP, the user can longer authenticate to access the CoreStack portal. In this case, the respective user's "Access Key" needs to be deleted from the CoreStack portal.
Adding OKTA Setting
Integration of OKTA Single Sign-On (SSO) with CoreStack enables users who have OKTA SSO enabled to access CoreStack directly. This setting does not require any users to be created already in the CoreStack application. With this integration, users are sent invites to access CoreStack and do not need to use a password to sign-in.
After an account master is created, the user designated as Account Admin/Provider Admin/Delegation Admin can access CoreStack and enable OKTA settings. Refer to the Account Management user guide to learn how to create a new account master.
Perform the following steps to add the OKTA SSO setting:
- Navigate toSettings > Users > Security.
- In the Auth Type list, click to select Okta.
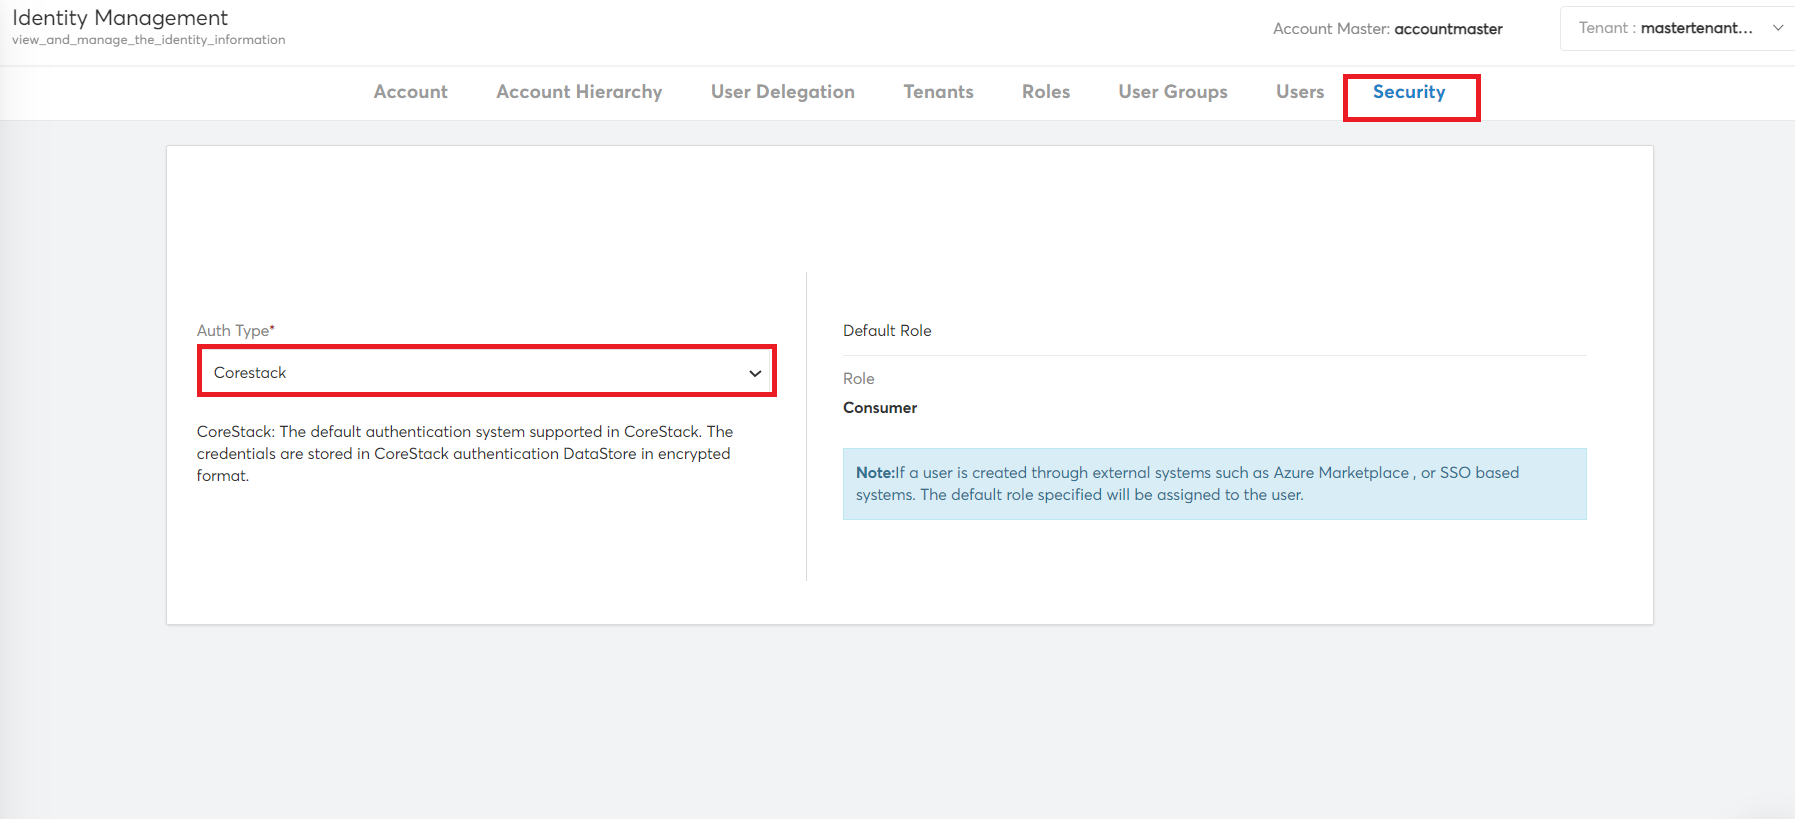
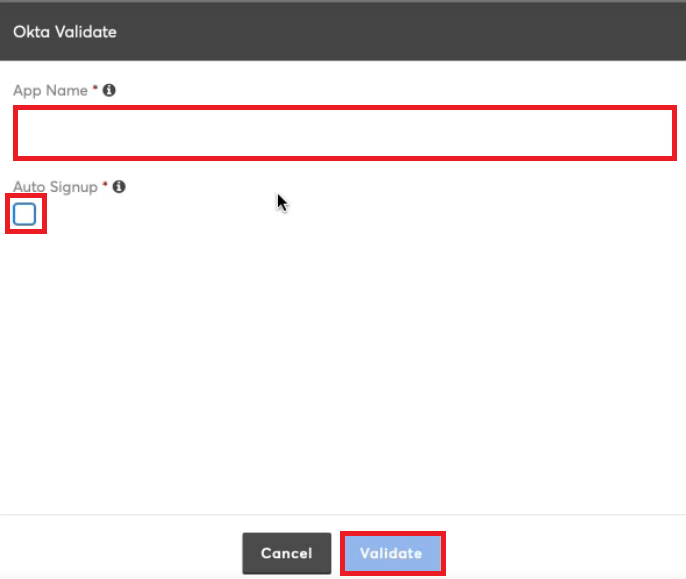
The Okta Validate dialog box opens.
-
In the App Name box, type the OKTA application name.
-
Select the Auto Signup checkbox to access the mapped application automatically.
Note:
If the "Auto Signup" checkbox is not selected, then the Account Admin/Provider Admin/Delegation Admin must manually invite user(s) to access the account.
- Click Validate.
An authorized user with OKTA SSO settings enabled can now continue with an OKTA sign in (as shown below).

Inviting New Users
An Account Admin can invite users with an email ID to access an account in the product if the admin’s authentication type is set to SSO. Since a user's details are ideally available from the SSO identity provider, providing any additional user details is not required.
Note:
If the Auth Type is set to "CoreStack" in the Security settings, then you'll have to follow the steps in Creating New User to create a new user in CoreStack.
Note:
An Account Admin can invite a new user using the procedure described in this document if the Auth Type is set as SSO or OKTA in the CoreStack application.
Perform the following steps to enable the SSO authentication setting:
- As an Account Admin, go to Settings > Account > Security.
- In the Auth Type list, select SSO (of an Identity Provider), and save the changes. This option allows the Account Admin to invite a user to the product.
- If the Account Admin sets theAuth Type as CoreStack or any option other than SSO, they can go ahead with the existing method of creating a new user by filling in all required details: first name, last name, email address, username, time zone, preferred language, tenant, roles, etc.
The OKTA setting must be enabled to invite a new user to access CoreStack. Refer to Adding OKTA Setting and follow the steps to make the necessary settings changes.
Perform the following steps to add a new user through invitation:
- Navigate to Settings > Users.
- To add a new user, in the Users tab, click the plus (+) icon.
A dialog box opens. The Account Admin/Provider Admin/Delegation Admin must fill all the details to invite a new user to an account.
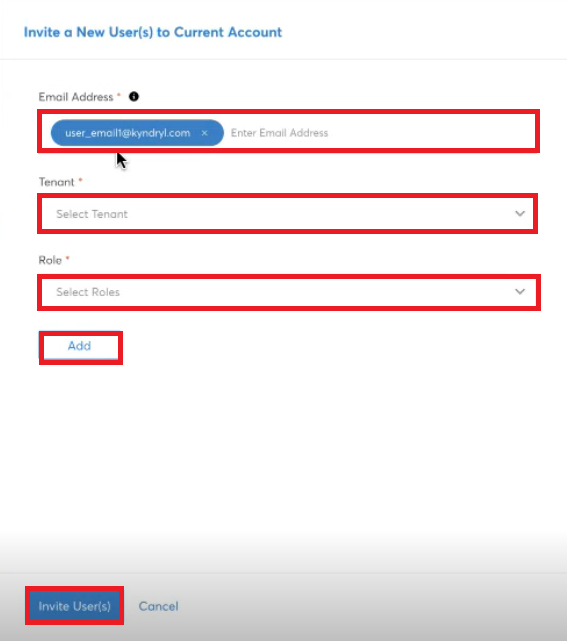
- In the Email Address box, type the email address of the user(s) that needs to be added for an account. You can type multiple email addresses.
- In the Tenant list, click to select a tenant and then click Apply.
- In the Role list, click to select the role and then click Apply. Multiple options can be selected here.
- Click Add.
- Repeat steps 4, 5, and 6 to add other tenants and roles for a user.
- Click Invite User(s).
The tenant details and their mapped roles are displayed in the Tenants, Roles section.

- You can click the Edit icon to modify tenant roles if needed, then click Apply to save your changes.
- To delete the access for a tenant from a user profile, click the ‘X’ symbol.
Assigning Tenants and Roles for Existing User Profiles
A Provider Admin/Account Admin can assign one or more tenants for an existing user profile and add roles for each tenant. Multiple roles can be assigned for a tenant, and it can be modified anytime.
To assign tenant and roles for an existing user profile, perform the following steps:
- In the Tenants, Roles section, click the plus (+) symbol.
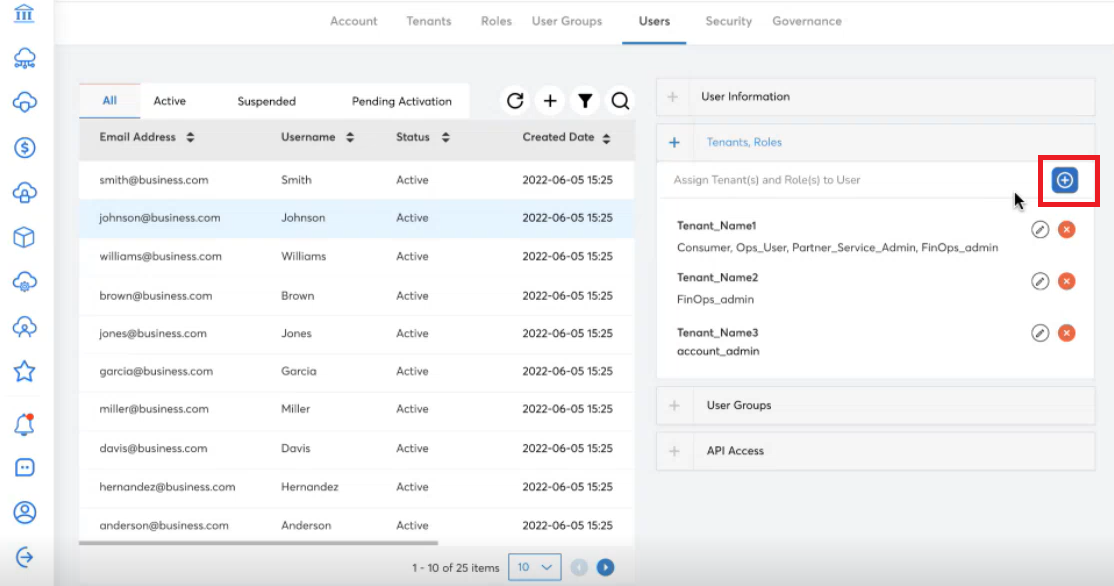
A dialog box displays.
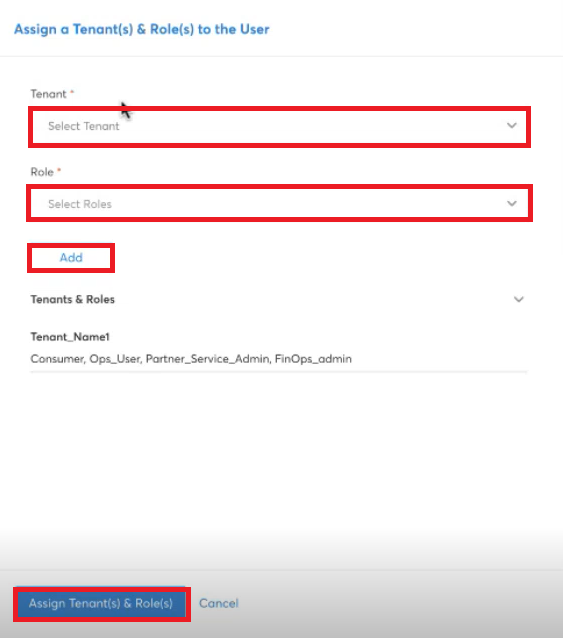
- In the Tenant list, select a tenant, and click Apply.
- In the Roles list, click to select roles and then click Apply. Multiple roles can be selected.
- Click Add.
- Repeat the above steps to assign more tenants.
- Click Assign Tenant(s) & Role(s).
Note:
- To delete a tenant and their roles, a user can click X and then click OK on the dialog box that displays.
- To edit an existing tenant and their roles, click the pen icon, select the roles for the selected tenant, and in the end of the section, click the tick symbol.
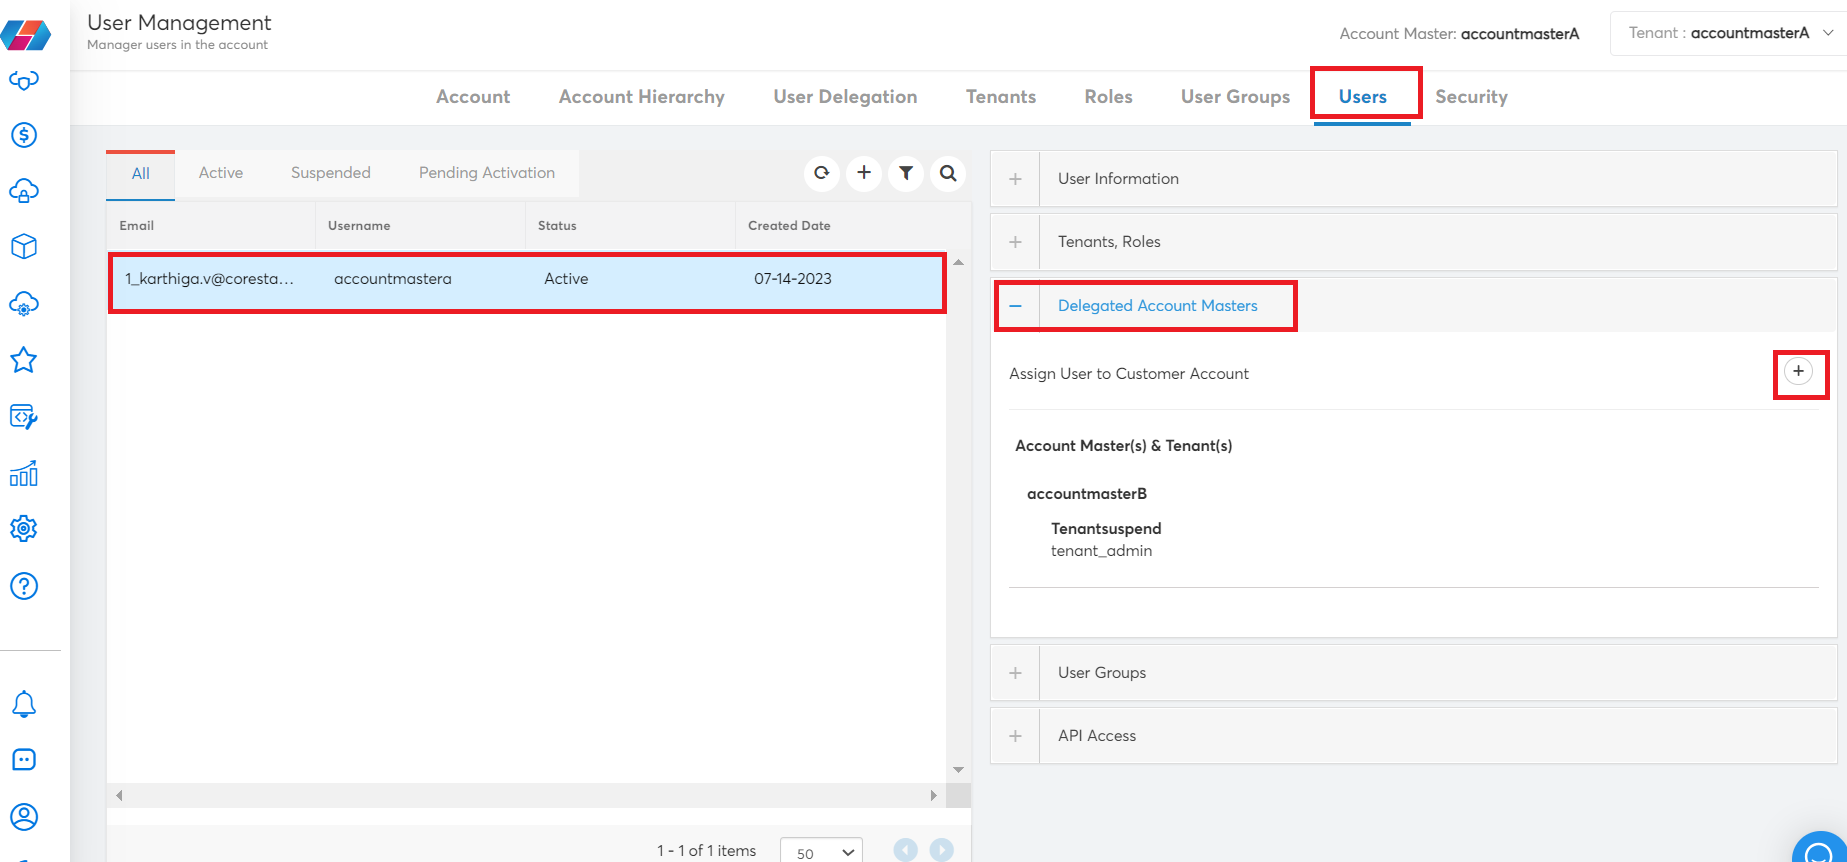
Delegating Customer Account
An existing user who is part of one account master can be delegated as a user to another account. The delegated account will also need to be assigned with tenants and roles.
Perform the following steps to delegate a customer account:
-
In the Users tab, select a user. Then click to expand the Delegated Account Masters section.
-
In the Delegated Account Masters section, click the plus (+) icon.
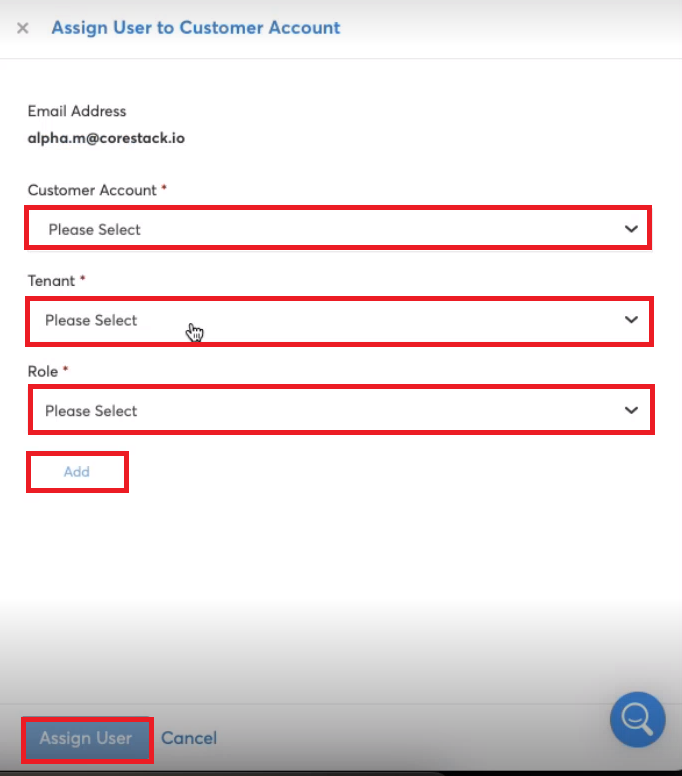
- In the Assign User to Customer Account dialog box, perform the following:
- In the Customer Account list, click to select the delegated account name, then click Apply.
- In the Tenant list, click to select the tenant for the selected account, then click Apply.
- In the Role list, click to select the roles, then click Apply. Multiple options can be selected here.
- Click Add.
- Click Assign User.
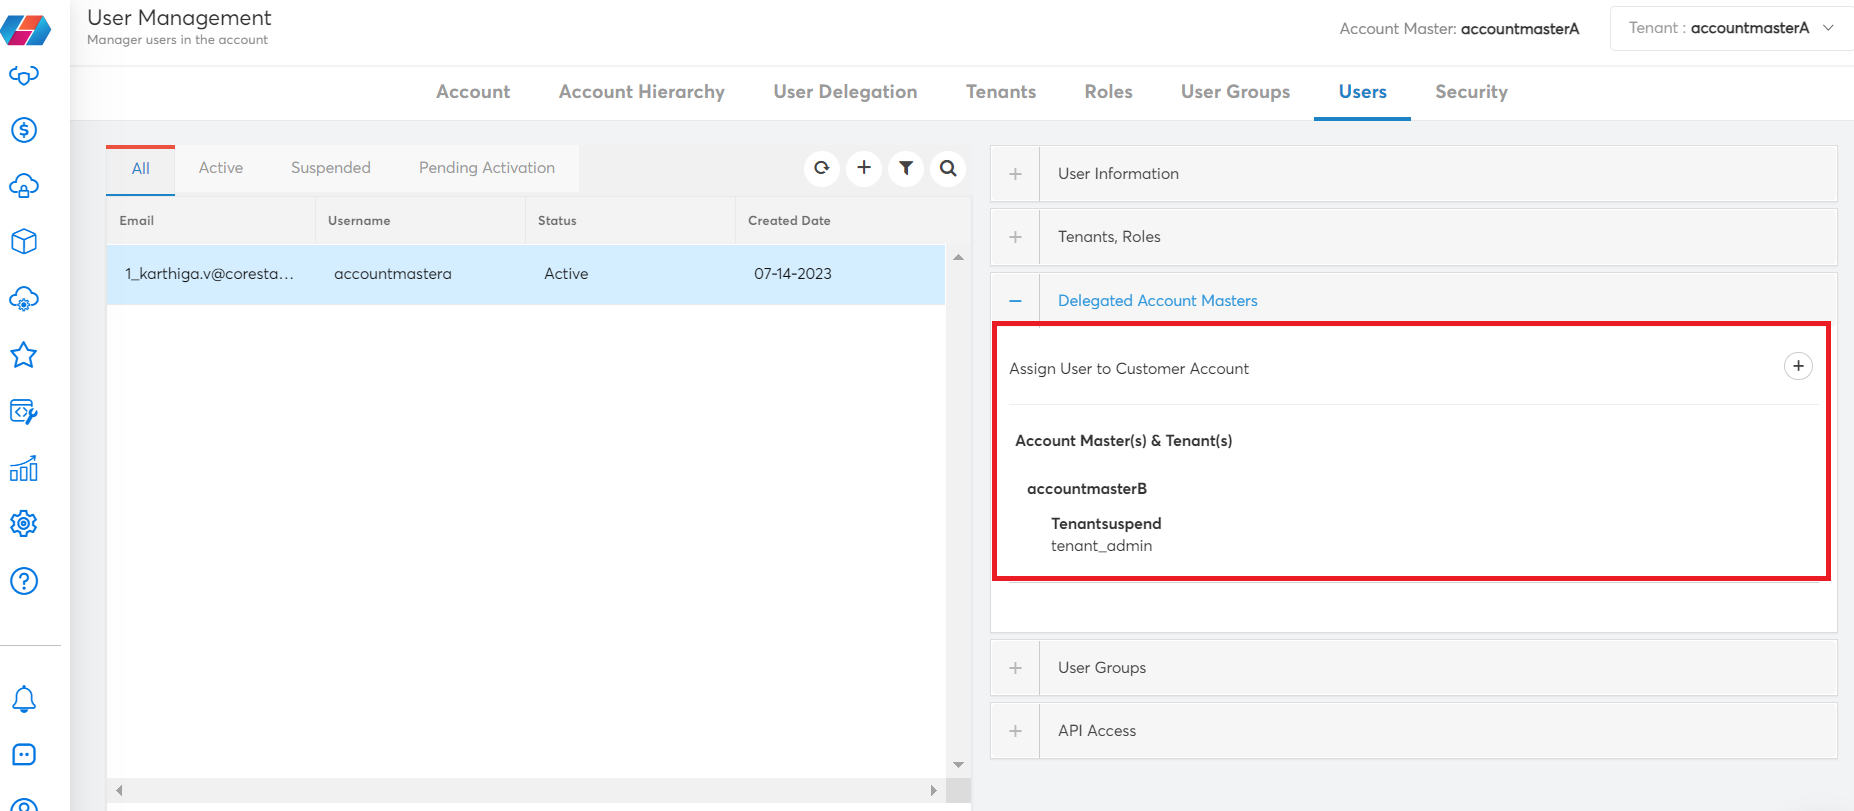
The Delegated Account Masters section shows the details of delegated account -- That is, for a particular user, you can view the account they are part of, along with tenants and roles.
This process can be used to add multiple accounts to a single user.
Updated 6 months ago